Section 2
Keyframe Easing
The most important aspect of movement that you’ll need to actively consider when creating an animation is the timing. The timing is based on two factors:
The first part is obvious - if I move two keyframes closer together, the movement becomes faster. Less time for the same move = more speed. But the second part is at least as important, because how keyframes are eased describes exactly how After Effects will transition from one keyframe to the next. The most basic way to move from one keyframe to the next is to move with constant speed - that’s also After Effects’ default behavior. But you could also start very fast, then slow down when you approach the destination.
As an example, let’s take a look at the movement of the two dots in this scene.
If we don’t worry about easing and go with After Effects’ default constant speed, a.k.a. linear interpolation, the animation would look like this.
As you can see, this feels a little boring and artificial – not really alive. This is because in reality things rarely move with constant speed, but accelerate and slow down all the time. So, mastering the concept of easing will be absolutely crucial to your success as a motion graphics artist.
Easy Ease
So, the default easing of After Effects is ‘linear’, which means the layers move with a constant speed from one keyframe to the next. But if you select some keyframes and right-click on one of them, in the context menu under Keyframe Assistant you’ll find some more easing presets: Easy Ease, Easy Ease In and Easy Ease Out.
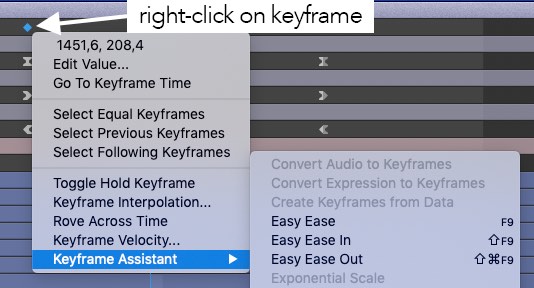
You will use these a lot, so it’s a good idea to learn the hotkeys for those commands (F9 for Easy Ease – you’ll find the hotkeys at the right edge of the respective menu entry, see screenshot above).
This video visualizes how the different easing variants change the timing of your animations. Looking at this example can be a bit scary or overwhelming, but for now, please just look at the movement of the big circles and forget everything else. The circles are animated with some very basic position keyframes: As you can see, each layer has four keyframes: the first two for the move from left to right, and the last two for the move back from right to left. They’re at exactly the same point in time for all the layers - that’s why all the circles start and stop their movements at exactly the same time. Still, the details of their timing are very different. The reason for this is that I’ve applied a different easing variant to each of them. In the timeline, this is also visualized with different keyframe shapes - while the Linear keyframes look like diamonds, the Easy Ease keyframes look like an hourglass, for example.
Now look at the moving circles one by one and try to figure out exactly what the differences in timing are. If you can convince your brain to tell you all details, you’ll notice that the one with linear easing moves at a constant speed. This means that from each frame to the next, it always moves the same number of pixels. The little dots on the path are also helpful for understanding this: they visualize exactly where the circle is at each frame of the animation. In the linear variant, the dots are all placed with the same distance, so the movement from one frame to the next is always the same.
The Easy Ease variant has many dots at the beginning and the end, but much less in the middle. This means the move starts and stop slowly - during the first and last frames of the move it just travels a few pixels, but in the middle of the move it travels much faster. This is like a car that cannot change its speed abruptly, but always needs time to accelerate and break.
Easy Ease In and Easy Ease Out are variants of Easy Ease that just ease one end of the move. One small stumbling block: Easy Ease In doesn’t mean that the beginning of the move is eased, it means that the end of the move is eased, i.e. it starts abruptly but decelerates softly at the end of the move. For Easy Ease Out, this is the opposite – the move starts softly but ends abruptly. Why does Easy Ease In influence the end and not the start of the motion - isn’t this a confusing choice of names? Not once you understood that each keyframe actually consists of two easings.
1 Keyframe = 2 Easings
When you set a keyframe, it’s part of two moves: the move before the keyframe and the move after it. In other words, each keyframe ends one move and starts another. For both these moves, the keyframe contains easing information. If you set a keyframe to Linear, it means that the move before the keyframe should end in a linear way and the move after it should start in a linear way. If you set a keyframe to Easy Ease, it also means that the end of the move before the keyframe is eased, and so is the start of the move after it. On the other hand, if you apply Easy Ease In to a keyframe, it means that only the end of the incoming move should be eased, whereas the outgoing move of the keyframe stays unchanged (i.e. by default stay linear). This is why Easy Ease In influences the end of your moves: it influences the animation that animates into a keyframe, meaning the end of this animation. This becomes even more clear if you look at the keyframe symbols. 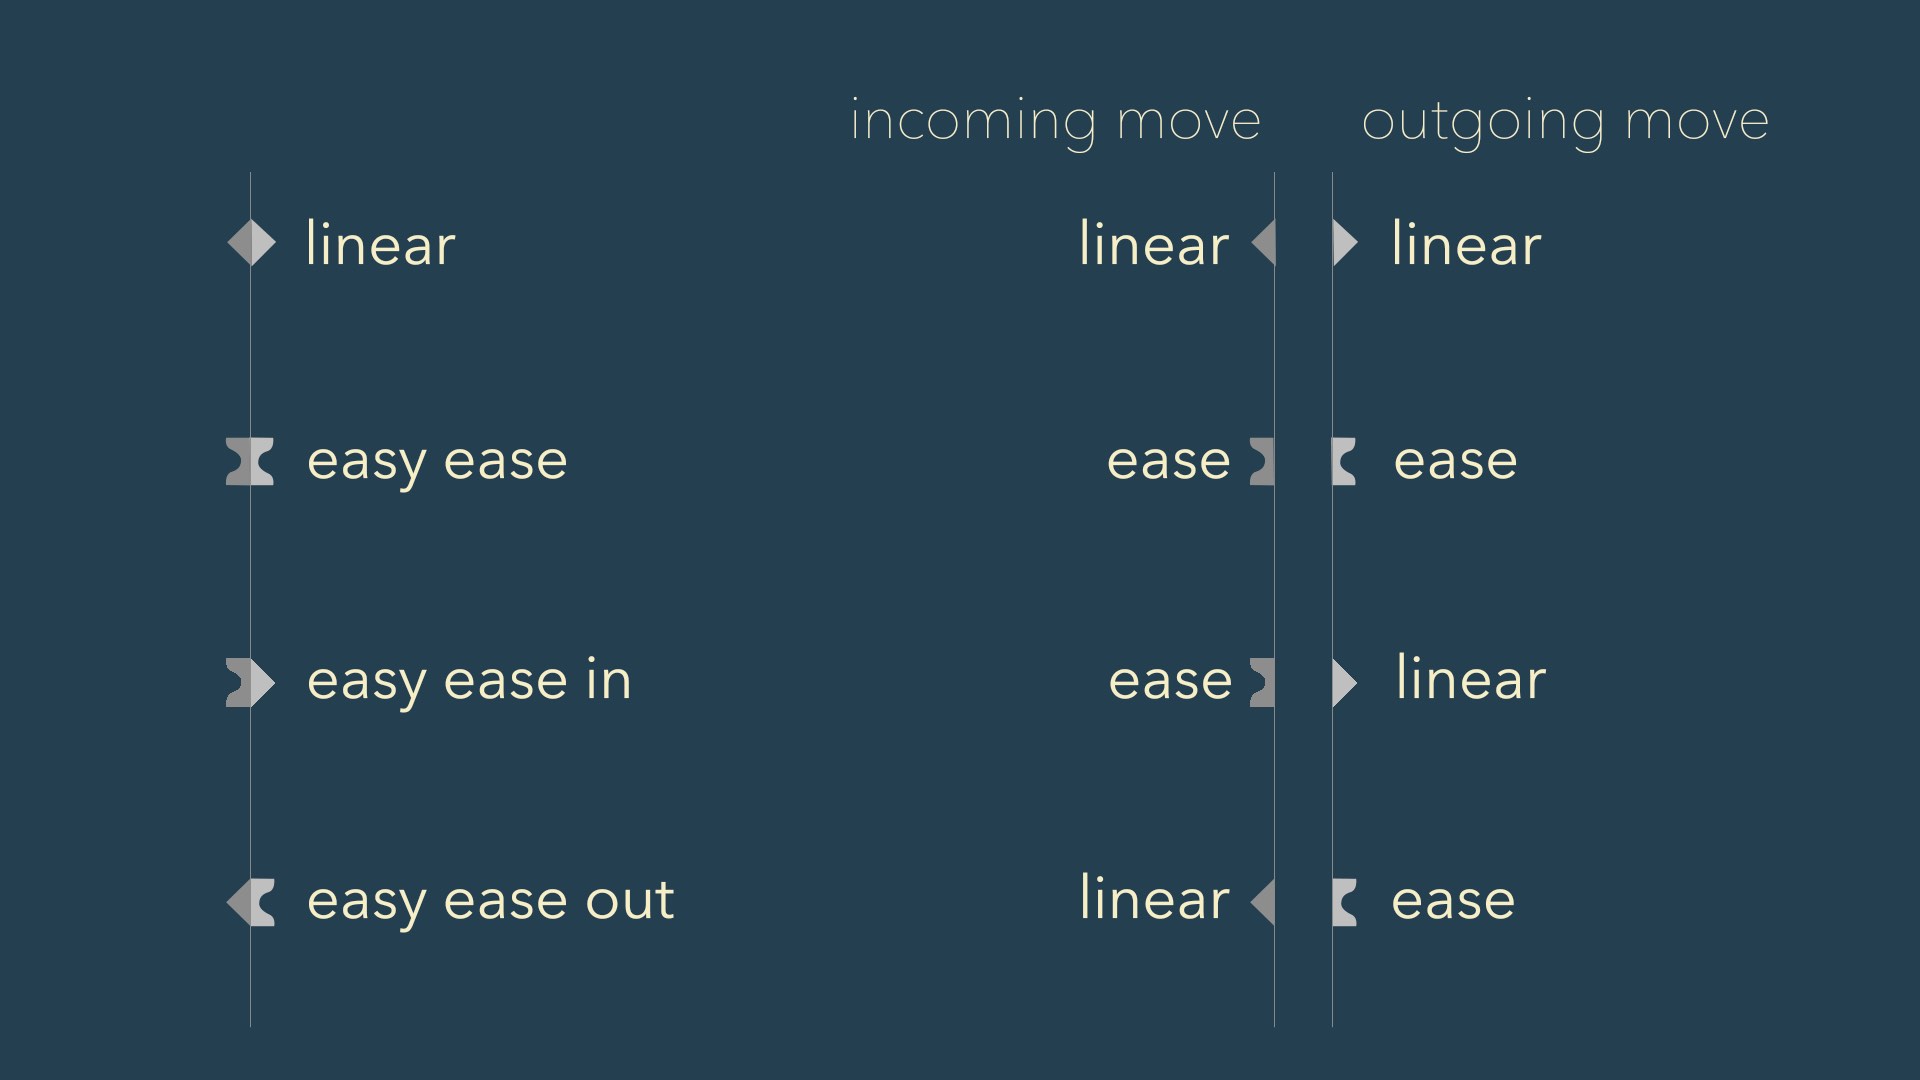 The Easy Ease In keyframe shape looks like the left half of an Easy Ease keyframe combined with the right half of a Linear keyframe. And that’s exactly what it is: it eases the incoming movement in an eased way, and the outgoing movement in a linear way. So, each keyframe symbol is in fact two symbols. When you work on a particular move, the only thing that is relevant to this move is the right half of the keyframe that starts it, and the left half of the keyframe that ends it.
Easing in Practice
So, now that you understood the basics of easing, let’s get back to our initial example from Movie 6.2. Which part of the moves should be eased, and in what way? Let’s go over the animation step by step. The first move where the two dots crash and merge at the center should definitely have no easing at the end. The dots collide with maximum intensity - like a car crash at full speed with no brakes. But we should probably ease the start of this move. The start is outside the visible area of the comp, so you won’t really see it starting with zero speed. But while approaching the crash position you probably want the dots to accelerate instead of just having a constant speed - this will add even more intensity to the crash. So we ease out of the start keyframe of the move, but keep the end linear. Here I’ve modified the motion path slightly, so that the start of the move is also in the visible area and you can see the ease out at the start better:
Now let’s look at the easing of the next move which, reveals the title text:
In contrast to the previous move, here the points don’t crash into something that makes them stop abruptly. Instead they should stop in a more controlled, smoother way. The end of the move should definitely be eased, so you should apply an Easy Ease In for the end keyframe. But what about the start keyframe? Should we ease out of it? One the one hand - yes. To make it feel realistic, it should not start instantly at full speed, but instead take some time to accelerate. In our real world, speed changes usually take time - no car can start moving at full speed instantly, for example. But on the other hand, an abrupt start makes the reveal more surprising and intense. Since the move is pretty fast, the difference is fairly subtle anyway – here’s a comparison:
Speed Curves
Easing can also be described by speed curves. I included the speed curves in the visualization in Movie 6.4, and here they are again for reference: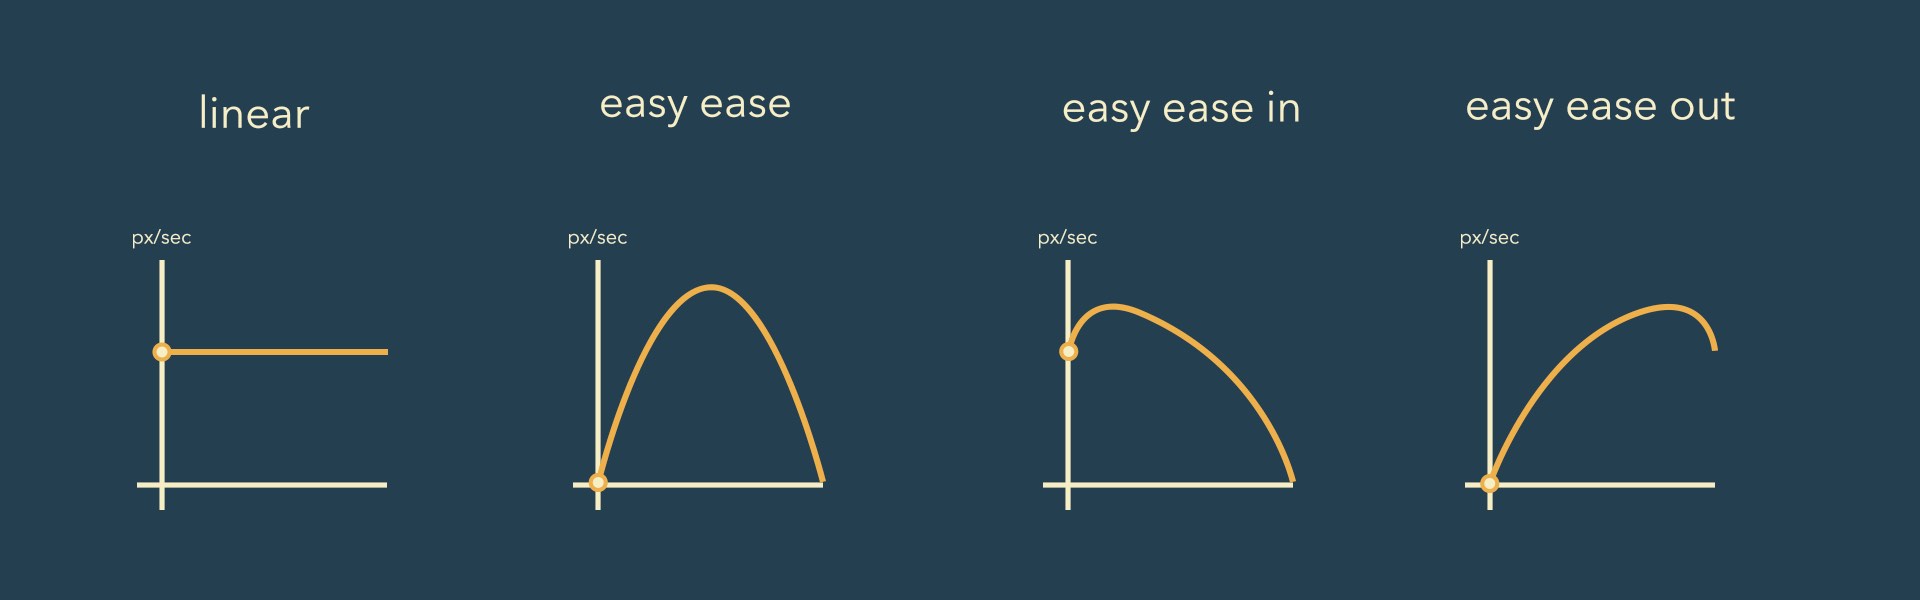 These speed curves describe how the speed changes over time. The higher a curve goes, the faster the layer will move at that point in time. The x-axis of the graph is like a timeline, so the left side of the curve is the start of the move and the right side is its end.
For linear keyframes, the speed curve is a horizontal line – at each point in time the speed is the same, so the line will always remain at the same height. For Easy Ease, the line starts and ends at zero height, i.e. with a speed of zero. From no speed at the beginning, it gradually speeds up until it reaches its highest point (i.e. its top speed) in the middle of the move. From that point on it decelerates gradually until it reaches zero speed again at the very end.
The Easy Ease In curve starts at the same height as the curve for linear. So it starts with the same speed as linear (because Easy Ease In keyframes are actually only easing their incoming move, but are linear for their outgoing move). Then, due to the easing of the end keyframe, the move wants to gradually decelerate. But since it still has to finish the move in the same total amount of time as the linear move, it first has to speed up. If it were to slow down immediately, it would arrive later at the destination than the linear easing, which runs at a constant speed until the end. So, in order to be able to slow down and still arrive in time, the Easy Ease In first speeds up to gain a lead, then slows down until it reaches zero speed. Since the Easy Ease Out is exactly the opposite of Easy Ease In, the speed curve is exactly the same, just flipped.
Why are those speed curves useful? Because the easing presets you’ve seen so far are just the beginning. If you’re serious about timing, you’ll want to have full control over those speed curves. Welcome to the graph editor.

Create animations in no time with Squash & Stretch, featuring a vast range of ready to use behaviors, carefully handcrafted by professionals and controlled by an intelligent system. This Pro version includes over 60 extra behaviors and 350 extra sound effects and can also be extended with additional behavior bundles.

Create dynamic layouts easily. Align and attach elements to any point of the bounding box of texts and create boxes that grow and shrink with their content.

BeatEdit detects the beats in your music and generates markers for them in your Premiere Pro timeline. Create automatic edits in sync with the music, or let BeatEdit assist your manual editing process.