Section 1
Motion Graphics Templates
Motion graphics templates (often shortened to mogrts) are After Effects projects that can be imported and customized right inside Premiere Pro. They allow you to design a title animation in After Effects, for example, then use it like a normal video clip in Premiere Pro. What makes this approach so powerful is that things like the text or colors of the project can be changed from right inside the Premiere Pro timeline.
Why Mogrts?
As a motion designer, mogrts offer two big opportunities for you:
Let’s talk about both options in more detail.
Selling Templates
When you’re just starting your career in motion graphics, it’s not easy to find clients. Nobody will hire you before you have a cool showreel featuring impressive projects you’ve done so far. So, you probably have to start with personal projects that you aren’t paid for. But if you turn your personal projects into motion graphics templates, you can earn a little extra money by selling them on marketplaces like Adobe Stock, VideoHive or Motion Array.
It's a good idea to spend some time on these marketplaces and understand what kind of templates sell well. You’ll gain an idea of what typical clients need, as well as getting tons of inspiration for your own projects. Those projects not only sell well as templates – if you include them in your showreel. They’ll also convince your potential future clients. Because clients don’t just want to see great looking animations, they want to see things that are very similar to what they need. If a client is looking for a designer to support his upcoming Instagram campaign, they’ll be happy to find Instagram-related content in your reel. But if your dream customers are NGOs that fight against climate change, you’d be better off searching for templates about ecology and see if you can contribute something in that area.
Creating Templates for Clients
When you develop templates for your clients, you‘re not just a video creator – you’re also a problem solver. Clients love it when you’re able to simplify their workflow. This is the case for any kind of automation, and Motion Graphics Templates are the easiest way to get started with this. It’s one of those extra skills that can make a difference, and give you access to an additional market segment. Since Motion Graphics Templates are a comparably recent development (the first version was released in 2017), many established artists don’t yet look at this sector.
Perhaps you feel that creating templates is rather like eliminating your own job, because by making templates you empower clients to create their own videos. So instead of ten lower thirds every week, the client may now only need one template every few months. But this perspective is short-sighted - if you want to run a successful business, you should aim to do work that creates a lot of value. Being efficient and solving your clients’ problems in the best way possible allows you to charge more and build a solid client base. If you don’t offer your clients the best solutions, someone else will.
How to Create Mogrts?
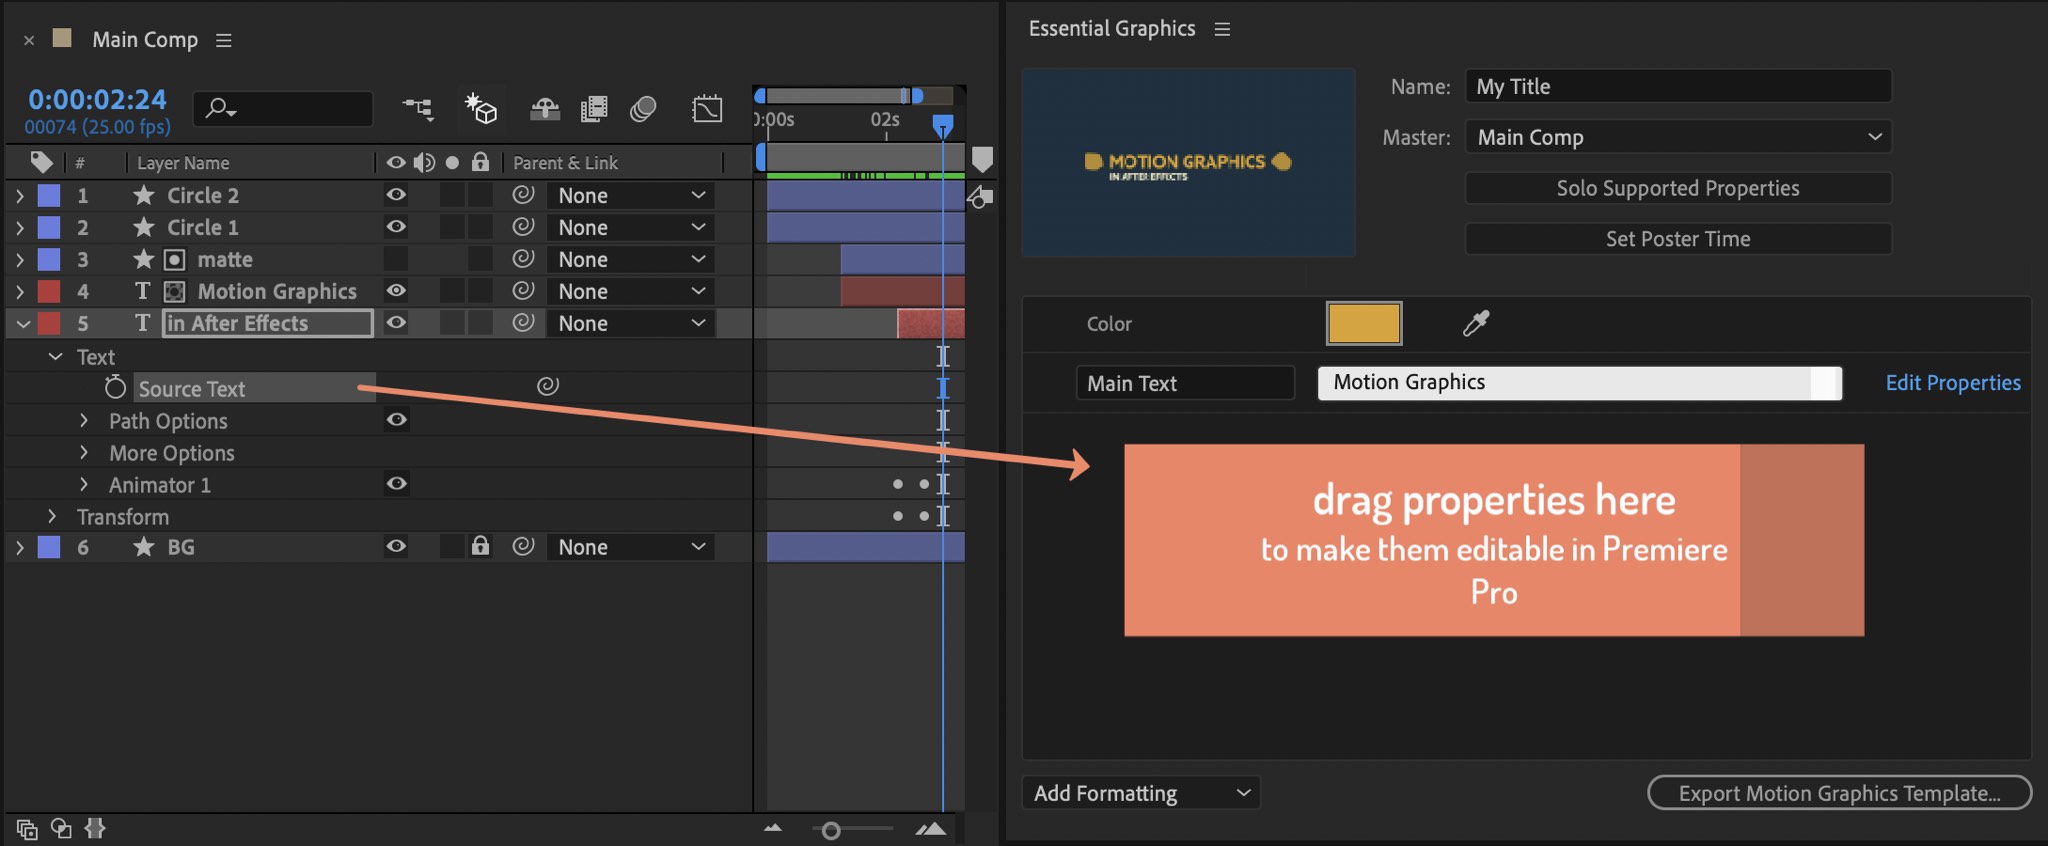
The concept of motion graphics templates is both surprisingly simple and powerful. In a nutshell, a mogrt is just a normal After Effects project with some annotation to show which properties should be available in Premiere Pro for the template user to edit. If you want to make it possible for a user to edit a text or a color, for example, just drag that property onto the Essential Graphics panel. This works for almost any property, including 1D values like opacity, 2D values like positions of 2D layers, and even fancy things like the dropdown parameters of effects. Some other properties like 3D position values are not yet supported. Note that text color doesn’t appear as a property in the timeline, so it can’t be added to the Essential Graphics panel directly. As a workaround, however, you can apply a fill effect to the text layer and then add the color of this fill to the Essential Graphics panel.
Inside Premiere Pro, you can use the Essential Graphics panel to browse all your templates and simply drag them into your sequence. If you have a template selected in your sequence, the Edit tab of the Essential Graphics panel can be used to edit all the properties that appear. To edit a text, you can also click on it directly inside the program monitor.
This tutorial gives a quick overview of the entire process.
Poster Frame
The poster frame is the frame of your animation that Premiere Pro uses as a preview when browsing templates. So, it’s important that the poster frame gives people a good idea of what the animation looks like. By default, the first frame is used as poster frame, but usually the first frame is not a good choice, since texts that animate in are not yet visible, for example. To change the poster frame, just set the current time indicator of the After Effects timeline to the frame you want and click the ‘Set Poster Time’ button in the Essential Graphics panel.
Linking Properties with Expressions
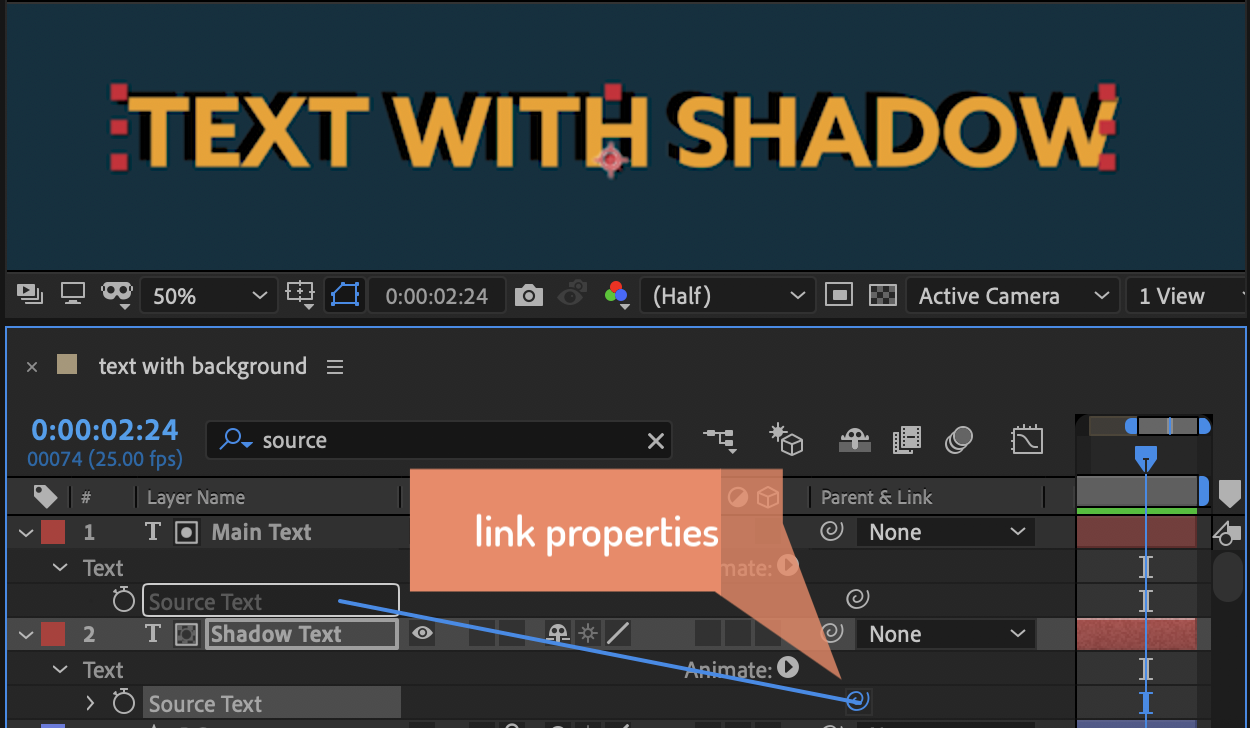
Often, you’ll want a single property in the Essential Graphics panel to control several properties in your After Effects project. A single color picker can control the colors of several objects in your scene, for example. Or when a text in the template is changed, this may affect not only the text layer itself but also a second, black text layer that you’re using to create a shadow. In these cases, you can use the property pick-whip in the ‘Parent & Link’ column of the timeline to link one property to another. So in the example with the text shadow, you could drag the pick whip of the source text property of the shadow layer to the source text of your main text layer. That way, the shadow will instantly update whenever the main text is changed. After you’ve created the link, you just need to add the main text to the Essential Graphics panel, then whenever the template user changes the main text, the link means the shadow will also update.
Responsive Design Time
One important aspect of templates is not shown in the tutorial above: responsive design time. Usually, animations have a fixed length, but with this feature, the template length can easily be adjusted. If you think of your template as a video clip, you could make it twice as long simply by playing it back at 50% speed. This kind of time stretching is exactly what happens when a Premiere Pro user makes your template clip in a longer or shorter sequence. However, this is usually not really what you want. If you have a title text that flies in and out, for example, you’ll want those animations to happen at normal speed and only time-stretch everything in-between (where typically little or no animation is happening). You can do this by making ‘protected regions’, which can be created with a special type of composition marker. Once you make a region protected, this part of the animation will always play back at normal speed, even if the duration of the clip is changed in Premiere Pro.
In other words, if your template has protected regions, Premiere Pro will only adjust the unprotected parts to be faster or slower when the user changes the length of an animation. This allows you to protect the intro and outro part of a title, for example, so that the title always appears and disappears at the same speed. This video will show how to create those protected regions.
Less is More
Templates are all about making it easy for the template user. It might be tempting to add all kinds of properties to the Essential Graphics panel so the user can customize everything in your project. But as with so many other things: Less is More. Allow the template user to edit what they need, nothing more. You are the designer – you know how to choose good colors and good fonts. You know where to place objects and what size they should be. If you give your template user the ability to customize everything, you can be sure that they’ll mess up your nice design. Offer easy controls to change the content, but don’t offer detailed controls for changing the design.

Create dynamic layouts easily. Align and attach elements to any point of the bounding box of texts and create boxes that grow and shrink with their content.

Create a mouth that automatically animates according to your voice recording.

This bundle extends Squash & Stretch Pro with various behaviors and sounds to give your animations an organic and fun cartoon style.