Section 2
Automatic Layout
The point of motion graphics templates is to make it easy to adjust the content. This means when a template user replaces a text with a longer text, it may mean that the background box of this text also needs to grow, or the other elements in the scene need to be repositioned. All of this should happen automatically, and this is why we need to talk about automatic layouts. This is crucial not just for motion graphics templates, but also all other kinds of automated scenarios, like the data-driven animation we’ll look at in the next section.
Simple Text Boxes
The simplest case of an automatic layout is a single text with a box behind it, which resizes automatically when the text is changed.
This is not only very basic, but also very common; fortunately, JC Tecklenburg published a really cool technique on Twitter for just this, which I’ll describe here. The best thing about it: the solution is very compact, and requires only a few effects on the text layer itself. I summarize it in this short tutorial.
For your convenience, here’s a screenshot showing the effects stack that you’ll need to create for the box.
The key idea of this box rig is that the Shift Channels effect can be used to set all the pixels in the text layer to be fully opaque (i.e. set the Take Alpha From parameter to Full On). A simple Fill effect can then be used to color this box as needed. The CC RepeTile effect can make layers larger by repeating their content – we use it here to add margins to the box so it’s a little bit bigger than the text itself. The order of these first three effects doesn’t matter at all (it’s a fun exercise to think about why). However, the last effect – CC Composite – must always be at the bottom of the effect stack. This effect can combine the layer with the original layer content (before any effects have been applied). So in our case, the previous effects eliminated the text itself and turned it into a solid box; we now use CC Composite to bring back the original text and place it on top of this box.
By the way, there’s no need to learn this combination of effects by heart – just build the rig once, select all four effects and drag them onto the effects and presets panel to save them as a preset.
Pins & Boxes - Overview
If you like the simple box rig, you’ll love Pins & Boxes - it’s really simple to use, but much more powerful. Pins & Boxes is an After Effects extension that we developed at mamoworld to create complex automatic layouts in no time. Here’s an example - and as you can see, the entire layout instantly updates when I type in new text:
When you hear the word extension, some alarm bells may go off in your head: using plugins and extensions in templates is often not a good idea, since you don’t want to force the template user to install any other products just to be able to use your template. But don’t worry – projects you create with Pins & Boxes also work on machines where the extension is not installed.
Pins
The first concept you have to understand are pins. Select any text (or any other layer) and click the Pins button of Pins & Boxes. This will create some shape layers that look like pins along the borders of the text.
The great thing about these pins is that they stay attached to the text layer: there are some expressions working in the background to make sure that when you replace the text, the pins will update their position automatically. Since the pins are normal layers, you can also parent other layers to them. If you want a second text below your main text, for example, and you want to ensure that it always stays aligned to the right edge of your main text, just parent it to the bottom right pin. This way, when the bottom right pin moves, the text linked to it moves, too. The entire process is shown in this video:
So, in the example above we attached a secondary text to the bottom right corner of your main text. In the same way, you could now add pins to your secondary text and place more layers relative to it. In this way you can create complex layout chains using only pins and parenting. Let’s take a look again at our example from the beginning (Movie 11.5).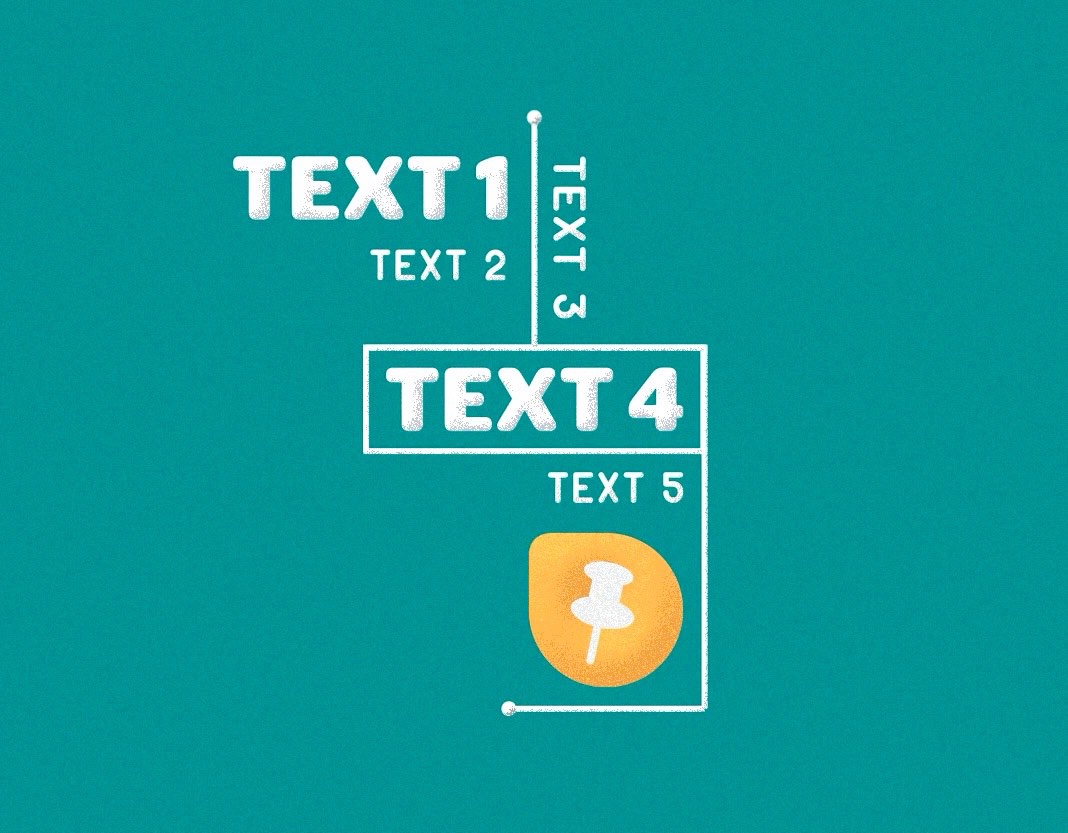 In this example, Text 4 is our main text and Text 3 and Text 5 are placed relative to it. More precisely, Text 3 is parented to a (invisible) pin at the top center of Text 4, and Text 5 is parented to a pin at the bottom right corner of Text 4. Now let’s take a look at the orange Pins & Boxes logo layer. This needs to move when Text 4 is resized (since the logo is aligned to the right edge of the text), but it also needs to move downwards when a second line is added to Text 5. So, we parent it to a pin at the bottom right corner of Text 5. Since Text 5 itself moves with Text 4, the logo will automatically react to changes from both Text 4 and Text 5. In the upper part of the design we have an even more complex parenting chain: Text 3 is parented to the top center pin of Text 4, Text 1 is parented to a pin at the top left corner of Text 3 (where the dot at the end of the line is), and Text 2 is parented to a pin at the bottom right corner of Text 1. As you can see, it’s easy to create fairly complex dependencies by applying the same simple concept again and again.
Boxes
Pins alone are already pretty useful, but it gets even better when you start to combine them with boxes. Boxes are shape layers that draw a box around a given set of pins. Just select a few pins, click the Box button, and Pins & Boxes will create a box shape for you that is just big enough to contain all the selected pins. Of course, the box also instantly updates when the pins move. Boxes also offer detailed controls to animate them in and out, as well as to create individual lines instead of entire boxes. This video gives a quick overview.
Moving and Static Pins
What happens with the pins if you keyframe the position of a text? There are two kinds of pins, moving and static. Moving pins are the default – they follow the text layer no matter how you animate it. In contrast to these, static pins don’t move at all; they have a marker and always stay at the position where the text is at this particular frame. So if you want a box to move with your text, use moving pins; if you want the box to stay in place, use static pins instead.
When creating pins, the dropdown menu next to the Pins button allows you to choose the pin type. If you want to convert a moving pin into a static pin (or vice versa), just select the pin and click the marker button in Pins & Boxes.
The next tutorial demonstrates how to use static pins. It also explains how boxes can be used as track mattes for your text.
Position Controls
The example with the matte box above has one little issue: when the text moves in, how far should it actually move? You can always keep it simple by starting the move far out of frame, ensuring that even the biggest texts are invisible at the beginning of the move. But in order to have accurate and consistent easing, you usually only want the texts to move as much as necessary - i.e. smaller texts need to move less than large texts:
That’s where position controls can help. Just select the text layer and click the P button of Pins and Boxes to add position effect controls to the layer; these will allow you to keyframe a movement in percent, instead of pixels. So, if can say ‘move 100% of your own width to the right’, a 100 pixel wide text will move 100 pixels; if it’s 200 pixels wide it will move 200 pixels, and so on. You can even combine the percentage-based animation with pixels-based to say ‘move 100% of your width + 30 pixels’, for example. This makes sense if a text box has a 30 pixels margin and you want the text to move exactly beyond the border of the box, for example. All of this may sound very technical , so here’s a tutorial to give you a better understanding.
A more comprehensive example for position controls can be found in this tutorial on mamoworld.com.
Anchor Controls
Anchor controls (button labeled ‘A’ in the Pins and Boxes user interface) are similar to Position controls – they allow you to set the anchor point of the layer based on a percentage value of its own size. So to always keep the anchor in the middle of a text, just set the anchor controls to 50% - now, no matter how the text resizes, the anchor will always be in the middle. If you place texts above other texts, you often want to keep the anchor point at the bottom (y anchor at 100%). This way, when new lines are added to the top text, it will only grow upward and won’t overlap with the text below it. For more details see this tutorial.
Anchor controls are described in more detail in this tutorial.
Centering Layouts
Centering Pins & Boxes layouts can be tricky. If you have one main text (or other layer type) that needs to be centered, then it’s easy – just place this layer in the center and use the Pins & Boxes anchor controls to make sure its anchor point always stays at the center. But what if you want to center complex combinations consisting of several texts, or other layers? In these cases, a good trick is to work with two compositions: a main comp and a precomp nested inside of it.
Let’s take a look at an example - here we have two texts with corresponding boxes side by side.
Instead of centering one of the texts, we want to center the entire combination - in the precomp, however, we don’t need to care about centering and can build our layout as usual. We then create a pin at the location that should be in the center. This is much easier than actually centering the layout – all you need to do is first create an (invisible) box around the entire content, then create a pin at the center of this box. Note that you can create pins not just for text layers, but for any type of layer - even boxes.
Now comes the trick: in the main comp, we link the anchor point of the precomp layer to our center pin. This means the content inside the main comp always shifts so the center pin stays in the same place, no matter how the content changes. This entire process is shown in this video:
The beauty of this approach is that it works for any kind of layout. No matter how complex your design is, you can always create an invisible box around all the content, place a pin in its middle, and then link the anchor point to it. For a more detailed description of this centering workflow, see this tutorial at mamoworld.com.
Pins & Boxes Resources
Pins and Boxes has even more features, which I don’t have the space to describe in this chapter. For example, instead of drawing entire boxes, you can also create individual lines. I’d suggest just playing around with the tool, or studying a few examples to get a feel for its potential. You’ll find plenty of examples in the tutorials about Pins & Boxes on mamoworld.com, as well as the Pins & Boxes product page, to deepen your understanding.

Create dynamic layouts easily. Align and attach elements to any point of the bounding box of texts and create boxes that grow and shrink with their content.

Export text from your After Effects project into a spreadsheet, then apply the modified spreadsheet to the Ae project once again with a single click. Perfect for text translation, client review and other text processing tasks.