Write Your First Custom Script with Automation Blocks
Wow! So you've decided to take your workflows in Premiere Pro to the next level - great to have you on board! As with any tool that gives you superhero powers, Automation Blocks comes with a learning curve. But don't worry, this quick tutorial will teach you all the basics. Along the way, we'll also create a useful script that imports all your footage from a certain folder and inserts it into a new sequence. Time to get your superhero cape out of the closet!
The User Interface
First, open the Automation Blocks user interface with the menu command Window->Extensions->Automation Blocks.
The user interface consists of several panels, which you can rearrange freely:
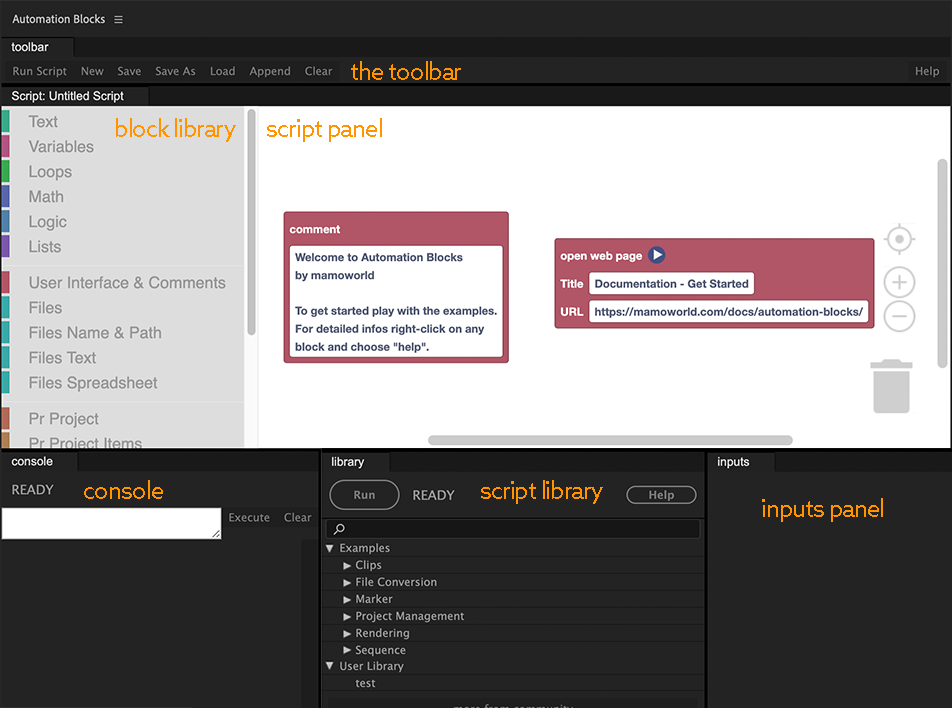
- Toolbar: Here you can run the currently open script, and load and save scripts. On the far right side of the toolbar, you'll find the "Help" button, which opens the online help.
- Script Panel: This is where you can see and change the currently open block script. By default, it just contains a comment block and an open web page block. These are special blocks which have no influence on the script at all - they are just used for documentation. If you click on the play button of the open web page block, for example, it opens the Automation Blocks documentation. We'll take a look at some more exciting blocks in a second.
- Block Library: Here you'll find all the blocks that are included in Automation Blocks. Since there are quite a few block types, they are grouped into categories. Just click on a category to see all the blocks included in it. To add a block to your script, just drag & drop it from the block library to the script panel.
- Script Library: This is where you'll find all the example scripts that come with Automation Blocks. Once you've started creating your own scripts, they will show up here, too (in the User Library section).
- Console: After you execute a script, the console shows if it was executed successfully, or if it failed (in which case you'll find an error message with more details, too). Scripts can also produce status output to explain what they are currently doing. All this output will show up in the console, too.
- Inputs Panel: This is where the user interface of the currenty open script is shown (if the script has a custom UI created with the input block).
Your First Script
Adding a Block
Let's first open the script panel and get rid of its default blocks by clicking the "New" button of the toolbar. Now, in the block library, we open the category Pr Project and drag the Sync Folder block into the script panel (click on the image to play the screen recording):
This block can import an entire folder on your hard-drive into the currently open Premiere Pro project. If the folder contains subfolders, it will create subbins into the project, too. Even better: before importing anything, the block checks if the project bin already contains any of the files and if so, it won't import those a second time. So this block is like an intern that you can ask "Hey, could you please take a look at this folder and check if all of it is imported properly into that project bin?"
Now I've told you what this block is doing, but in general, how do you figure out exactly what a block does? Just right-click on any block and choose "help" to get an in-depth documentation of what it does.
Customizinig Block Parameters
Now let's adjust the block to our needs! First we choose the folder that you want to import. Just click on the folder icon at the top right of the block and then choose a folder in the "Open Folder" dialog that pops up. Make sure that the folder actually contains some footage, so we have something we can import.
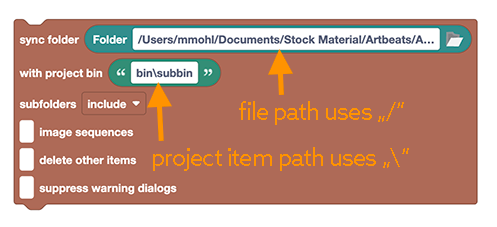
Next, we also need to choose target bin in Premiere Pro's project panel, where the imported footage should be inserted. For this, we just select the desired target bin inside the project panel and then click on the refresh icon icon in the second line of the sync folder block. In our example, we select the bin "day 1" which is located inside the bin "footage". Automation Blocks describes this bin with the path \footage\day1. Instead of using the refresh icon you can also enter these paths manually, if you like. This is useful, for example, if you want to use a bin which does not exist in the project, yet.
Backslash vs Slash
For the path of a project item (i.e. a bin, sequence, footage etc. inside your project), Automation blocks always uses a backslash \ whereas for file or folder paths (which represent a location on your hard-drive and not inside your project), you can use both / or \ (the latter is usually used on Windows).
Run the Script
Now it's time to run your script! Just click the Run Script button and see what happens! Automation Blocks has two buttons for this: The "Run Script" button at the top left of the toolbar and the "Run" button in the library panel. Both buttons do exactly the same, so it does not matter, which one you use.
As you can see, the script imports all footage into the desired target bin successfully. Note the green "DONE" message next to the "Run" button, which indicates that the script execution was successful.
The Console

The console panel of Automation Blocks shows some additional information about the script execution, which is created by the blocks while they do their job. What exactly you see there depends on the block - our sync folder block, for example, prints a check file message whenever it checks if a particular file has been imported before. In case it found new files which need to be imported, it also prints an import file message for each of those files. For files which could not be imported, it also shows a skip file message. Some other blocks don't write anything to the console, or only if they run into any issues.
These detailed outputs can be a lifesaver for troubleshooting, since they give you a good overview of what exactly a block is doing - it's like a logbook of the script execution. But as long as your script does what you want, you can ignore them.
Errors
Now, let's provoke an error: we'll replace the folder path of the block with another text saying whatever. Assuming that you don't have a folder with that name in the root folder of your file system, the block should have trouble importing footage from that location. And as you can see, the status message now shows a red text "ERROR" with a helpful description:
Saving Your Script
Great work - you've just written your very first script! So let's save it by clicking on the Save button of the toolbar. After you've saved the script, it also shows up in the script library panel:
Note that scripts are just simple, self-contained xml files. If you want to restructure your library, or delete or rename scripts, just open the library folder with Windows Explorer or Mac OS Finder and move/delete/rename the files to your liking. After you did that, make sure to restart Automation Blocks, such that it notices your changes.
User Library Location
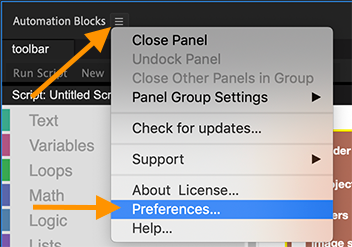
By default, you'll find your user library in a folder Automation Blocks Pr Library inside your documents folder. If you prefer to keep your scripts in some other location, you can change that in the Automation Blocks preferences. In the preferences, you'll also find a button to open the library folder in Windows Exploder or Mac OS Finder.
Adding Clips to a New Sequence
Ok, the sync block is amazing, but if a single block alone can be so useful, imagine what you can do if you combine two blocks! So far, our example script just imports some footage. Wouldn't it be great if it could also put those clips into a new sequence?
Since we want to create a new sequence, let's take a look at what the block category "Pr Sequence" has to offer (you'll find an overview of all block categories in the block reference). If you browse through the blocks in that category, three of them seem to be related to creating new sequences and adding clips to them:
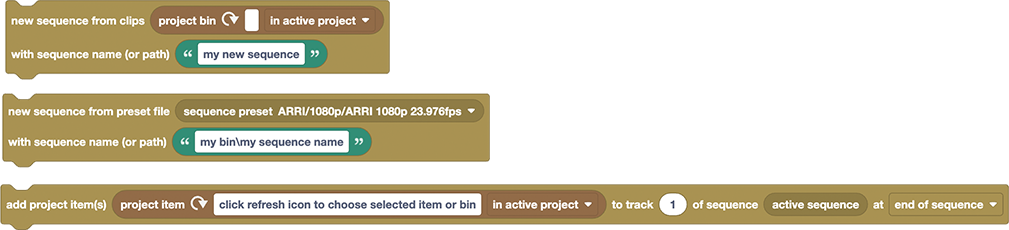
The first two are both about creating a new sequence, so which one are we going to use? To understand exactly what these blocks do, drag each of them into your script panel, right click on them and choose "help" to see their documentation. There you'll find the info that you can simply give the "new sequence from clips" block a bin and it will take all the footage items in that bin and insert them into a new sequence. Cool - exactly what we want!
The other block, "new sequence from preset file", is useful if you need more control over the format of the sequence. Say you have HD footage, but want to insert it into a 4K comp. You could first create a 4K comp with the "new sequence from preset file" block and then insert your HD footage items using the "add project item(s) to track of sequence" block. Bottom line: sometimes you can achieve the same thing in different ways - and often one way is simpler, but the other way gives you more control or flexibility.
So let's go for the "new sequence from clips" block and add it to our script. We drag it into our awesome importer script and make sure it uses the same project bin as our sync folder block:
Adding a User Interface
Now our script is already pretty useful - whenever you start a new project, it imports your footage and creates a sequence in no time! But the folder from which you want to import the footage is probably different for each project you create, right? So wouldn't it be cool if the script asked you for the folder you want to import?
In the block category "User Interface & Comments", you'll find the Select Folder Dialog block. Just drag it into your script and replace the hard-coded folder block with it. Now, instead of using the same folder each time you run the script, a dialog pops up and asks you for the folder you want to use.
Thanks to the Open Folder Dialog, you don't need to modify the script itself anymore whenever you want to choose a new folder to import. This might seem like a minor difference - whether you enter a new file path right inside the block script, or use this kind of dialog instead - but imagine if you want to share your blocks with your colleagues. You won't need to explain to them anymore where exactly in your block code the folder path needs to be adjusted - the dialog just pops up whenever they run the script, so they won't have to touch your code at all.
Inputs Panel
Instead of showing a popup dialog where the user can choose a folder, you can also add a user interface element for this to the inputs panel. If you want to add something to the inputs panel, you always need to use the Input block for this. Just replace the Select Folder Dialog block by the Input block and choose a type of the input in the block parameters (in our case the type is "choose folder").
Summary
Congratulations - you just finished your first lesson on your path to becoming a true automation hero! By now, you've developed a good intuition for where to find the right block for your task, and gained some hands-on experience by writing your first script.