Search & Replace in Project Items
In this tutorial, you'll learn how to work with texts, project items, loops and variables. But this wouldn't be a superhero class without a spectacular result. Therefore, we'll also create a cool script that can do search & replace in your project panel:

where's the Run Script button?
This tutorial has been recorded with an early beta version of Automation Blocks, where the "Run Script" button was in the console panel. Now you have the "Run" button in the Library panel instead.
Search & Replace in Texts
Whether we want to do a search & replace in the names of project items, in metadata, or even in the comments of markers, the approach is always the same: first, we have to understand how to do such a search & replace operation in a text.
Pattern vs General Purpose Replace
If you look at the Text category in the block library, there are two blocks that mention replace:
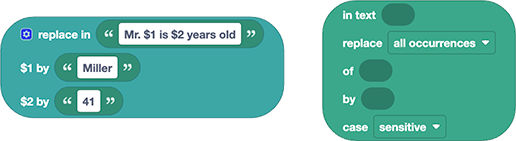
The block on the left does a very special kind of replace. It searches for occurrences of placeholders $1, $2, $3 ... in the text and replaces them. So the result of the example shown is the text Mr. Miller is 41 years old. This block is very useful whenever your script wants to output information (like writing something on the console or in a text file). Say you want to output Sequence 'Main' has a duration of 14.21 seconds - you can use this block, with the template text Sequence '$1' has a duration of $2 seconds, and feed it with the sequence name and duration as $1 and $2 respectively. This is a very useful block, but not what we are currently looking for.
The block on the right is a general purpose search & replace block, so exactly what we need. Let's feed it some simple texts and play with it a bit.
Results in the Console
A useful thing to remember is that among all the console outputs that a script execution produces, near the end there is always a line saying
execution result:
This includes the value that the last executed block produced. So, if you want to get a feeling for how a particular block behaves, just start a new script with only this single block, feed it with all kinds of different inputs and see what the returned result looks like. As you can see, in our test the block took the text let's search something, found the word search within it, and replaced it with replace. Therefore, the resulting value of that block is let's replace something:
execution result: let's replace something
You can play some more with the options of the block (or read its documentation), but for now you only need to understand that this block does the basic search & replace we're looking for.
the last block?
The execution result in the console shows the value calculated by the last block. If you have only a single block, it's obviously the last one. If you have multiple (stacks of) blocks in your script panel, higher ones are executed first (if two stacks are approximately the same height, stacks to the left are executed first). This means that if you have a comment below your block, for example, this comment is the last executed block and its result will be shown in the console.
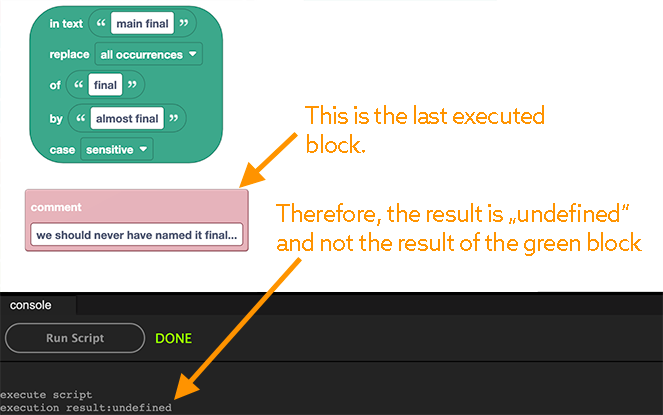
After the script has been executed, it's easy to see which one has been executed last, since the most recent block executed is always highlighted.
Accessing Project Items and Their Properties
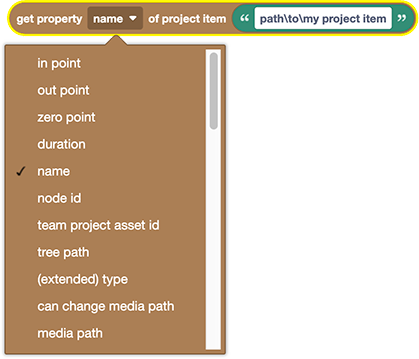
Now we know how to search & replace texts, let's figure out next how we can access texts like the name of project items, so we can perform a search & replace on them. If you browse through the blocks in the category Pr Project Items, you'll find one for obtaining and setting the properties of project items, respectively:

And fortunately, the property name is available in the dropdown list:
If we want to test this block on its own, we'll have to give it a meaningful argument for the project item. Project items can be specified in all kinds of ways (for details, see the beginning of the documentation of the category Pr Project Items). Later we'll want to use a loop to process all the project items, but for now - just as an example - let's try to retrieve the name of a single project item. This can be done using the project item's path.
Project Item Path
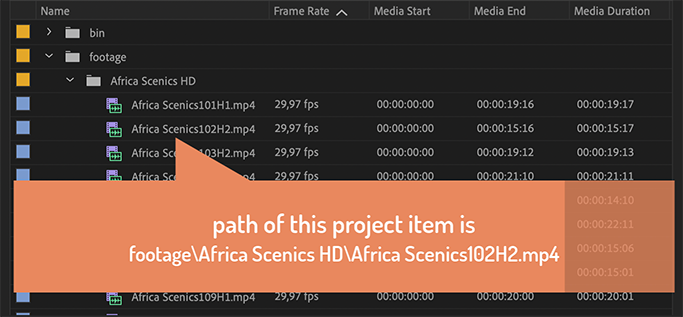
One easy way to select a specific project item is to enter its path. If we want to access the project item with name Africa Scenics102H2.mp4 inside the bin Africa Scenics HD, which itself is included in the project bin footage, then the path of this item is footage\Africa Scenics HD\Africa Scenics102H2.mp4 (make sure to use \ and not /).
So let's try to access the name of this project item:
As you can see, the block indeed returns the name of the project item. I agree that it is not super exciting to retrieve the name of a block if you have to feed that same name into it as part of the path. But remember, this is just an example!
Also note how we disable the Search & Replace block temporarily so the script only executes the new block we want to test.
Replacing the Project Item Name
Let's see what happens if we combine the block we just created with the Search & Replace block:
As you can see, we can indeed combine the two blocks to replace the text Africa Scenics in the project item name with ASC. The result calculated by the block (and as shown in the console) is exactly what we want, but so far our script just prints this result in the console, rather than actually changing the name of the block.
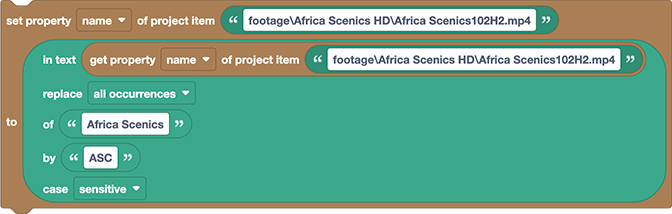
This is because we didn't yet tell the block what to do with the result. You could do all kinds of things with it: maybe you calculated this value because you want to write it to a text file, or use it as the name for a new sequence. But what we actually want to do, of course, is to replace the existing name of the project item with that new text. Hence, we need to feed the result into the Set Attribute of Project Item block:
Great, we managed to replace the name of a single project item! One little thing that might be confusing: if you run the script a second time, you'll get an error message (if you had a typo in your project item path, you might have seen this earlier already):
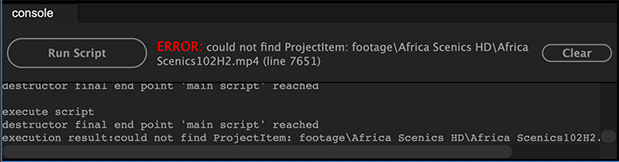
The reason for this is that we renamed our project item, so its path changed.
A project item with path footage\Africa Scenics HD\Africa Scenics102H2.mp4 no longer exists, since the correct project item path is now footage\Africa Scenics HD\ASC102H2.mp4.
Your First Loop
So far, we've combined some blocks to replace the name of one particular project item.
Now we want to do that for all project items. If you had an intern, you could tell him to copy our blocks one hundred times and replace the item path in each copy as needed. But of course, that's nothing a true automation hero would be proud of. What we need instead is a loop.
Finding the Right Loop Block
In the Loop category, you'll just find general purpose loops, but if you browse the other categories, you'll find more specialized loops. To loop over project items, we need the For Each Project Item block from the category Pr Project Items:
For Each Project Item Block
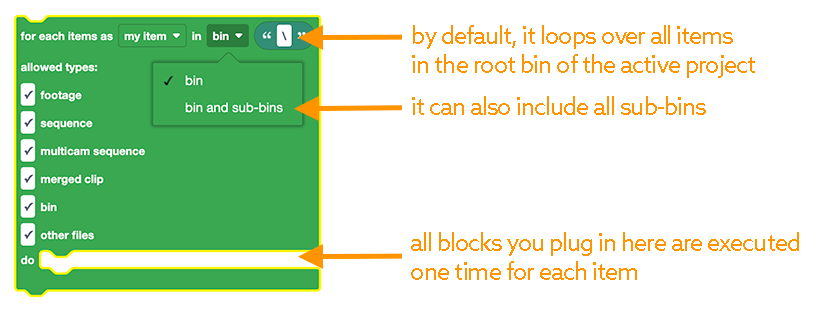
We want to do something for each bin and sub-bins of the root folder (which is represented by the path \). If you only want to search & replace inside the particular bin, instead of \ you can also enter the path of that bin like footage or footage\Africa Scenics HD, for example. The checkboxes allow you to only loop over items of a particular type, but for now let's search & replace in all items, so we'll keep all of them checked.
The key thing you need to understand is that whatever blocks you plug inside of that block are executed many times - if you have 50 project items, they will be executed 50 times. Let's try to plug our search & replace code inside the loop:
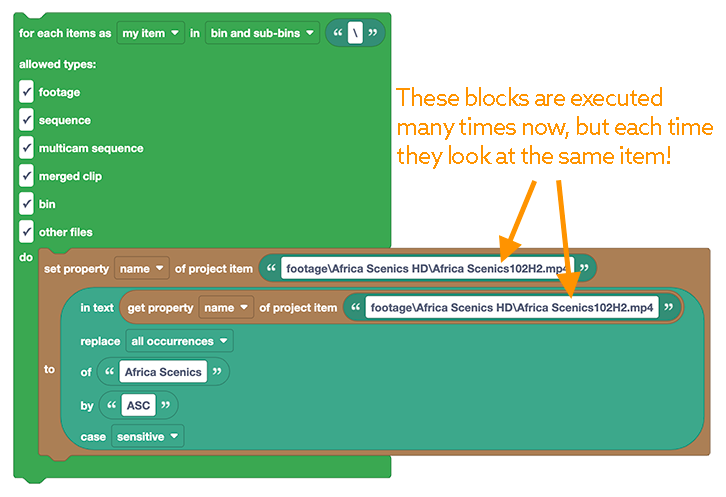
That's a step in the right direction, but if you try to execute the code, you'll get the error again, that our sample item footage\Africa Scenics HD\Africa Scenics102H2.mp4 cannot be found.
Loop Variables
The problem here is that these blocks are executed many times now, but each time they look at the exact same item again and again, since we hard-coded the name of the item footage\Africa Scenics HD\Africa Scenics102H2.mp4. So, instead of telling our script: "use the item footage\Africa Scenics HD\Africa Scenics102H2.mp4", we need to tell it something like "use the item of the current loop".
If you take a look at the first line of our loop block again, it says "for each item as my item". The my item is like a placeholder that you can use instead of a hard-coded project item path. And each time the loop is executed, the script will replace it with the corresponding project item. More technically, my item is a variable and each time the loop is executed, it stores the corresponding project item in that variable. Hence, we need to replace our hard-coded project item path with the variable my item.
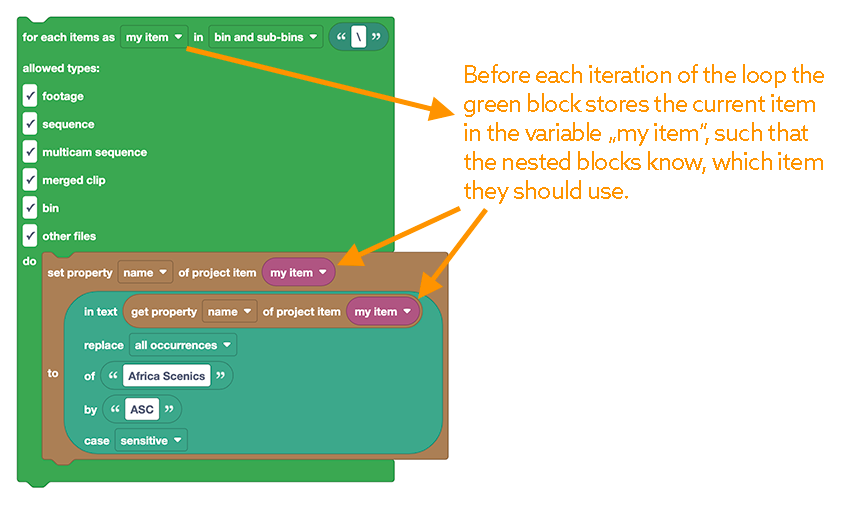
Note that my item has a magenta color, since it is a variable block. If you kept the green text block that we used for the path, and just replaced its text with my item, the script would look for a project item with the path my item instead.
You'll find all variables of your program in the block category Variables and when you add the For Each Project Item block to your script, the my item variable appears there automatically. Here is the entire process of adding our loop, from start to finish:
As you can see, now the script updates the names of all project items - even the name of the bin. If you don't want to rename the bin, you could simply uncheck the checkbox for bins in the allowed types settings of the block. This is the real beauty of Automation Blocks - you can customize it exactly to your needs.
Another thing you might have noticed is that during the execution, the blocks change their color. This is because the block that is currently calculating is always highlighted. This mean when an error occurs, you always know which block caused the error (namely the highlighted one).
Loop Summary
Loops are something that you need to get used to, but don't worry if they feel complicated at the beginning. The good thing is that once you've learned how to use one loop, you know how to use all of them. The principle is always the same: you have one green loop block, and then nest other blocks inside of it. The nested blocks are then executed many times - namely one time for each of the things that you loop over (no matter if they are project items, markers or lines of a text file). Also, no matter which loop you are using, it will always store the 'things' you loop over in a variable, so that in each iteration the nested blocks know which of those things they need to work on.
In other words, loops are really like little assistants - you explain how to do something once, and then they repeat it for you many many times. I encourage you to browse through the examples in the script library again and check where you can find green loop blocks. Try to understand what the nested blocks are doing and where they use the variables that the loop block provides. The more examples you see, the more similarities you will recognize and the more you will get used to using loops.
Nice! This is just the third class on your way to becoming an automation hero and I can already see some true superhero powers emerging!
Variables
So far we've just used variables inside a loop, but there are many other applications for variables. And sometimes you don't just use variables that a loop provides, but instead create your own variables! That's what you'll learn in this section, but let's first take a little detour and talk about user interfaces.
Prompt Dialog Inside a Loop
Our script is almost perfect, but instead of hard-coding the search and replacing text in the script, it would be much nicer if the script would ask for the text each time you run the script. During the First Steps tutorial you already created a Choose Folder dialog, and a quick look in the block category User Interfaces & Comments reveals that Automation Blocks also comes with a Prompt Dialog Block, where you can enter things like a search word.
Let's see what happens if we simply replace our hard-coded search and replace texts with Prompt Dialogs:

As you can see, this is not really what we wanted. The texts for search & replace are indeed taken from a prompt dialog, but for each individual item new prompts show up! Of course, we just want the two prompts to show up once and then use their result for all the items. The problem here is that the loop executes everything you put inside of it many times (namely once per item). If you put a prompt inside a loop, it is also shown many times.
Of course, this wouldn't be an automation superhero class if we didn't have an elegant solution: we need to show the prompt before the loop, not inside of it!
Prompt Dialog Before the Loop
If we want to show the promp dialogs for the search and replace text before our loop, we need a way to save their result and then use it later inside the loop. That's exactly what a variable can do for you: save a value and reuse it in any later step of your block script.
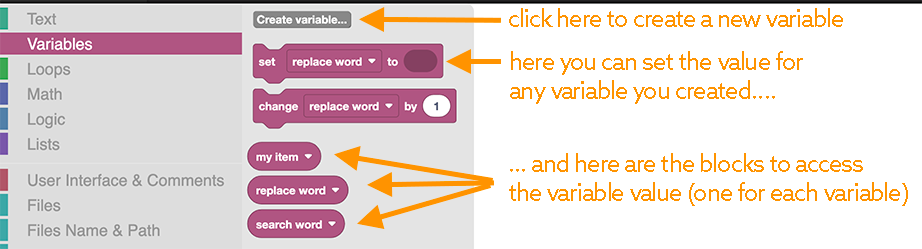
Whenever you create a new variable, you effectively create two blocks: one for setting the value of the variable, and one for accessing that value. In the loops variables that you've already seen, you didn't need to bother with setting the value, you only needed to use the block to access it. Now we need both.
Let's create two new variables, search word and replace word, assign them the values of our prompts, and then use them inside the loop:
Summary
Congratulations - you just created a super cool search & replace script, and if your colleagues often spend hours renaming project items, they will love you for this one!
You also gained some experience on how to work with texts and project items in this tutorial. You don't yet know every single block of Automation Blocks, but you already know all the important concepts!
On the technical side, you've earned badges for two pretty advanced topics:
- loops
- variables
Loops and variables don't just take your automation workflows to the next level, they are fundamental principles of programming. It will take some time to get used to them, but if I haven't scared you away by now, you can consider yourself a programmer!