Loops
Overview
Loops allow you to repeat a particular task many times. For a more detailed explanation, see the section My First Loop of the tutorial "Search & Replace in Project Items"
Specialized Loops
The blocks in this section are general purpose loops, but you'll find some more specialized loops in other sections:
- loop over all lines of a text file
- loop over all rows/columns of a spreadsheet
- loop over all matches of a regular expression in a text
Premiere Pro
- loop over all open Pr projects
- loop over Pr project items
- loop over clips in a sequence
- loop over markers of a clip or sequence
- loop over parameters of a clip
After Effects
- loop over Ae project items
- loop over frames of a composition
- loop over layers of a composition
- loop over layers with a particular source item
- loop over properties of layers
Repeat Loop

This loop just executes the blocks you plug inside it as many times as you want. It is the simplest loop and therefore useful to understand the concept of loop blocks. However, in practice you will use the For Loop much more often, which is very similar, but more powerful.
Example
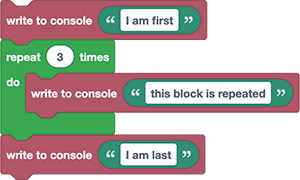
This example prints the following output to the console:
I am first
this block is repeated
this block is repeated
this block is repeated
I am last
As you can see, the block that is plugged into the block is executed three times, whereas the other blocks above and below are just executed once.
While/Until Loop

In the top row of this loop you need to put a condition (a logic value that evaluates to either true or false).
The loop executes the blocks you plug into it again and again, but before it starts a new round of the loop, it checks the condition, and if this condition evaluates to false it stops looping. In other words, the While/Until loop repeats until the condition is not true anymore.
While vs Until
In the dropdown of the block you can choose between "while" and "until". The only difference is that for "while", the condition is also evaluated before the very first loop execution. In other words, the "until" loop always executes at least once, whereas the "while" loop does not execute at all if the condition already evaluates to false at the very beginning.
Example - Import Multiple Folders
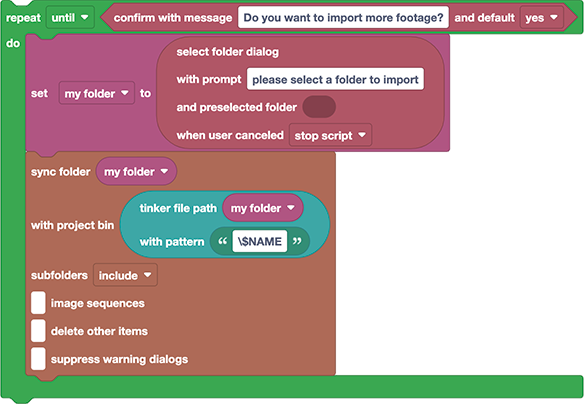
This script imports multiple footage folders into your Premiere Pro project. The blocks plugged into the loop first show a "Choose Folder" dialog and then import the folder that the user has chosen. Since we plugged the blocks into the loop, the script then asks "Do you want to import more footage?" and as long as the user chooses "yes", the script repeats the process. Note that we have chosen the "until" option, so that the question is not asked before the first folder import.
By the way, if you're wondering what the Tinker File Path block here does: from the full path (say C:\projects\myProject\footage), it just takes the name (like footage in our example) and puts a \ in front of it to indicate that we want to import it into a bin in the root bin of the project (\footage denotes a bin "footage" in the root bin, whereas footage denotes a bin with name "footage" that could be anywhere - so Automation Blocks would search your project to see if it can find a bin of that name).
Count With

The "Count With" loop is similar to the simple Repeat Loop, but it offers a variable i, which you can use for counting how often the loop has already repeated.
Count with is NOT a real For loop
If you know a for(...) loop, you might get the impression that "Count with" is the same, but there is a subtle difference: When you "count from x to y" and y is smaller than x, then the count goes backwards (whereas the for loop would not execute at all). To achieve the usual for loop behavior, it's better to use a while loop:

By parameter

This block prints the following to the console:
this is loop repetition 1
this is loop repetition 2
this is loop repetition 3
this is loop repetition 4
this is loop repetition 5
this is loop repetition 6
this is loop repetition 7
this is loop repetition 8
this is loop repetition 9
this is loop repetition 10
As you can see, the variable i is incremented by 1 each time the loop repeats.
If we change the by parameter to 4, the variable i grows by 4 in each iteration of the loop:

this is loop repetition 1
this is loop repetition 5
this is loop repetition 9
Example - Export Stills
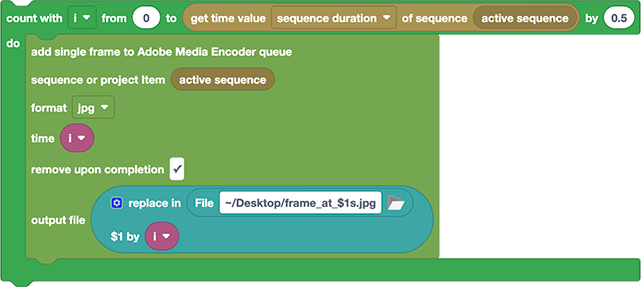
This loop exports still images from the active sequence. In the example, the 0.5 at the end of the first line results in the export of one still image every 0.5 seconds of the sequence. The loop variable i is also used to name the exported stills. The created output files are
frame_at_0s.jpg
frame_at_0.5s.jpg
frame_at_1s.jpg
frame_at_1.5s.jpg
...
If you prefer frame numbers or timecodes instead of seconds in the file names, you could use the blocks in the category Pr Time to convert the time in seconds into your preferred format.
For Each Loop

The For Each loop takes a list and then executes the blocks you plug into it once for each list element. The list element is stored in the variable j.
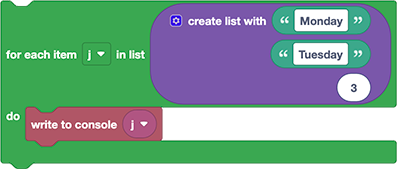
This example calls the "write to console" block three times. The first time j is Monday, the second time Tuesday, and the third time 3. So, the script writes the following on the console:
Monday
Tuesday
3
Example
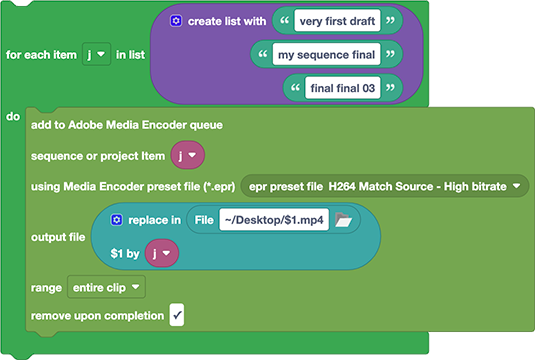
This scripts adds the sequences with names very first draft, my sequence final and final final 03 to the render queue. Note that the variable j is used both for the sequence name that is rendered and for the output file.
Loop Break/Continue
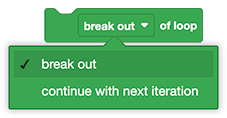
The break/continue block can be plugged into any loop block to stop its execution early. Here is a basic example, where the loop is configured to repeat ten times, but inside the loop, we check if the 5th repetition has been reached, and if so we break out of the loop:
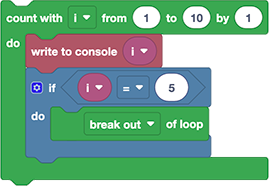
As a result, the loop only executes 5 times and the script shows this in the console:
1
2
3
4
5
Example - Break out of Search
Here is a more practical example, where we search for a sequence item. We loop over all project items, but as soon as we've found one that is a sequence, we stop.
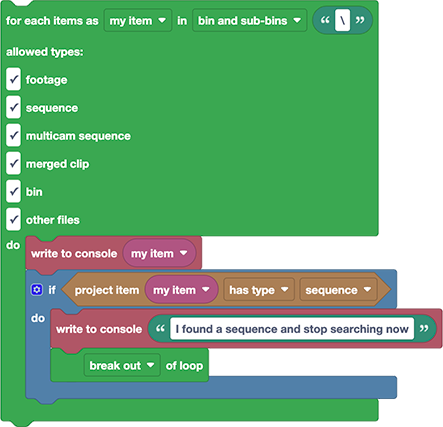
The same pattern can be used for all kinds of search operations, when you don't want to continue the loop after you've found what you were looking for.
Continue option
If you choose the continue with next operation instead of break out, the loop only stops the current iteration and immediately continues with the next one.
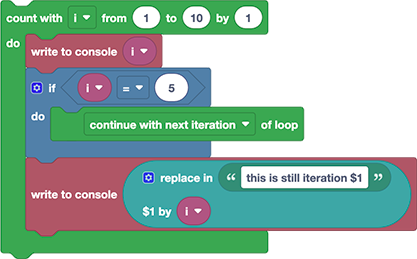
In this example, each iteration writes two messages to the console - one before and one after the if condition. In the fifth iteration, the condition is true, so we execute the continue with next iteration statement. As as result, the second console output is skipped in the 5th iteration and there is no line this is still iteration 5 in the console output:
1
this is still iteration 1
2
this is still iteration 2
3
this is still iteration 3
4
this is still iteration 4
5
6
this is still iteration 6
7
this is still iteration 7
8
this is still iteration 8
9
this is still iteration 9
10
this is still iteration 10