Ae Keyframes
The blocks in this category allow you to work with keyframes on properties in After Effects.
Add Single Keyframe

This block creates a single keyframe - you just need to specify the property on which the keyframe should be created, the time and the value for the keyframe.
Add Keyframes
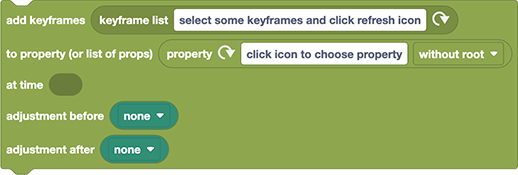
This block can create multiple keyframes on any keyframeable property - it is your keyframe copy and paste operation on steriods. If the property already has keyframes, it can even adjust them for you - if, for example, you add keyframes which move the layer 100 pixels downwards, then it can move all keyframes after the newly inserted ones 100 pixels down, too.
To use the block, you need to specify the following parameters
keyframe list: to tell your block script which keyframes you want to add, you can either us a Static Keyframe List or a Dynamic Keyframe List. By default, the Add Keyframes block comes with a static keyframe list. If you want to use a dynamic one instead, just create a Dynamic Keyframe List block and drag it on top of the static list to replace it.
property: choose the Layer Property to which the keyframes should be applied.
time: the time where the first new keyframe should be located (the distance of the other keyframes depends on the keyframe data you provide). If you don't provide a value here, the keyframes are inserted at the time in the keyframe data (i.e. at the original time of the keyframes that you copied).
Automatic Keyframe Adjustment
The parameters "adjustment before" and "adjustment after" of the block allow you to adjust the existing keyframes to the newly inserted ones - or also vice versa! The first dropdown controls the behavior of the keyframes before the newly inserted ones, and the second dropdown controls the behavior of the keyframes after the newly inserted ones.
Adjust Keyframes before newly inserted ones
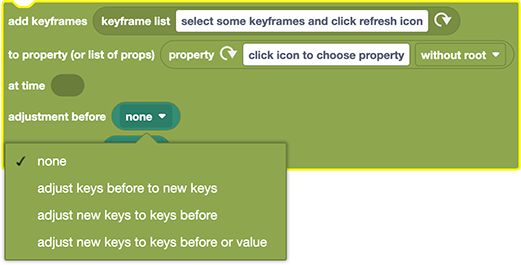
Here you have the following options:
none: keeps all keyframes before the new ones exactly as they are and pastes the new keyframes without modifying them in any way.
adjust keys before to new keys: offsets all the keyframes before the new ones so that the last one ends up exactly at the value where the first newly inserted keyframe is. Example: say you already have two scale keyframes on your layer, which scale it from 20% to 50%, and now after that you want to add two keyframes which scale from 60% to 80%. This option will then change the first two keyframes to 30% and 60%, i.e. add 10 to them to ensure they end at 60%, which is exactly the value that the new inserted keyframes start with.
adjust new keys to keys before: This option adjusts the newly inserted keyframes so they start exactly where the last keyframe before the new ones ends. Example: If you already have two scale keyframes which animate the layer from 20% scale to 50% and you insert new keyframes with an animation from 60% to 80% after that, then those new keyframes will be changed to 50% and 70% to make sure they start exactly at the 50% where the animation of the existing keyframes ended.
adjust new keys to keys before or value: This option is the same as adjust new keys to keys before, except that it also adjusts the new keyframes if there are no existing keyframes before the new ones at all. In other words, this option makes sure that the newly inserted keyframes start exactly at the current value, no matter if the property is already keyframed or not.
Adjust Keyframes after newly inserted ones
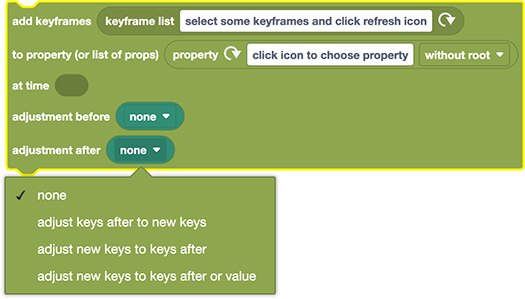
Here you have the following options:
none: keeps all keyframes before the new ones exactly as they are and pastes the new keyframes without modifying them in any way.
adjust keys after to new keys: offsets all the keyframes after the new ones so the first of them starts exactly at the value where the last newly inserted keyframe ends. Example: Say you already have two scale keyframes on your layer, which scale it from 20% to 50% and now you want to insert two keyframes which scale from 60% to 80% BEFORE those existing keys. This option will change the old keyframes to 80% and 110%, i.e. they will still scale up by 30%, but instead of starting from 20% they now start from 80%, where the newly inserted keyframes end.
adjust new keys to keys after: This option adjusts the newly inserted keyframes so they end exactly where the first keyframe after the new ones ends. Example: If you already have two scale keyframes which animate the layer from 60% scale to 80% and you insert new keyframes with an animation from 80% to 100% before that, then those new keyframes will be changed to 40% and 60% to make sure they end exactly at the 60% where the animation of the existing keyframes starts.
adjust new keys to keys after or value: This option is the same as adjust new keys to keys after, except that it also adjusts the new keyframes if there are no existing keyframes after the new ones at all. In other words, this option makes sure that the newly inserted keyframes end exactly at the current value, no matter if the property is already keyframed or not.
conflicting options
Note that the new keys can either be adjusted to fit seamlessly to the existing keys before, or to the existing keys after, but not both. If you choose both options at the same time, the latter one is ignored.
Seamless Animation
A very powerful combination for seamless animations is
- adjust new keys to keys before or value combined with
- adjust keys after to new keys
That way, the newly inserted keyframes and the existing keyframes after them are all shifted as needed to create a seamless animation which starts at the current position of the animation.
If the newly inserted keyframes should animate a layer into the scene, you typically want to preseve the position where the animation ends (and not where it starts). To achieve this, you can set "adjustment before" to "none" and "adjustment after" to "adjust new keys to keys after".
Pasting Keys to Multiple Properties
Instead of providing the block a single property and a single list of keyframes, you can also pass it lists of them.
Here, we paste keyframes on both the position and the scale of a layer:
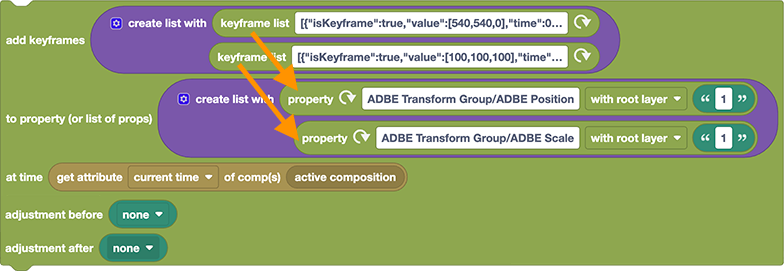
As the orange arrows indicate, the first keyframe list is applied to the first property and the second keyframe list to the second property.
At first sight, this seems to be the same as if you simply used two copies of the "add keyframes" block (the first to paste the position keyframes and the second to paste the scale keyframes). However, there is one important difference: The behavior of the at time parameter. If you give the block an entire list of keyframe lists, it will look at all of them and offset all keyframe times so that the very first one is at the given time. If this sounds strange, it's best explained with an example:
Example
Say you read keyframe data for both scale and position from a layer and the first scale keyframe is at 1s, and the first position keyframe at 2s. Now you paste those keys to another layer with the at time parameter set to 5s. If you just paste the position keyframes alone, the first position keyframe will be at 5s. However, if you paste both scale and position at once, the block notices that the scale keyframes start 1s earlier than the position keyframes. So, it pastes the keyframes so that the first scale keyframe is at 5s, but the first position keyframes is at 6s.
Note that this behavior is identical to what After Effects does when you cut and paste keyframes manually in the user interface.
set value for keyframed property
If you want to create a single keyframe at the current time, you can also use the block Set Attribute of Property to set the attribute "value". If the property already has keyframes, this will add a new keyframe at the current time (but if the property is not keyframed, this will change the value for all frames and will not insert a keyframe).
Static Keyframe List

Static Keyframe lists save the keyframe data inside the block - in other words, they contain a hardcoded list of keyframes (including all easing information).
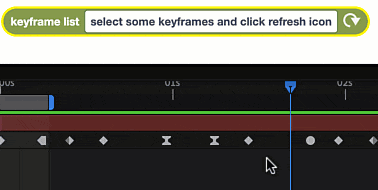
Using a static keyframe list is very simple: Just select any keyframes (of a single property) in the Ae timeline and click the refresh icon of this block. The text field of the block now contains the keyframe data. To apply those keyframes to a property, use the block Add Keyframes.
JSON data
Technically, the result of this block is a text in a json format (which is identical to the data shown in the block's text field) . This allows you to write the data to a text file, for example, or bind it to a variable.
Dynamic Keyframe List

This block reads keyframe data from a Layer Property and returns it as a json string. In contrast to the Static Keyframe List, this block does not store any keyframe data, but just stores the information from which property the keyframe data should be retrieved. In other words, instead of saving a fixed set of keyframes with your script, this block reads keyframe data from the currently open Ae project in real time, each time the block is executed.
The dropdown option of the block allows you to specify which keyframes of the property you want to read and has the following options:
- all keyframes
- selected keyframes
- keyframes in workarea
- keyframes in time range (if you choose this, two more options appear to select a start and end time)
Delete Keyframes

Deletes keyframes on the given property (or if you give it a list of properties, the keyframes of all those properties are deleted). With the additional (and optional) parameters you can specify a min/max range and only delete the keyframes within that range.
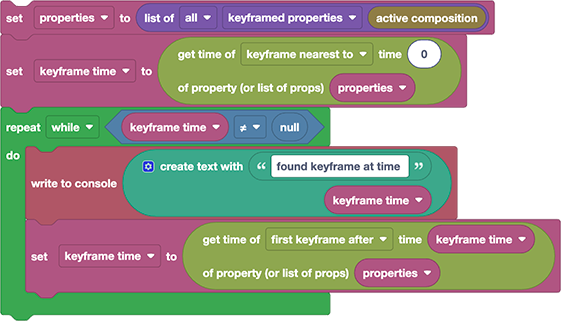
Nearest Keyframe Time

Returns the time of the keyframe that is closest to the given time, or null if no such keyframe exists.
Optionally, the block can look only at keyframes before or only at keyframes after the given time.
Example: Loop over keyframes
This block script writes all points in time to the console, where at least one property of the active comp has a keyframe: