Pr Mogrts & Clip Parameters
The blocks in this section allow you to access and change some of the properties of sequence clips, which you can find in the Effect Controls Panel and the Essential Graphics Panel. You can get and set values, and even create keyframes.
Replace Ae Mogrt Text

This block does a search and replace for texts in motion graphics templates. This is very useful to translate title texts or lower thirds into multiple languages, for example.
search and replace text
Just give the text you want to replace as the first parameter, and the text that it should be replaced with as the second parameter. The block then searches though all the texts of all motion graphics template clips in the given sequence (or you can specify a specific clip instead of a sequence, as described below). Whenever the text equals exactly the text you search for, the block replaces it with the new text. Note that the search replaces all occurrences of the text, and does not stop after the first hit.
in sequence (or clip)
By default, the block looks at all clips in the active sequence, but you can also specify a different sequence, or a single clip instead. If the text you want to replace is just contained in a single clip and you know which clip that is, it makes sense to provide this clip as an argument, instead of the entire sequence, because the block will process much faster if it does not need to search through the entire sequence. For all the ways to specify a specific clip, see Accessing a Particular Sequence Clip.
case sensitive
If you enable this checkbox, the search is case sensitive. If you disable it, a search for #TEXT1 would also replace the text #teXT1, for example.
Help us to support other templates, too!
There are two flavors of Motion Graphics Templates: templates created inside Premiere Pro, and templates created inside After Effects. Currently, this block only supports templates that have been created in After Effects. We would love to support all other templates and titles too, but this is only possible if the Premiere Pro team extends their scripting API. Please submit a feature request to encourage the Premiere Pro team to add that feature.
use #IDs
Say you plan to locate a text in English, German and Spanish. Instead of starting with the English texts and then replacing them with the German and Spanish texts, you can start with a version that only contains placeholder IDs instead of the actual texts like #text1, #text2 etc.
Keep the IDs in a spreadsheet together with the actual texts in English, German and Spanish - then you can always quickly create your English, German and Spanish variants at any time.
If you start with the English texts instead, things can become messy when you decide to change any of them later (for IDs, there should be no need to change them at any time).
use clones
If you want to keep your original sequence and make the replacements in a copy, you can use the Clone Sequence Block for that.
Get Clip Parameter Value
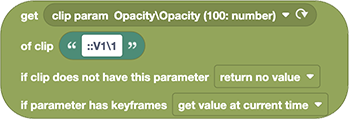
This block can return the value of all kinds of properties that are listed in the Effect Controls Panel - like the position or scale of the clip, but also any parameters of effects.
clip param
Here you can choose the parameter whose value you want to have (like the opacity or scale of the clip). The dropdown where you can choose the parameter by default contains a list of parameters that most clips have. However, you can also access other parameters - like the effect controls of effects you applied to a particular clip. Just select a clip (or several of them) in your sequence and click the refresh button behind the dropdown list (the circular arrow symbol). The block then reads all parameters that it can find within the selected clip(s) and populates the dropdown list with them. Now you can choose the parameter in the dropdown easily.
Instead of choosing a parameter from the dropdown, you can also drag a text block or variable here to specify the name of the clip parameter. You can retrieve the name of an individual parameter with the Clip Param block or iterate over all clip params to get all their names.
clip
Specify the clip from which you want to read a parameter value here. In the example above, the ::V1\1 represents the first clip in track V1 of the active sequence. For all the ways to specify a specific clip, see Accessing a Particular Sequence Clip.
if clip does not have this parameter
Some properties are not available on all clips (for instance, the controls of a particular effect are only available on clips to which this effect has been applied). If the clip does not have the parameter you want to read, you have two options:
- return no value
- stop with error
if parameter has keyframes
If the parameter you want to read has keyframes, the value changes over time. For this situation, you have the following options:
- get value at current time: returns the value at the time where the current time indicator of the sequence is.
- get value before keys where added: when a parameter is keyframed, Premiere Pro still remembers the value that the parameter had before keyframing was activated. You can access this value with this option.
- stop with error: choose this error if you want to be sure that the parameter has no keyframes.
Set Clip Parameter Value
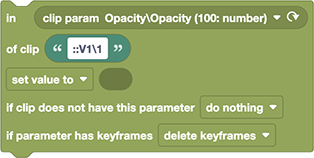
This block can change the value of all kinds of properties that are listed in the Effect Controls Panel, like the position or scale of the clip, but also any parameters of effects.
clip param
The dropdown where you can choose the parameter by default contains a list of parameters that most clips have. However, you can also access other parameters - like the effect controls of effects you applied to a particular clip. Just select a clip (or several of them) in your sequence and click the refresh button behind the dropdown list (circular arrow symbol). The block then reads all parameters that it can find on the selected clip(s) and populates the dropdown list with them. Now you can choose the parameter in the dropdown easily.
Instead of choosing a parameter from the dropdown, you can also drag a text block or variable here to specify the name of the clip parameter. You can retrieve the name of an individual parameter with the Clip Param block or iterate over all clip params to get all their names.
clip
Specify the clip whose parameters you want to change here. In the example above, the ::V1\1 represents the first clip in track V1 of the active sequence. For all the ways to specify a specific clip see Accessing a Particular Sequence Clip.
set value to
By default (dropdown option set value to), the existing parameter value is replaced with the new value. But this block also supports other operations to modify the existing value with the new one:
- set value to: replaces the old value with a new one
- multiply value with: multiplies the existing value with the new one. If you want to make a layer twice as big, for example, no matter how it has been scaled before, you can multiply its scale value by 2. (This only makes sense for number and list values, not for boolean or text values)
- multiply value with %: multiplies the existing value with the new value divided by a hundred. So if you want to make your layer half as big as before, you can multiply its scale parameter by 50% (e.g. pass number 50 as new value). (This only makes sense for number and list values, not for boolean or text values)
- add to value: adds the new value to the existing one - so if you want to lower the opacity of a clip by 20%, you can just add the number -20 to the existing value, for example. (This only makes sense for number and list values, not for boolean or text values)
- keep current value (ignore new value): This does not change the value at all. It does not make a lot of sense for this block, but works the same way on the Set Clip Parameter Value At Time block, where it creates a new keyframe at the given time but keeps the existing value.
value
The parameter dropdown lists, behind each parameter in parentheses, give an example value and a type:
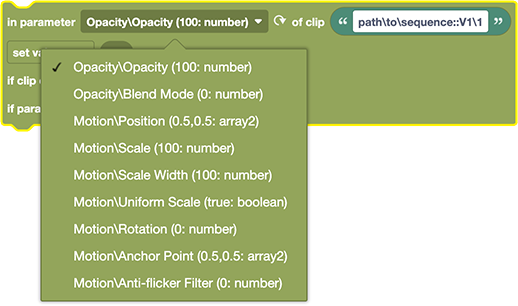
You need to specify a value of that type, but Automation Blocks does its best to convert whatever you provide to that type.
The types are:
- number: a single number (you find a block for that in the Math section). Texts are converted to numbers, too.
- array2: the position or anchor point of a clip has two values (for x and y). Therefore you need to provide a list with two entries as values (see section Lists for blocks that create lists). Also note that position and anchor point are not measured in pixels. Instead, the top left corner of the frame corresponds to
[0,0]and the bottom right corner to[1,1]. The default value of[0.5,0.5]is thus always the center of the frame, no matter what resolution the sequence has. - boolean: Parameters which correspond to checkboxes need a logic value
trueorfalse. You'll find blocks for these in the Logic section. Texts are converted to booleans as follows: if the string is empty or is exactly the textfalseit is converted to the logic valuefalse; otherwise it is converted totrue. All numbers except0are converted totrue(also negative numbers). - string: a text
if clip does not have this parameter
Some properties are not available on all clips (like the controls of a particular effect are only available on clips to which this effect has been applied). If the clip does not have the parameter you want to read, you have two options:
- do nothing
- stop with error
if parameter has keyframes
If the parameter you want to change has keyframes, the value changes over time. For this situation, you have the following options:
- delete keyframes: deletes all existing keyframes on the parameter before setting the new value.
- stop with error: choose this error if you want to be sure that the parameter has no keyframes.
If you want to create keyframes (i.e. change the value only at the current time), you need to use the Set Clip Parameter Value At Time Block instead.
Get Clip Parameter Value At Time
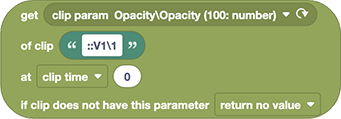
Reads the value from a keyframed parameter at the given time. This block is very similar to the Get Clip Parameter Value Block, except that it supports an additional time value to specify at which point in time the value should be read. For parameters which are not keyframed, the two blocks behave identically, but if the value changes over time, this block can read that keyframed value.
at clip time
Here you need to specify the time (in seconds) where the keyframed value should be read. You have different options for how exactly to specify this time:
- clip time:
0means the beginning of the footage file that this clip is using - sequence time:
0means the beginning of the sequence - time from in point:
0means the beginning of the clip in the sequence - time from out point:
0means the end of the clip (and-1means one second before the end of the clip, for example)
other controls
For everything else that this block has to offer - in particular how to access properties which are not listed in the dropdown by default - see the documentation for the Get Clip Parameter Value Block, which is identical to this one, except for the missing time value.
Set Clip Parameter Value At Time
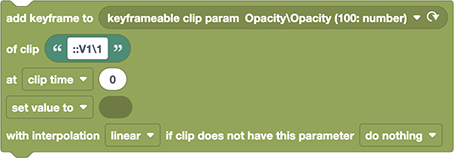
Adds (or modifies) a keyframe to a parameter at the given time. This block is very similar to the Set Clip Parameter Value Block, except that it supports:
- an additional time value to specify at which point in time the value should be read.
- a control to choose the keyframe type
at clip time
Here you need to specify the time (in seconds) where the keyframe should be created. You have different options for exactly how to specify this time:
- clip time:
0means the beginning of the footage file that this clip is using - sequence time:
0means the beginning of the sequence - time from in point:
0means the beginning of the clip in the sequence - time from out point:
0means the end of the clip (and-1means one second before the end of the clip, for example)
with interpolation
Here you can choose the type of the keyframe, i.e. how the keyframe interpolates the values. This is sometimes also called the keyframe easing. You have the following options:
- linear
- hold
- bezier
- time
- time transition start
- time transition end
- easy in (obsolete)
- ease out (obsolete)
- ease in & out (obsolete)
Premiere Pro Bug
Due to a bug in Premiere Pro 2021, the scripting API can only create keyfames with linear easing. If you try to create a keyframe with another type in a Premiere Pro version that has this bug, Automation Blocks will detect it and stop with a helpful error message. Please switch the interpolation option to linear to avoid this problem.
We reported this bug (bug DVAPR-4231653) to the Premiere Pro team and hope they will fix it fast. If you have this issue and need other keyframe types, please encourage the Premiere Pro team to fix bug DVAPR-4231653 asap. The more people that complain, the more priority they will give to this.
other controls
For everything else that this block has to offer - in particular how to access properties which are not listed in the dropdown by default - see the documentation of the Set Clip Parameter Value Block, which is identical to this one, except for the missing time and easing controls.
Remove Keyframes
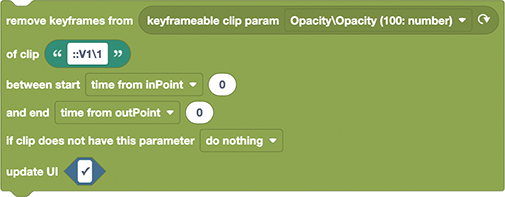
By default, this block removes all keyframes from the given clip param between its in point and its out point.
start & end time
You can specify the time range in which the keys should be deleted (both start and end time are inclusive, i.e. keys which are exactly at the start or end time are removed, too). For details how exactly the start and end time can be specified see the Set Clip Parameter Value At Time block, which has the same options (i.e. the time can be specified relative to the in- or out-point, or in clip time or sequence time).
other controls
For everything else that this block has to offer - in particular how to access properties which are not listed in the dropdown by default - see the documentation of the Set Clip Parameter Value Block, which is identical to this one, except for the missing time and easing controls.
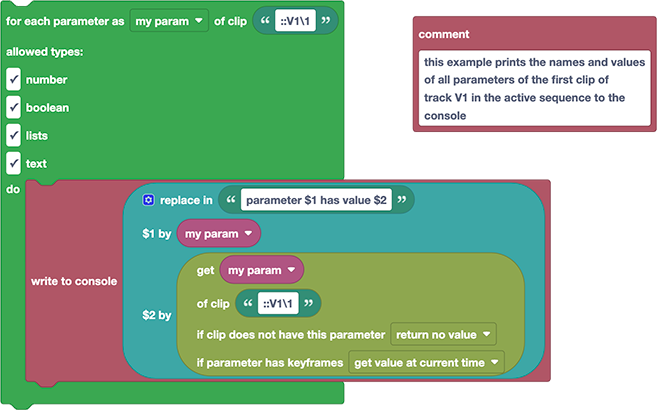
For Each Parameter of Clip

This block loops over all parameters of the specified clip. This includes the usual parameters that most clips have (like opacity or scale, or the volume parameters for audio clips) but also any parameters of effects which are applied to the clip. The block executes the blocks you nest inside of it for each of those properties. Each time those nested blocks are executed, the variable my param includes the name of the respective property. To retrieve the value of the property, for example, just drag the variable my param onto the block Get Clip Parameter Value:
Clip Param

This block offers a dropdown where you can choose a clip parameter (like the opacity or scale of the clip) and returns the name of that parameter. Usually, this block is just embedded as a part of other blocks like the Get Clip Parameter block. However, it is also available as a standalone block if you ever want to figure out the name of a particular clip parameter.
By default, the dropdown lists the clip paramters which most clips have. However, you can also access other parameters - like the effect controls of effects you applied to a particular clip. Just select a clip (or several of them) in your sequence and click the refresh button behind the dropdown list (the circular arrow symbol). The block then reads all the parameters that it can find within the selected clip(s) and populates the dropdown list with them.
Keyframeable Clip Param

This block works exactly as the Clip Param block, except that the dropdown only lists the clip parameters that can be keyframed.
Troubleshooting Clip Param Issues
Could not find component parameter
If a component parameter could not be found by Automation Blocks, you typically see a message like this in the console:
could not find component parameter mySequence::V1\1\Motion\Scale
It indicates, that in the sequence with name "mySequence" in Track V1 the clip numer 1 has no clip parameter "Scale" in the group "Motion". This can have two reasons:
- The parameter really does not exist (maybe you try to access the scale of an audio clip?)
- The parameter has a different name, since you use a different UI language version of Pr.
In German Pr, for example, "Scale" is named "Skalieren" and "Motion" is "Bewegung". Automation Blocks 1.1.001 or newer knows the names of all parameters in all user interface languages. That means, if it looks for a property "Scale" and cannot find it, it will check if it finds a property "Skalieren" instead, for example. Therefore, updating to Automation Blocks 1.1.001 solves most language issues.
However, for third party effects, it is not aware of their localizations, for example. Hence, if you run into any issues, you might want to check if switching the UI language of Pr to English solves your issue.
Changing the UI langage of Pr
You can change the language without reinstalling Pr:
in Pr use the keyboard shortcut to open up the console window: Mac: fn + command + F12 Win: ctrl + F12
in the Console, make sure the Debug Database view is open:
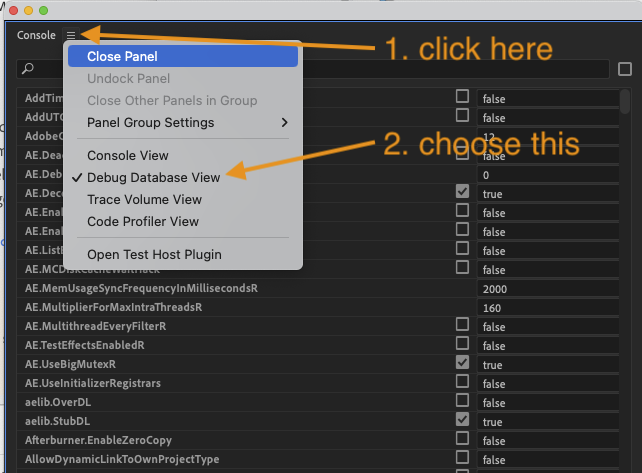
search in the Console for "ApplicationLanguage" and set it to "en_EN" for English
restart Pr