Pr Other
Execute Code
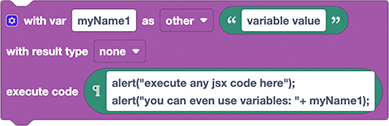
This block can execute any Adobe ExtendScript (jsx) code using the Premiere Pro scripting API.
Automation Blocks also uses the Premiere Pro scripting API under the hood and most of its functionality can be used without writing any programming code. But whenever you need a function of the scripting API that is not covered by Automation Blocks natively, you can use this block.
Tutorial
Learn how to combine block-based scripting with ExtendScript and ChatGPT to unlock advanced Premiere Pro automation using the Execute Code block.
Variables
At the top of the block, you can configure variables, which are passed from Automation Blocks to the ExtendScript code. By default, you have a single variable "myName1", but you can change this name freely. Just make sure to follow the rules for variable names in JavaScript, i.e. in contrast to variables in Automation Blocks, the name may not contains spaces, for example.
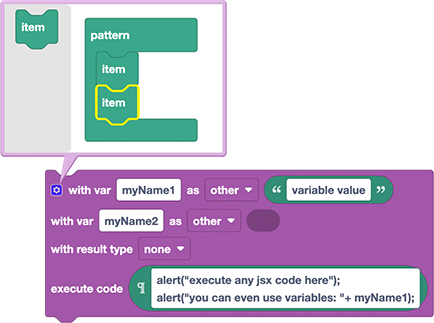
To add more variables, use the blue cog wheel icon at the top left of the block:
Variable Types
By default, variables have the type "other", which means that Automation Blocks just passes the data to ExtendScript without any modification. This is fine for numbers, strings, or lists (which are represented as JavaScrript arrays). But let's say you set the variable value to the project item "\footage\logo.png":

Then with type "other" the variable would contain the string "\footage\logo.png", but if we choose the type "ProjectItem", Automation Blocks converts it to a ProjectItem object. Therefore, we can call the method myItem.setOffline() of the ProjectItem object in the jsx code.
The following types are available:
Automation Blocks will do its best to convert anything to the chosen type. So if you choose type "Sequence", for example, and give it a TrackItem, then it will convert it to the sequence, which contains the track item.
Returning a Result
By default, the execute code block has result type "none", which means that the execution result of the jsx code is discarded. However, if you choose another result type, the shape of the block changes, such that you can plug it into other blocks as a value. Here is a same block with the result type "none" and "other":

The result of the code is always the value of the last statement, i.e. if you have a code
statement 1;
statement 2;
statement 3
then the end result will be the result of statement 3. You cannot use return to return a value (since internally the code is executed with eval and it is not a function call). A good pattern is usually to create a variable result and then simply put that variable value as the last statement, such that it is returned:
var result;
// do everything you want here and assign your return value to result
result  // this value will be returned
Execute Code - Examples
We collected all examples shown below in a single Automation Blocks xml file:
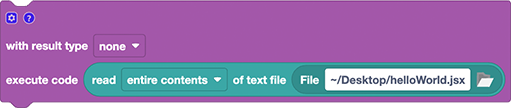
Executing jsx Files
You can combine the Execute Code block with the Read Text File block. Since script files take no arguments, you can remove all variable definitions from the Execute Code block in that case.
$.filename
Some script files use the attribute $.fileName to retrieve the file path of the currently executed file. Since we first read the file contents and then eval it, this won't work properly. Instead, better use a variable, to pass information like the file path to the jsx.
ProjectItem: Create Smart Bin
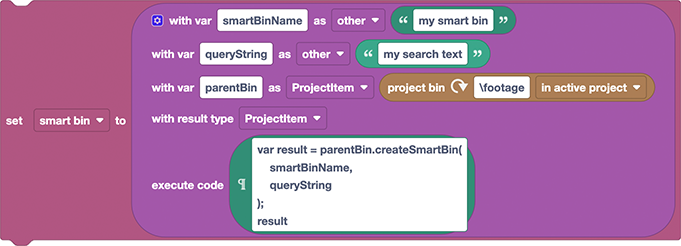
This block creates a new smart bin and saves it in the Automation Blocks variable smart bin:
var result = parentBin.createSmartBin(
    smartBinName,
    queryString
);
result
Note that the variable parentBin and the result have type "ProjectItem" whereas the variables smartBinName and queryString represent basic strings and hence keep the default type "other". Also note that the documentation of ProjectItem.createSmartBin says that it returns 0, but in practice it looks like it is actually returning the item of the new bin. Hence, we also return it.
ProjectItem: Set Offline
We've shown the example above already: To set a project item offline use the code
myItem.setOffline();
with a variable myItem of type "ProjectItem":
ProjectItem: Import Mogrt
This example inserts the motion graphics template contained in the file test.mogrt on your desktop into the active sequence into tracks V1 and A1 at time 0s:
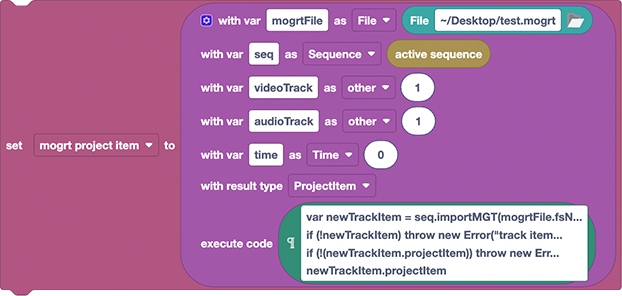
var newTrackItem = seq.importMGT(mogrtFile.fsName, time.ticks, videoTrack-1, audioTrack-1);
if (!newTrackItem) throw new Error("track item could not be created");
if (!(newTrackItem.projectItem)) throw new Error("track item of mogrt has no project item");
newTrackItem.projectItem
Note that currently, Automation Blocks does not support track items as result type. Therefore, we return the corresponding project item instead.
ProjectItem: Audio Channel Mappings
This example sets the audio channel mapping of a project item:
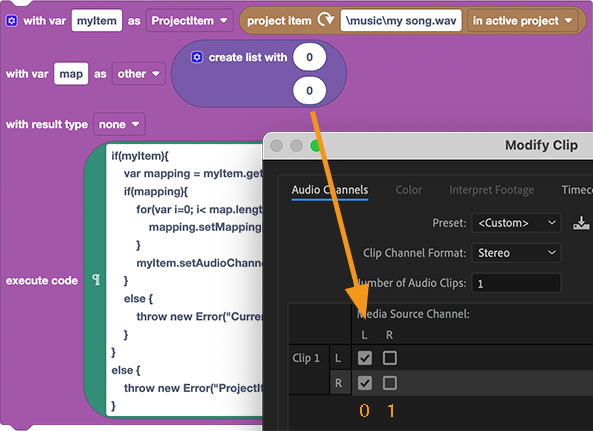
if(myItem){
    var mapping = myItem.getAudioChannelMapping
    if(mapping){
        for(var i=0; i< map.length; i++){
            mapping.setMappingForChannel(i,map[i]);
        }
        myItem.setAudioChannelMapping(mapping);
    }
    else {
        throw new Error("Current audio mapping unavailable for item "+myItem.treePath);
    }
}
else {
    throw new Error("ProjectItem not found");
}
In the screenshot above, we used the list [0,0] as map, to map both the left and right channel of the clip to the left media source channel (and replacing a 0 by 1 would map to the right media source channel). For clips with more channels, you can simply use a list with more entries.
Here is a second example, which changes the audio channel mapping of a stereo file, such that it uses two mono tracks instead of one stereo track in the timeline:
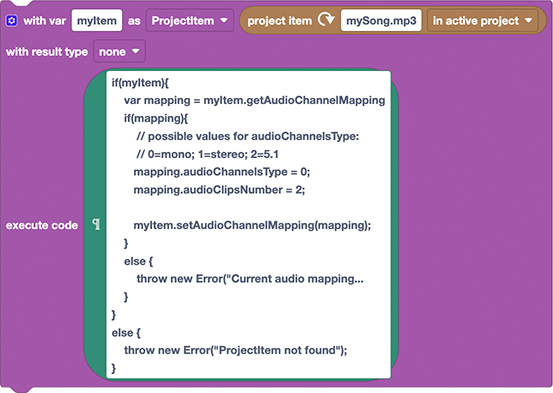
if(myItem){
    var mapping = myItem.getAudioChannelMapping
    if(mapping){
        // possible values for audioChannelsType:
        // 0=mono; 1=stereo; 2=5.1
       mapping.audioChannelsType = 0;
       mapping.audioClipsNumber = 2;

       myItem.setAudioChannelMapping(mapping);
    }
    else {
        throw new Error("Current audio mapping unavailable for item "+myItem.treePath);
    }
}
else {
    throw new Error("ProjectItem not found");
}
To chieve this, we set the audioChannesType of the the audio channel mapping to 0 (0=mono; 1=stereo; 2=5.1) and the audioClipsNumber to 2, since we need two mono tracks for the stereo data.
Audio Channel Mappings are also discussed in this forum thread.
Track: Set Visibility (Eyeball)
This example switches the eyeball icon on/off, which controls the visibility of a video track:
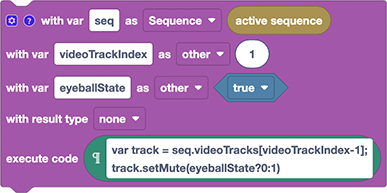
var track = seq.videoTracks[videoTrackIndex-1];
track.setMute(eyeballState?0:1)
Note that the function setMute() can both mute audio tracks and set the eyeball of video tracks.
Track: Mute
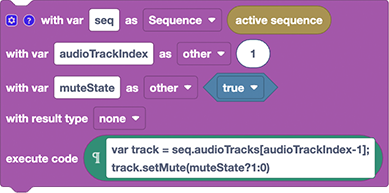
var track = seq.audioTracks[audioTrackIndex-1];
track.setMute(muteState?1:0)
Track: Set Locked
You can lock tracks using the method Track.setLocked(). You needd to give the funtion 1 as argument to lock it and 0 to unlock it. See also this forum discussion.
In this implementation we pass the sequence and a track index as argument to lock tracks A1 and V1, respectively:
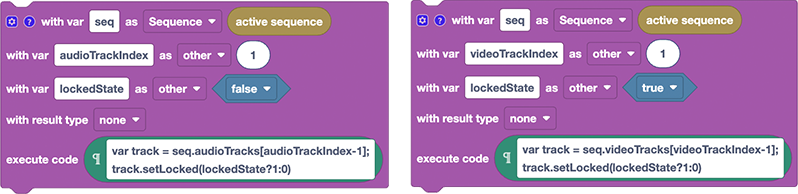
Lock Audio Track:
var track = seq.audioTracks[audioTrackIndex-1];
track.setLocked(lockedState?1:0)
Lock Video Track:
var track = seq.videoTracks[videoTrackIndex-1];
track.setLocked(lockedState?1:0)
Here is an alternative implementation, which can lock both audio and video tracks and which takes the track itself as argument (learn here how to specify a track using a path string):
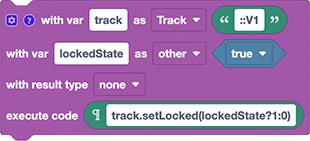
track.setLocked(lockedState?1:0)
Clip: Remove
In Premiere Pro's scripting API, clips in a sequence are represented by objects of type TrackItem. The function TrackItem.remove() removes the clip from a sequence and takes two arguments: inRipple and inAlignToVideo. See here for a description of these arguments.
In this example, we remove the first clip in track V1 of the active sequence. If you wonder what the ::V1\1 exactly means and what other options you have to specify a TrackItem, see here.
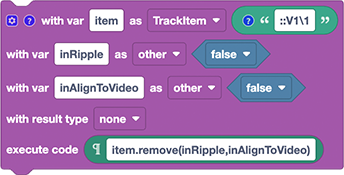
item.remove(inRipple,inAlignToVideo)
Clip: Apply Effect
The official scripting API of Premiere Pro contains no function to apply effects. But there is also the undocumented QEdom, which you can actually use to apply effects. Be aware that this is unsave territory officially not supported by Adobe, but it still might work. This example applies the Gaussian Blur effect to the first clip in track V1 of the active sequence:
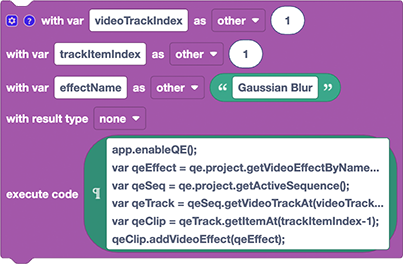
app.enableQE();
var qeEffect = qe.project.getVideoEffectByName(effectName);
var qeSeq = qe.project.getActiveSequence();
var qeTrack = qeSeq.getVideoTrackAt(videoTrackIndex-1);
var qeClip = qeTrack.getItemAt(trackItemIndex-1);
qeClip.addVideoEffect(qeEffect);
Cudos to NT Productions for figuring this out; see also this forum discussion.
trackItemIndex
qeTrack.getItemAt() counts the gaps between clips in a track also as "items". Hence, you need to count both the clips and the gaps between them to find the right value for trackItemIndex. See also this forum discussion to learn how to find the correct index for an item.
Clip: Apply Transition
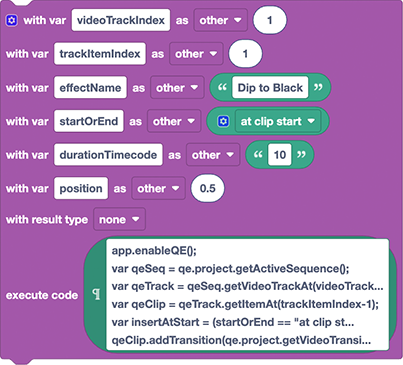
app.enableQE();
var qeSeq = qe.project.getActiveSequence();
var qeTrack = qeSeq.getVideoTrackAt(videoTrackIndex-1);
var qeClip = qeTrack.getItemAt(trackItemIndex-1);
var insertAtStart = (startOrEnd == "at clip start");
qeClip.addTransition(qe.project.getVideoTransitionByName(effectName), insertAtStart, durationTimecode,  "0", position );
Applying transitions works very similar to applying effects (and also has the same stumbling block that gaps between clips affect the trackItemIndex).
For transitions you have a few extra parameters:
- startOrEnd: Set this to "at clip start" to insert the transition at the beginning of the clip and to any other value otherwise.
- durationTimecode: The total duration of the transition as a timecode - like "10" for 10 frames or "00:00:00:10". Note that this must be a string, not a number value
- position: A number between 0 and 1 determining the exact position of the transition. A value of 0.5 inserts the transition in the middle of the cut. For a value of 0.2, 20% of the total duration of the transition are on the first clip and 80% on the second clip.
Note that qeClip.addTransition() also has an extra argument "0". We have no idea what it is doing - if you do, please let us know!
Source Monitor: Open Project Item
With the method app.sourceMonitor.openProjectItem() of Premiere Pro's scripting API, you can open any project item in the source viewer. In this example, we open the image "image.jpeg" in the project bin "footage" in the source monitor:

app.sourceMonitor.openProjectItem(myItem)
Here is another variant, which optionally closes all other open clips in the source monitor before opeing the new one:
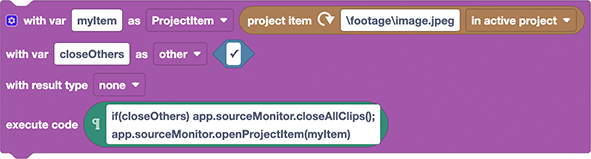
if(closeOthers) app.sourceMonitor.closeAllClips();
app.sourceMonitor.openProjectItem(myItem)