Ae Layer
The blocks in this section allow you to do all kinds of things with the layers of a composition. You can create, copy, move or delete layers, apply effects or presets to them, and change their attributes, for example. If you want to manipulate an individual property of a layer (like the position property or any effect control), you need to use the blocks in the categories Layer Properties and Ae Keyframes.
Accessing a Particular Layer
Whenever a block requires a layer as an argument, Automation Blocks represents the layer as a text, which is similar to a file path. You can create those texts manually using a Text block, for example, but usually it is more convenient to use a Layer block, which will create the text for you.
By Layer Name
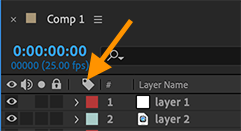
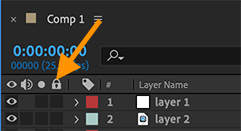
The following blocks all reference the layer White Solid 1 in the composition Comp 1 (which is in the root bin of the project panel).
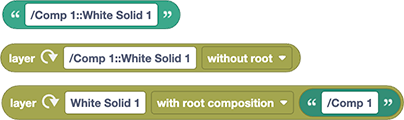
As you can see, the path of a layer is composed of a name or path for the composition, followed by a :: and then the name (or index) of the layer itself.
The biggest different between the first two is that when you click the refresh icon of the layer block, it will fill all its text fields automatically based on the layer that is currently selected in the Timeline panel. With the "root composition", however, the text is also split into one component for the layer and one for the containing comp, so you can manipulate each of them individually.
By Layer Index
Instead of a name, you can also use the index of a layer. This is the path for the 3rd layer in the composition "Comp 1": Comp 1::3.
You can also use negative indices, which will count the layers from the end of the composition. This is the path of the last layer in the comp with name my comp which is contained in the project bin teaser: /teaser/my comp::-1.
This tutorial video shows a basic example how to access a layer of the active comp by index.
In the Active Composition
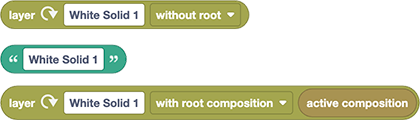
To specify a layer in the active composition, you can simply skip the part with the path, which specifies the composition itself. Here are three different ways to choose the layer "White Solid 1" in the active composition:
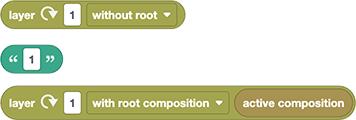
Of course, this also works in combination with layer indices. Here are three different ways to access the first layer of the active composition:
If you skip the comp name, you can usually also skip the :: separator. However, you can also keep the :: before the layer name to explicitly tell Automation Blocks that this text describes a layer. Let's take a look at these examples:

Note that the first one uses the block Get Attribute of Layer, whereas the second and third one use the block Get Attribute of Project Item. Hence, the first example retrieves the label color name of the layer with name my video (from the active comp), whereas the second example retieves the label color of a project item with name my video. In the third example, we put the colons in front of the name to make it clear that this should actually be a layer name. So, Automation Blocks searches for the layer with name my video (in the active composition) and because the block expects a project item as argument, it then attempts to convert the layer into a project item. For details about this, see the section about accessing a project item using a layer or property.
(Not) Unique Layer Names
We recommend you make sure that each layer of a composition has a unique name. However, if you have multiple layers with the name White Solid 1, then Comp 1::White Solid 1 will refer to the first of these. If you want to access another one, you can append a number in square brackets to the name. To obtain the second layer with name White Solid 1 you can use White Solid 1[2], for example.
Using Blocks
Of course you can also access a layer with the Only Selected Layer block or an entire list of layers using the List of Layers block
Layer

This block is built into many other blocks as a parameter - in every situation where you need to choose a layer, you will most likely find this block. Picking a particular layer is very easy: Just select the layer and click the refresh icon of this block.
root
Say you selected the layer My Title Text of the composition Comp 1 and then clicked the refresh icon of the Layer block. Then the block will look like this:

If you change the option without root to with root composition the block changes as follows:

As you can see, the text specifies that the layer has now been split into two parts: one for the layer itself and one for the composition to which the layer belongs. The result of the block is still the same - it still represents the layer My Title Text of the composition Comp 1. But now you can change these two parts independently. You can, for example, drag an Active Composition block onto the Comp 1 text:

Now this block no longer represents the layer My Title Text of the comp Comp 1; instead, it represents the layer My Title Text of the active composition.
Only Selected Layer

This block returns the only selected layer, if exactly one layer is selected and otherwise stops with an error.
This is very useful if you want to write a script which assumes that the user has selected a single layer and doesn't want to worry about dealing with a List of Layers and check if that list has length 1.
List of Layers

This block creates a list (array) of all layers a composition. Optionally, it can also just put the selected layers into the list and also limit the list to a specific layer type.
For examples of using this block, see the blocks Delete Layer, Select Layers, and Select Project Items.
For Each Layer

This block is a loop which allows you to do something with all layers, or all the selected layers of a composition. You can also select only a particular type of layer that should be considered.
selected layers
If you choose to iterate over the selected layers only, you can either choose selected layers or selected layers (sorted by index). In the first case, the layers will be processed in the same order in which you selected them. In the second case, they will be processed from top to bottom.
my layer variable
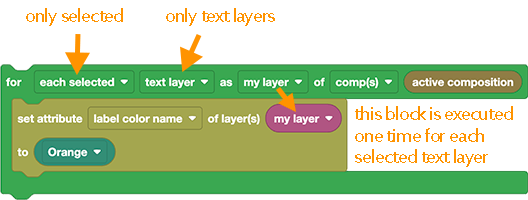
This block executes all the blocks which you plug inside of it many times - namely once for each of the layers. And while these blocks are executed, the variable my layer always contains that respective layer. In other words, you can use my layer as a placeholder for the layers over which the block loops.
example
This example sets the label color of all currently selected text layers:
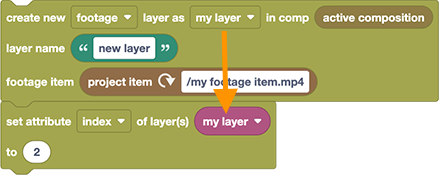
New Layer
This block creates a new layer. In the first row you can choose what kind of layer you want to create and choose the Composition in which it should be created.
The new layer is always inserted as the first layer of the comp (you can change its index with the Set Attribute of Layer block).
my layer variable
After the layer has been created, the block saves it in the variable my layer. Hence, you can use this variable if you want to do something with the layer in later blocks of your script. Here is an example, where we set the index of the layer to 2 (i.e. make it the second layer of the comp) after we created it:
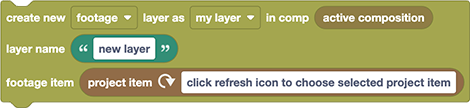
New Footage Layer (Video/Audio/Precomp)
If you want to create a new footage layer, you need to specify the name of the new layer and the project item, which should be used as the footage of the layer. Note that the project item can also be a composition; in that case, the new layer will be a precomp.
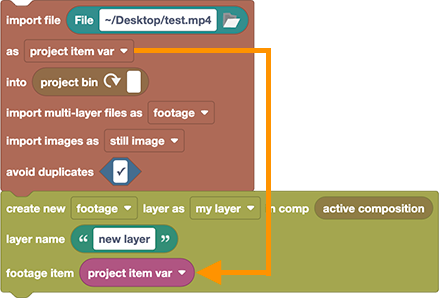
Example
This script first imports the file test.mp4 from the desktop into the After Effects project and then inserts it as a new layer into the active composition. Note that the Import File block saves the project item of the imported file in the variable project item var and then the New Layer block uses this variable to create a layer with that new project item.
New Null Layer

If you want to create a new null layer, you just need to specify its name.
New Adjustment Layer
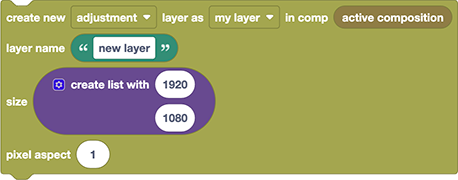
If you want to create a new solid, you need to specify the name of the new layer, its size (in pixels), its pixel aspect ratio (1 for the usual square pixels).
New Solid Layer
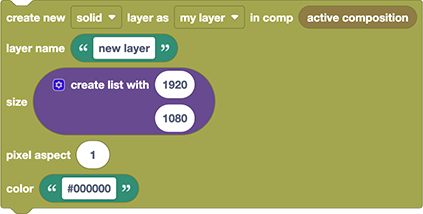
If you want to create a new solid, you need to specify the name of the new solid, its size (in pixels), its pixel aspect ratio (1 for the usual square pixels) and its color. For details on color values, see Ae Color.
New Camera Layer
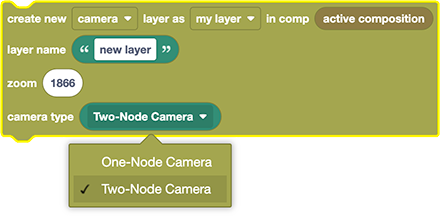
To create a new camera layer, in addition to the layer name, you can specify the zoom and the camera type. If you need to set any of the additional parameters of a camera, you can use the block Set Attribute of Property, to set the value of that property. Here is an example, where we set the "Depth of Field" property of the camera to On after we created it:
New Light Layer
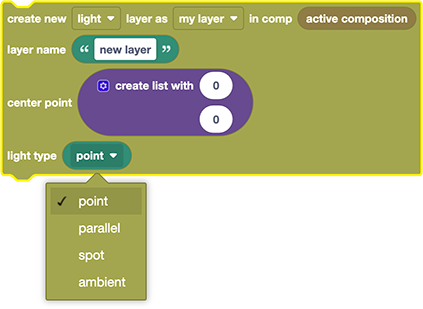
To create a new light layer, in addition to the layer name, you can specify the center point and the type of the light.
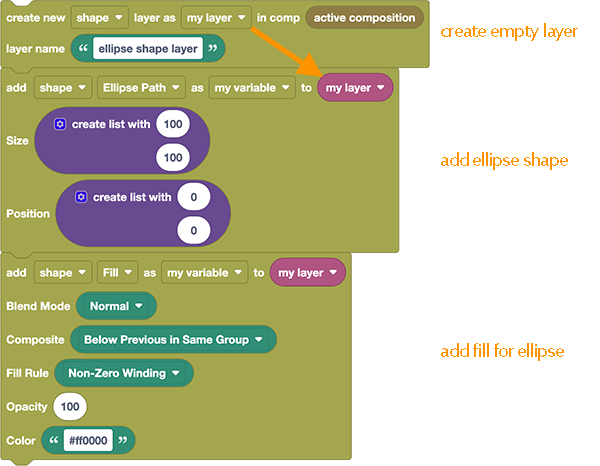
New Shape Layer

If you want to create a shape layer, the only parameter you need to specify is the name of the layer. The block will then create an empty shape layer for you, and you'll need to use the Add Effect/Mask/Shape block to add shapes to that layer. Here is an example, which first creates the layer and then adds an ellipse path with a red fill to it:
Add Effect/Mask/Shape

This block can create effects, masks or shapes on an existing layer. The block is highly dynamic and changes its content depending on the options you choose.
In the first row of the block, you can choose the kind of effect/mask/shape you want to create, as well as the Layer on which it should be created. The block also creates a variable my variable and assigns the Layer Property of the newly created effect/mask/layer to it. That way, you can easily access it from other blocks of your script, after it has been created.
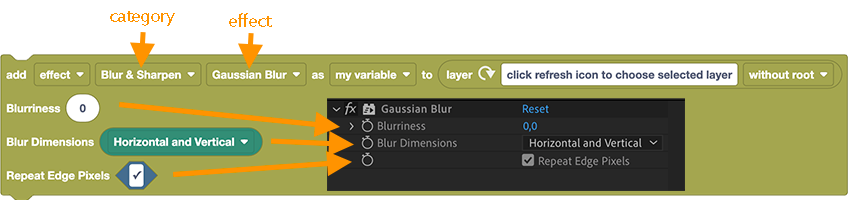
Adding Effects
To create an effect, use the dropdowns in the first row of the block to first choose the effect category and then the effect within that category. Once you've chosen an effect, the block contents updates and shows exactly the same parameters as the respective effect has in the Effect Controls panel. Here we've chosen the "Gaussian Blur" effect from the category "Blur & Sharpen":
You can set all effect parameters to the values you want and when the effect is created, it is initialized directly with these values.
The following video shows how to create a Gaussian Blur effect using this block:
Adding Masks
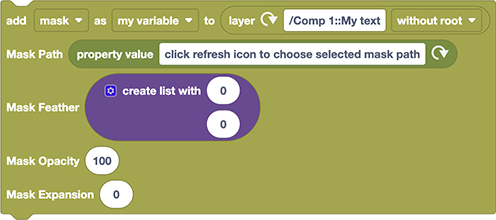
If you choose to create a mask (using the first dropdown of the block), the block shows you the following parameters:
Mask Path: A Property Value, which must be a path value. The easiest way to choose a path is to select a mask or shape path in the Timeline panel and click the refresh icon of the property value input to load the path into the block.
Mask Feather: A list (array) of two numbers for the feather amount in x and y, respectively.
Mask Opacity: A number for the mask opacity (from 0 to 100)
Mask Opacity: A number for the mask expansion (in pixels)
Adding Shapes
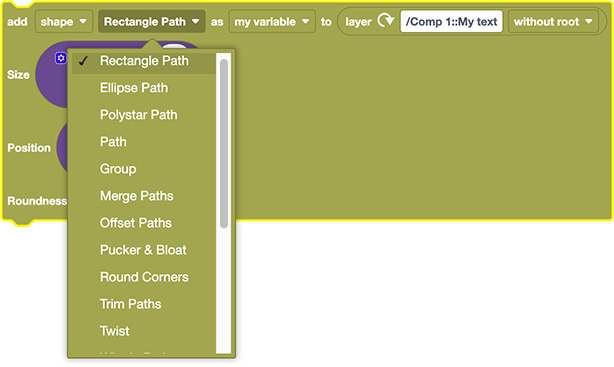
If you choose to create a shape (using the first dropdown of the block), in a second dropdown you can choose the type of shape, or shape modifier, that you want to create.
Exactly as for effects or masks, the block then shows the parameters of the respective shape type (or shape modifier) so you can adjust them as needed.
Creating Shapes inside Groups
Whereas effects and masks are always applied to a layer, shapes can be added either to the top level (i.e to the "Contents" group) or to subgroups. If you want to use a subgroup, you need to drag a Layer Property block on top of the layer input (since groups are also layer properties). In that block, you can then connect the subgroup that the new shape (or shape modifier) should be inserted into.
This video shows how to create a rectangle path first at the top level and then inside a subgroup.
Apply Preset

This block applies an After Effects preset to a single Layer or an entire list (array) of layers.
Preset Files
After Effects saves presets in .ffx files. If you click on the Open icon of the Preset File it shows the folder where After Effects saves these files by default, so you can pick where you'd like to save it.
Embedding Preset Files
Note that by default, the chosen preset file is not saved as part of your script. That means if you run your block script on another machine which does not have the preset file installed, the block script will fail.
To avoid that issue, you can include the preset file as an embedded file into your block script as follows:
- Create a new Embedded File block (which you find in the File category).
- In the Embedded File block choose the preset file you want to use .
- Drag the Embedded File block over the Preset File parameter of the Apply Preset block.
Now your script uses an embedded file whose contents is saved with your blockscript so that it is always available when you run the block script, whether the preset file is installed on the machine or not.
Example
For an example, see the Auto Resizing Text Box tool.
Get Attribute of Layer

Returns one of the attributes of the given composition, like its active camera, number of layers, or motion blur settings. For a description of all available attributes, see Set Attribute of Layer. Note the difference between layer attributes and layer properties - to change things like the position of a layer or effect controls, see the section Layer Properties.
Set Attribute of Layer

Sets any of the available attributes of a layer. After you choose an attribute, the inputs of the block change as needed for that attribute.
Note the difference between layer attributes and layer properties - to change things like the position of a layer or effect controls, see the section Layer Properties.
The available attributes of layers are listed below. If an attribute is marked as read-only, you can only get but not set this attribute.
3D layer
A logic value true or false corresponding to the 3D Layer switch of the the layer.
3D per character
For text layers only - a logic value which is true if the 3D per character option is enabled for the character animators.
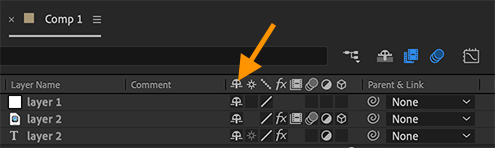
adjustment layer
A logic value which is true, if the layer is an adjustment layer (i.e. the Adjustment Layer switch is enabled for this layer).

audio active (at current time) (read-only)
A logic value which is true if the layer’s audio is active at the current time. For this value to be true, audioEnabled must be true, no other layer with audio may be soloing unless this layer is soloed too, and the time must be between the in point and out point of this layer.
audio enabled
A logic value which is true, the layer’s audio is enabled. This value corresponds to the audio toggle switch in the Timeline panel.
auto orient
The type of automatic orientation to perform for the layer. If you get this value, it will be one of the following texts
NO_AUTO_ORIENTALONG_PATHCAMERA_OR_POINT_OF_INTERESTCHARACTERS_TOWARD_CAMERA
If you set this value, you can either set it to one of the texts above, or to one of the numbers 1-4. Upper/lower case is ignored and instead of underscores you can also use spaces. So, instead of the text ALONG_PATH, you can also use the number 2, or the text along path.
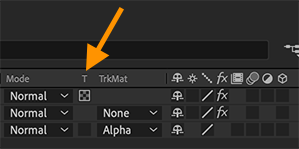
blending mode
The blending mode of the layer. If you get this value, it will be one of the following texts
ADDALPHA_ADDCLASSIC_COLOR_BURNCLASSIC_COLOR_DODGECLASSIC_DIFFERENCECOLORCOLOR_BURNCOLOR_DODGEDANCING_DISSOLVEDARKENDARKER_COLORDIFFERENCEDISSOLVEDIVIDEEXCLUSIONHARD_LIGHTHARD_MIXHUELIGHTENLIGHTER_COLORLINEAR_BURNLINEAR_DODGELINEAR_LIGHTLUMINESCENT_PREMULLUMINOSITYMULTIPLYNORMALOVERLAYPIN_LIGHTSATURATIONSCREENSUBTRACTSILHOUETE_ALPHA- note the mispelling of "SILHOUETTE"!SILHOUETTE_LUMASOFT_LIGHTSTENCIL_ALPHASTENCIL_LUMASUBTRACTVIVID_LIGHT
If you set this value, you can either set it to one of the texts above, or to one of the numbers 1-39. Upper/lower case is ignored and instead of underscores you can also use spaces. So, instead of the text LINEAR_DODGE, you can also use the number 22, or the text linear dodge.
can set collapse transformation (read-only)
A logic value which is true if collapse transformation can be enabled for this layer.
can set time remap enabled (read-only)
A logic value which is true if time remap enabled can be enabled for this layer.
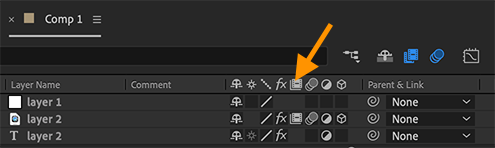
collapse transformation
A logic value which corresponds to the Collapse Transformation switch in the Timeline panel:
You can only set this attribute if the attribute Can Set Collapse Transformation is true. If you attempt to change it for other layers, Automation Blocks prints a warning in the console and continues with the block script (i.e. does not stop with an error).
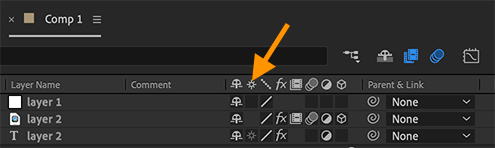
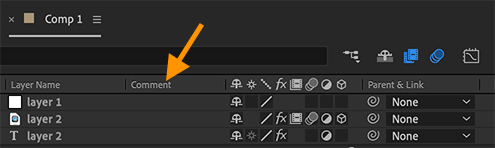
comment
The text shown in the comment column of the layer in the Timeline panel.
containing comp (read-only)
The Composition to which this layer belongs.
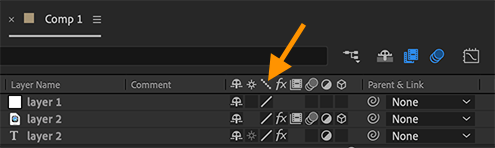
effects active
A logic value true or false indicating whether the effects on this layer are enabled or not.

environment layer
A logic value value, which is true if this layer is an environment layer. Setting this value to true or false has the same effect as if you right-click on the layer and enable/disable the option Environment Layer in the context menu.
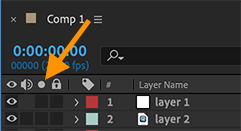
eyeball icon
A logic value which you can set to true or false to turn on/off the eyeball icon of the layer. Set it to false to hide the layer or trueto make it visible.
frame blending type
The frame blending type is a text which is one of the following values:
NO_FRAME_BLENDFRAME_MIXPIXEL_MOTION
If you want to set this value, you can either set it to one of those texts, or one of the numbers 1-3. Upper/lower case of the texts is ignored, and instead of underscores you can also use spaces. So, setting this value to NO_FRAME_BLEND, to 1, or to no frame blend gives exactly the same result.
guide layer
A logic value true or false indicating if the guide layer option is enabled for this layer. Setting this value to true has the same effect as if you right-click on the layer and activate the Guide Layer option.
has audio (read-only)
A logic value which is true if the layer has audio, i.e. is an audio file, a video file with audio channel or a precomp with audio.
has parent (read-only)
A logic value which is true if the layer has a parent layer.
has track matte (read-only)
A logic value value which is true if the layer has a track matte.
To change the track matte, use the attribute track matte type.
has video (read-only)
A logic value which is true if the layer has video. Note that this is also true for null layers.
height (read-only)
The height of the layer in pixels. See also the width and size.
in point
The in point of this layer as a time value (in composition time).

See also out point and start time.
index
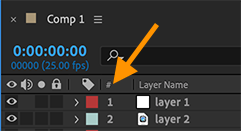
The index of the layer, which determines where the layer is located in the layer stack. The first layer has index 1. You can set this value to a new number to move the layer to a different location in the layer stack:
positive number
If you set the value to 8, it will become the 8th layer of the comp (unless the comp has less than 8 layers: in that case it will become the last layer. If you set the value to 0 the result is the same as if you set it to 1 (it will become the first layer of the comp).
negative number
If you set this value to a negative number, the index is counted from the end of the composition. So, if you set the value to -1, it will become the last layer of the comp and if you set it to -2, it will become the last but one.
is name set
A logic value which is true if the value of the name attribute has been set explicitly, rather than automatically from the source.
If this value is false, the layer name is identical to the name of the corresponding project item and when the name of the project item is changed, the layer name changes with it. Changing layer names can cause a lot of trouble, since Automation Blocks accesses layers by their name. So, a layer that is bound to a variable, cannot be found by Automation Blocks anymore if you change the layer name.
Text Layer Names
Unfortunately (due to a limitation in Ae's scripting API), this attribute is always true for text layers - even though by default the name of a text layer is identical to its text and also changes when the text is changed.
Avoiding Accidental Name Changes
To prevent layer name changes when a project item is renamed or when the text of a text layer is changed, you can set this attribute to true. If you do this, Automation Blocks will manually rename the layer (actually to its current name, so that the name does not really change). After this renaming operation, the layer name will be independent of the project item's name and the layer's source text.
Note that you cannot set this property to false. In other words, this is a one-way street: Whenever a layer has been renamed once, it cannot go back to its default name.
label color HexCode (read-only)
Returns the label color of the layer as a HexCode (like #ff0000 for 100% red or #000000 for black).
If the label color is set to None, it will return undefined.
label color id
The ID of the label color (0 for None, or 1 to 16 for one of the preset colors in the Labels preferences)
label color name
The label color name of the project item as configured in the Labels preferences (like Red, Sea Foam, or None).
By default, the block to set the label color name shows a convenient dropdown where you can pick any of the default label colors. Note that this dropdown does not update when you have configured custom label color names. If you have configured custom label colors in the preferences, you can either drag a Text block on top of the dropdown and enter the custom label name manually, or you can set the label color using the color id.
For an example, see the label color name of Project Items, which works in exactly the same way.
light type (only for light layers)
The light type is a text with one of the following values:
PARALLELSPOTPOINTAMBIENT
If you set this value, you can either set it to one of the texts above, or to one of the numbers 1-4. Upper/lower case is ignored, so you can set it to parallelor PARALLEL, for example (but when you get the value, it will always be upper case).
locked
A logic value which corresponds to the locked switch of the layer. Note that scripts can also only change layers if they are unlocked.
motion blur
A logic value which corresponds to the motion blur switch of the layer. Note that After Effects only calculates motion blur if it is activated for both the layer and for the comp.
name
The name of this layer (as a text).
out point
The out point of this layer as a time value (in composition time).
See also in point and start time.
parent
The parent Layer of this layer or null, if the layer has no parent.
To check if a layer has a parent, you can check if this attribute equals null or use the attribute has parent.
preserve transparency
A logic value which is true if the preserve transparency switch is enabled for this layer.
quality
The quality setting of this layer is a text with one of the following values:
BESTDRAFTWIREFRAME
If you set this value, you can either set it to one of the texts above, or to one of the numbers 1-3. Upper/lower case is ignored, so you can set it to BESTor best, for example (but when you get the value, it will always be upper case).
Note that in the Ae user interface, you control both quality and sampling quality with a single switch:
sampling quality
The sampling quality setting of this layer is a text with one of the following values:
BILINEARBICUBIC
If you set this value, you can either set it to one of the texts above, or to one of the numbers 1-2. Upper/lower case is ignored, so you can set it to BILINEARor bilinear, for example (but when you get the value, it will always be upper case).
selected
A logic value which indicates whether the layer is selected. To change the selection in a composition, you can either change this value for individual layers or use the block Select Layers.
selected properties (read-only)
A list (array) if the currently selected properties of this layer.
shy
A logic value value which is true if the shy switch for this layer is enabled.
size [w,h] (read-only)
The size of the layer as a list (array) of two numbers representing the width and height of the layer (in pixels). If you need just one of the two values, you can use the attributes width and height.
solo
A logic value value which is true if the solo switch for this layer is enabled.
source item
The Project Item of the source of this layer. If the layer has no source (like a Text layer, for example) the value is null. If the layer is a precomp, it is the comp item of that precomp.
start time
The start time of this layer as a time value (in composition time). Note the different between the start time and the in point:
See also in point and out point.
time remap enabled
A logic value true or false indicating if time remapping is enabled for this layer. You can only set this attribute for a layer if the attribute can set time remap enabled is true. If you attempt to set it for other layers, the attempt will be ignored and a warning is printed to the console (but the script does not stop with an error).
Setting this value to true has the same effect as if you right-click on the layer and choose "Time->Enable Time Remapping" in the context menu.
track matte type
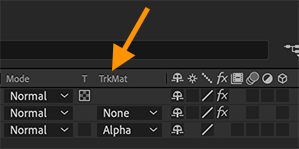
A text value which is one of the following:
NO_TRACK_MATTEALPHA_INVERTEDALPHALUMA_INVERTEDLUMA
If you want to set this value, you can either set it to one of these texts, or one of the numbers 1-5. Upper/lower case of the texts is ignored, and instead of underscores you can also use spaces. Hence, setting this value to NO_TRACK_MATTE, to 1, or to no track matte gives exactly the same result.
If you just want to check if this value is set to NO_TRACK_MATTE you can also use the attribute has track matte.
type (read-only)
One of the following text values:
TextLayerShapeLayerSolidLayerNullLayerPrecompLayerFootageLayerCameraLayerLightLayer
width (read-only)
The width of the layer in pixels. See also the height and size.
Duplicate Layer

This block duplicates the given Layer like the After Effects menu command Edit->Duplicate.
The duplicate is saved in the variable new layer var, so that you can easily access the layer in subsequent blocks of your script. For an example of how this works, see the block Copy Layer.
Copy Layer

Copies a single Layer to a different Composition. The layer in the new composition is saved in the variable new layer var, so that you can easily access the layer in subsequent blocks of your script.
The layer is inserted above the first currently selected layer or as the first layer of the comp if nothing is selected. To change the layer order, you can set the index of the layer.
Example
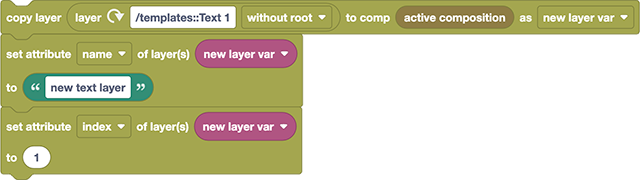
This example
- copies the layer with name
Text 1from the composition with nametemplatesto the active composition and then - sets the name of this newly inserted layer to
my text layerand - sets the index of it to 1, to ensure it is the topmost layer in the active comp, even if other layers have been selected.
Note how we use the variable new layer var, which is created by the first block, in the second and third blocks to access the newly created layer.
Delete Layer

Deletes the given Layer(s). You can give this block either a single layer as an argument, or also a list (array) of layers to delete all of them.
Example
This example deletes all currently selected layers (retrieved by the block List of Layers) from the active comp:

Select Layers

Selects or deselects the given Layer(s). You can give this block either a single layer as an argument, or also a list (array) of layers to (de)select all of them.
If you just want to get or set the selected status of a single layer, you can also get or set the selected attribute instead of using this block.
Examples
Empty Selection

This example deselects all layers in the active comp. To obtain a list of the layers which need to be deselected, it uses the block List of Layers.
Select Layers by Type

This example uses the same blocks to select all text layers in the active comp:
Advanced Selection by Search Word
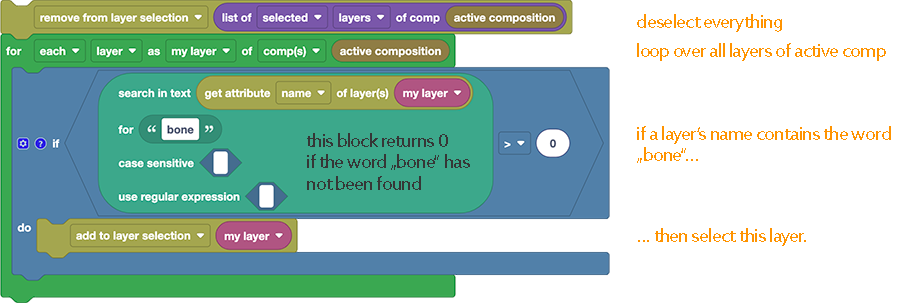
This is a more advanced example, which selects all layers which contain the text bone in their layer name.
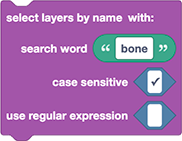
Select Layers By Name
The Automation Blocks library contains a ready to use example "Layers->Select Layers by Name". It is very similar to this example, but it hides the complex details and comes with an easy to use interface:
Precompose Layer(s)
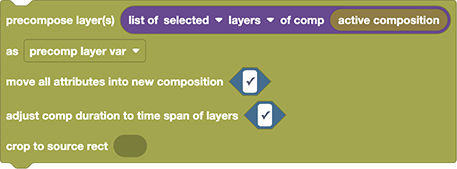
Precomposes the given layers. You can give either a single layer or an entire list (array) of layers as an argument.
If you give an entire list of layers, they are all precomposed together into a single comp. Also, in this case the "move all attributes" option is ignored, since it always needs to be true, if multiple layers are precomposed.
precomp layer var
After the precomp has been created, the precomp layer in the original comp is stored in the variable precomp layer var. If you want to access the precomp itself, you neeed to use the block Get Attribute of Layer to retrieve the Source Item of the precomp layer.
move all attributes
Is the same option as in the menu command Layer->Pre-compose
Adjust comp duration to time span of layers
Adjusts the precomp duration so that it starts at the eariest in point and ends at the latest out point of the precomposed layers.
crop to source rect
Here you can pass a list (array) with values [top, left, width, height] to crop the precomp to the area of the original comp. If you plug the Get Source Rect of Layer(s) block in here, for example, the precomp will be cropped to the area covered by these layers (make sure to get the value in Comp Space, not Layer Space).
Get Source Rect of Layer(s)

This block returns a list (array) with the values [left, top, width, height], which describe the area covered by the layer. This is similar to the layer attributes width, height and size, but with two major differences:
- For text and shape layers, their width and height is always the same as the composition, whereas the source rect represents the actual area covered by texts/shapes.
- The source rect changes over time (if shapes animate or texts change, for example), whereas the width and height of the layer does not.
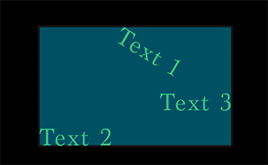
multiple layers
If you give this block an entire list (array) of layers, the returned result is a single rectangle that covers the area of all those layers. Note that this only makes sense if you use "comp space" (or if the layer spaces for all given layers are identical). The blue box here is the source rect for all the three texts in comp space:
comp space vs layer space
The source rect can be returned in comp space or in layer space. "Comp space" means that the positions are measured as pixel values of the composition (like the X/Y coordinates shown in the Info panel when you hover the mouse over the Composition panel). "Layer space" means that the coordinates are given measured in the coordinates of the individual layer (like the X/Y coordinates shown in the Info panel when you hover the mouse over a Layer panel instead of the Composition panel). The source rect in layer space only changes if you actually change the contents of the layer, whereas the source rect in comp space also changes when you move, scale or rotate the layer, for example.
In this example, the source rect of the text in layer space is visualized in red, and the source rect in comp space is dark grey: