Rigs & Presets
Auto Resizing Text Box
If you run the Auto Resizing Text Box Rig tool, it will create a box around each currently selected text layer:
The box is created with effects and expressions on the layer itself. It will update its size instantly when the text of the layer is changed. In case you want to delete the box later, just delete the effects on the text layer.
Pins & Boxes
If you want to create more complex dynamic layouts - like a box around multiple layers - take a look at our After Effects extension Pins & Boxes
Create Your Own Preset Rigs
The block code of the Auto Resizing Text Box Rig tool consists of just this single line:

All this code does is apply an After Effects preset named "Text Box Rig.ffx" to all selected text layers. If you have other After Effects presets and want to create Automation Blocks tools to apply those, just choose a different preset file in the block code and then choose the layers that the preset should be applied to.

For more details see the Apply Preset block.
Time-remapping properties
Repeating or retiming an animation is usually very tedious, especially if the animation includes keyframes on many different properties. The Time-Remap Selected Properties With a Slider tool allows you to connect such an animation to a single slider.
The slider is like a playback control for the animation: To play the animation, just keyframe the slider from 0 to 100%. The result is very similar to precomposing an animation and time-remapping the precomp, but the big advantage is that you don't need to create a precomp.
Overview
Clean & Simple
The rig created is very lightweight: There are no extra layers, no precomposing etc. The only things that the tool creates are
- the slider, which you use to control the animation and
- expressions on the keyframed properties, which should react to the slider.
Adding More Properties Later
If you've already created a rig and want to add more keyframed properties later, just select those properties and run the tool again. In the dialog which asks for the slider name, make sure to enter the same name that you used before (unless those new properties should be controlled by a different slider).
Time-Remapping Multiple Animations
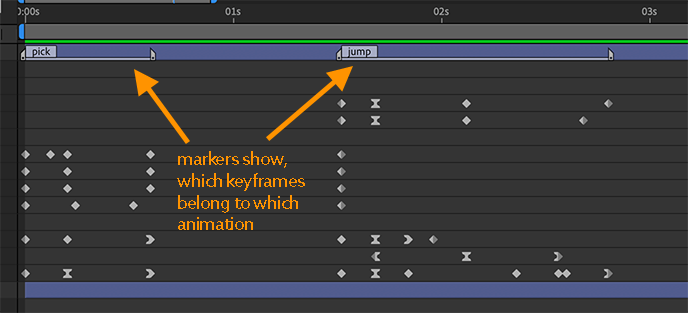
The Automation Blocks tool Time-Remap Selected Properties With Multiple Animations is very similar to the basic variant of the tool, except that it uses two sliders in order to handle multiple animations. As in the basic variant, the first slider controls the playback of the animation. The second slider allows you to pick which of the animations should be played:
The workflow with this tool for multiple animations is identical, except that before running it you need to create some markers on the layer, to indicate which keyframes should belong to which animation. Just create one layer marker for each animation and then set the duration of the marker to the duration of the respective animation:
The following tutorial shows this workflow in detail:
Import File, Apply Preset & Blending Mode
Do you have some favorite texture or other footage that you use all the time? Now you can do this in a single click:
- import the footage file into your project if it has not been imported before
- create a new layer with the file in the active comp
- set a blending mode of your choice for the layer
- apply any Ae preset to the layer (to apply effects, expressions and keyframes to it, for example)
Consider this tool as a template for creating your custom tool. The main part of the code consists of a single block, where you can easily choose the texture image, preset and blending mode.
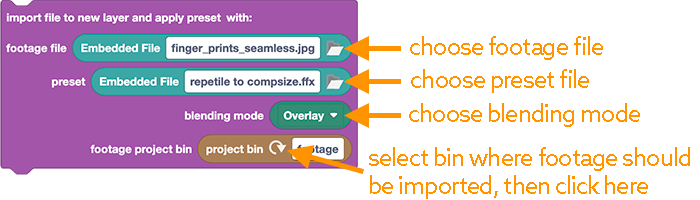
To create a custom tool for your favorite texture, just change those values as desired and save the block script in your user library.
Detailed Tutorial
Repeat Animation on Selected Layers
This tool allows you to repeatedly apply keyframes to many layers. By default, the tool applies a step by step move downwards, but you can also use your own custom keyframes. On the left is the result with the default keyframes, and on the right with custom keyframes:

If you want to use a custom sequence of keyframes, you need to first load those keyframes into the tool and then apply it to your target layers:
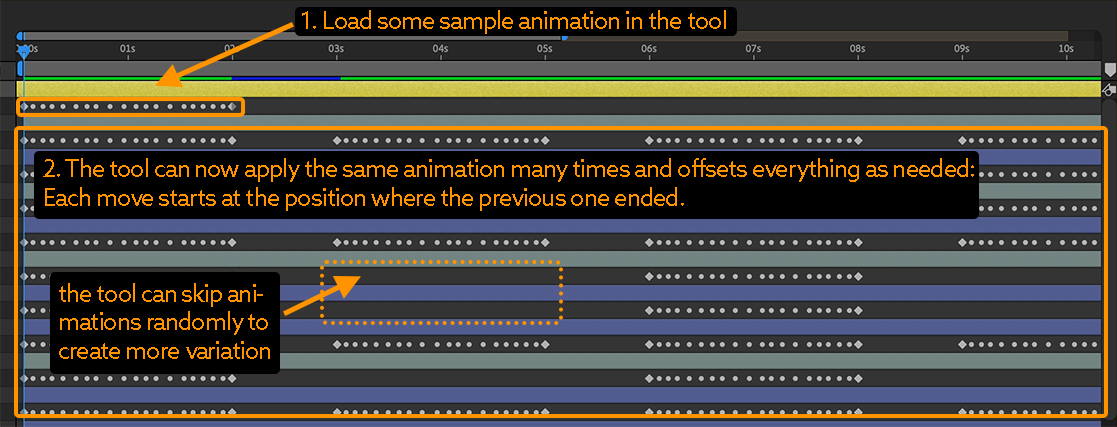
The tool then repeatedly pastes the loaded keyframes on all selected layers. However, in contrast to a normal cut & paste operation, the tool adjusts the pasted animation as needed, so it continues seamlessly from the location where the layer currently is. Also, a probability parameter gives the option of skipping the animation from time to time randomly, to create more variation.
Loading Keyframes and Adjusting Parameters
To load keyframes into the tool or adjust any of the parameters, you need to edit the block code:
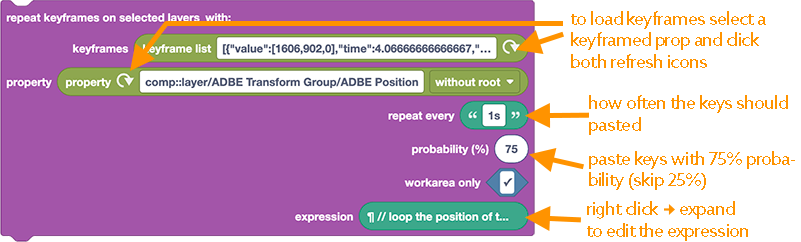
To load custom keyframes, just select the property with those keyframes and then click the refresh button on the two first parameters of the block. The first parameter stores the actual keyframe data, and the second one the property that the keyframes should be applied to (the tool not only supports position animations, but also keyframes on any properties).
Expression
The last parameter of the block code is an expression that is applied on top of the pasted keyframes. By default, this expression ensures that if a layer moves outside the comp, it appears at the other side again. If you don't want this to happen, you can simply delete the expression parameter. If you want to use your own expression, you can right click on the expression parameter and choose expand to edit the code of the expression.
Detailed Tutorial
This tutorial explains in detail how to use and customize the tool. It also includes some advanced tricks, like using keyframes on multiple properties of the layer.
Preserving Position of Layers
This tool adjusts the keyframes before pasting them to make sure the animations start at the current position of the layer. However, this is only the case if the properties have at least one keyframe at or before the start of the workarea. So, if your layers don't have any keyframes yet, add a keyframe at the beginning of the workarea before running the tool.