Keyframes
With Automation Blocks you can build your own library of keyframed animations and reuse them easily. The keyframes library does much more than a basic cut & paste - it automatically adjusts keyframes to the current context.
Overview
This video gives a quick overview of the keyframe preset workflow:
Save Preset
You can use this script to save keyframe presets to your Automation Blocks Keyframes Library, which you can then apply to other layers using the Apply Preset script.
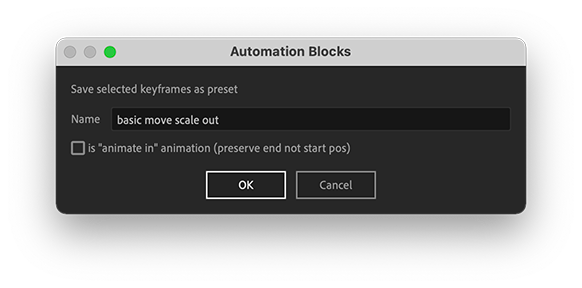
Just select some keyframed properties and execute the script Keyframes Library - Save Preset. When you execute the script, a dialog pops up where you can set the name of the preset that will be saved:
Selection
Make sure you have at least one property that has keyframes selected.
"Animate In" animations
If your animation is intendet to let a layer appear in the scene, make sure to check the checkbox is "animate in" animation.
This changes the behavior of the automatic keyframe adjustment. By default, it makes sure that the newly inserted animation starts at the current position. However to animate things into the scene, you want the inserted animation to end at the current position instead.
Renaming & Deleting Presets
Each preset is saved as a csv file in the folder ~/Documents/Automation Blocks/Keyframes Library/. If you created a preset with name "my fancy move", for example, the folder will contain a file "my fancy move.csv". To remove or rename presets later, you can simply delete or rename these files.
Choosing a Different Preset Folder
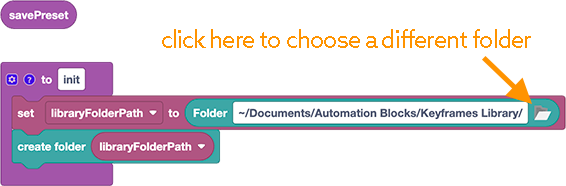
If you want to save your preset files in a different location, you can simply adjust the path in the block script:
Same Preset Folder for Save and Apply Preset
If you change the preset folder, make sure to change it in both the Save Preset and the Apply Preset script, because otherwise the Apply Preset script will look for presets in the wrong location.
Apply Preset
To apply a preset that you've saved in your Automation Blocks Keyframes Library, execute the script Keyframes Library - Apply Preset.
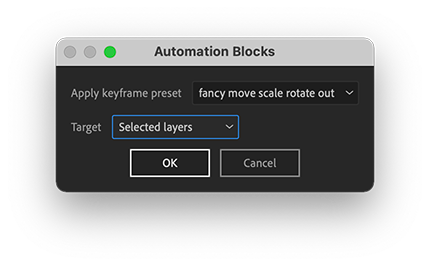
In the dialog you can choose the preset you want to apply and a target, which can be one of the following options:
- selected layers
- selected properties
- all layers
Automatic Adjustment of Keyframes
Applying a preset is very similar to pasting the keyframes via cut & paste. The keyframes are pasted so that the first one starts at the current time. Any existing keyframes of the properties are preserved (as long as they don't overlap with the preset) - and even adjusted to fit seamlessly to the inserted keys.
Automatic Adjustment of Preset Keys
What makes the presets much more powerful than normal cut & paste of keyframes is that the keyframe values are adjusted to fit the existing value or keyframes and even any already existing keyframes after the newly inserted ones are shifted to create a seamless animation.
Example Position Animation
Let's say the preset is a position animation, and in the original animation of the preset the layer moves from [500,500] to [600,500], i.e. 100px to the right. If you now apply the preset to a layer whose position at the current time is at [200,200], then we don't want it to jump to [500,500] when we apply the preset, but instead want the preset animation to start at [200,200]. The preset is thus adjusted so that it now starts at [200,200] and ends at [300,200] i.e. it starts where the layer currently is and still moves 100px to the right.
Example Opacity Animation
This adjustment not only works for position animations, but also for other properties. Say the preset animates the opacity of a layer to change from 100% to 50%. If you then apply this preset to a layer whose opacity is 80% at the current time, then the preset will be adjusted so it animates from 80% to 30%, instead of from 100% to 50% (i.e. the opacity is still decreased by 50%, but now starting at 80 instead of 100).
Automatic Adjustment of Keys After Preset
As described in the previous section, the keyframes of the preset are adjusted to fit the keyframes before the preset. If the property also has keyframes after the time span, where the preset was applied, then those keys are adjusted to fit to the keyframes of the preset in the same way.
Example
If the preset moves the layer 100px upwards, then all keyframes after the preset are also moved upwards 100px.
To Which Properties are the Keyframes Applied?
The presets contain the keyframes plus the the property that they belong to (technically speaking, the match name of the property is saved). This means that the preset knows if the keyframes belong to the position or scale of a layer, for example, or perhaps to the Blurriness slider of a Gaussian Blur effect. When you apply a preset, it will be applied to all properties that fit, i.e. keyframes which belong to the layer position are applied to the layer position (of course...), and keyframes which belong to a Blurriness slider are applied to all Gaussian Blur effects that the script can find - or are ignored, if no such effect exists on the target.
Presets & Multiple Layers
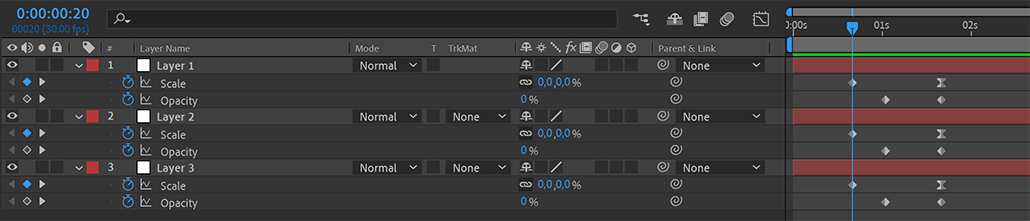
If you are targeting the preset to multiple layers/properties, the keyframes will be applied to every property that matches the property the keyframes were saved from.
For example, a preset that was saved from the Transform/Opacity property will be pasted into every Transform/Opacity property within the targeted layers/properties.
Selection when preset was created:

Loaded preset result:
Copy, Paste & Fit Keyframes
For a quick cut & paste of keyframes, it's a hassle to save a preset each time. With this script, you can cut & paste keyframes with the the same automatic adjustment of keyframes that our keyframe preset tools use, but without the need to save a preset.
This tool has no user interface. Instead' you need to adjust the block code of the script - but don't worry, it's very easy:
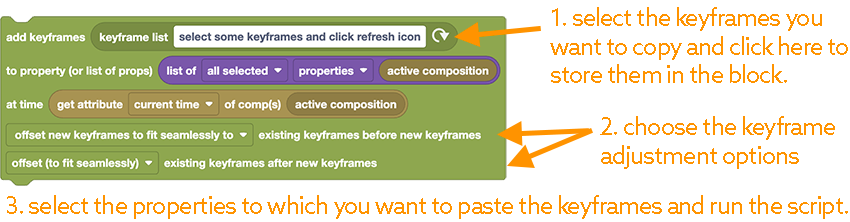
Here is a detailed description of the steps:
In the first step, you load the selected keyframes into the block. These are stored as part of the script now. So if you save a copy of the block script now and load it at any time later on, the keys will still be there.
Compared to a normal cut & paste operation of keyframes, the extra power of this tool is that the keyframes can be adjusted to fit seamlessly into the existing keyframes on the layer (and even those can be adjusted, too). You can control the exact behavior with the two dropdown options at the bottom of the block. For details, see the description of the Add Keyframes block, which we are actually using here.
When you run the script now, it will paste the keyframes onto all selected layers (so the first keyframe starts at the current time).