Pixelate Faces Automatically
Blurring or pixelating faces is one of the most common privacy tasks in editing — interviews with bystanders in the background, street footage, documentary material, GDPR requests. Doing it by hand means masking, tracking, and re-checking every shot.
The library workflow Pixelate Faces In Active Sequence automates this: it samples analysis frames from your active sequence, detects and tracks faces with OpenCV's YuNet face detector running in the bundled Python runtime, and then builds the pixelation directly in your timeline — non-destructively.
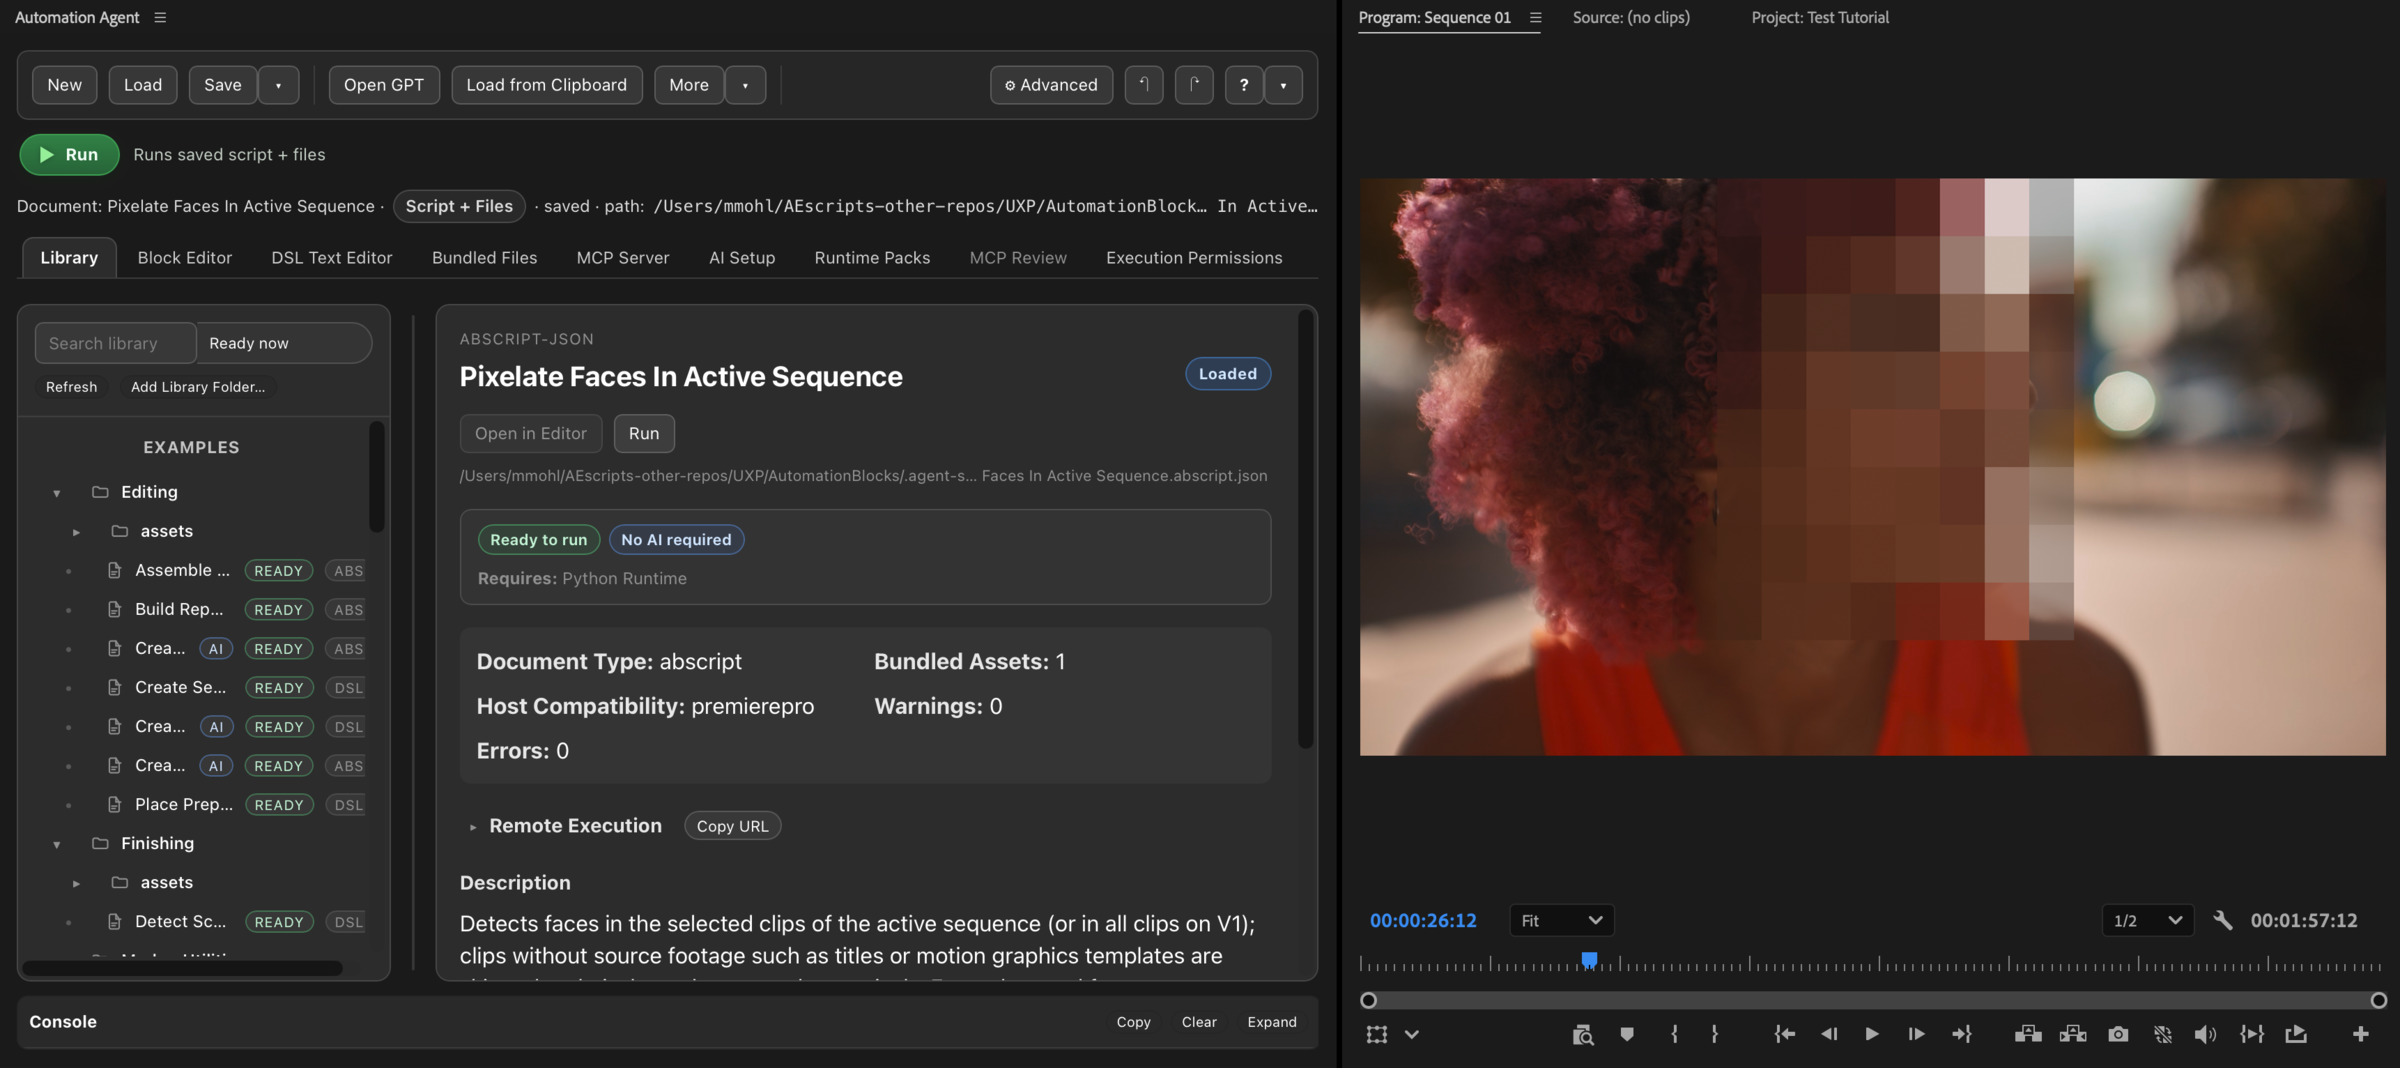
This is a good example of what Runtime Packs make possible: real computer vision on your timeline content, well beyond what timeline scripting alone can do.
This recipe uses Automation Agent for Adobe Premiere. If you are here for the workflow solution first, that is fine. Use the product overview and Set Up Your AI for the setup path.
When This Is Useful
- interviews or street footage where bystanders must stay anonymous
- documentary material with faces that may not be shown
- GDPR / privacy requests on already-edited timelines
- a fast first pass you refine by hand afterwards
What You Need First
- A sequence with the clips you want to process selected (any video track), or all of them on track V1 if you prefer processing the whole track.
- The Python Runtime Pack with face-detection support. The panel's preflight reports what is missing and points you to the
Runtime Packstab.
No Workflow AI provider is needed — the detection is deterministic image analysis, not model judgment.
How To Run It
- Open the
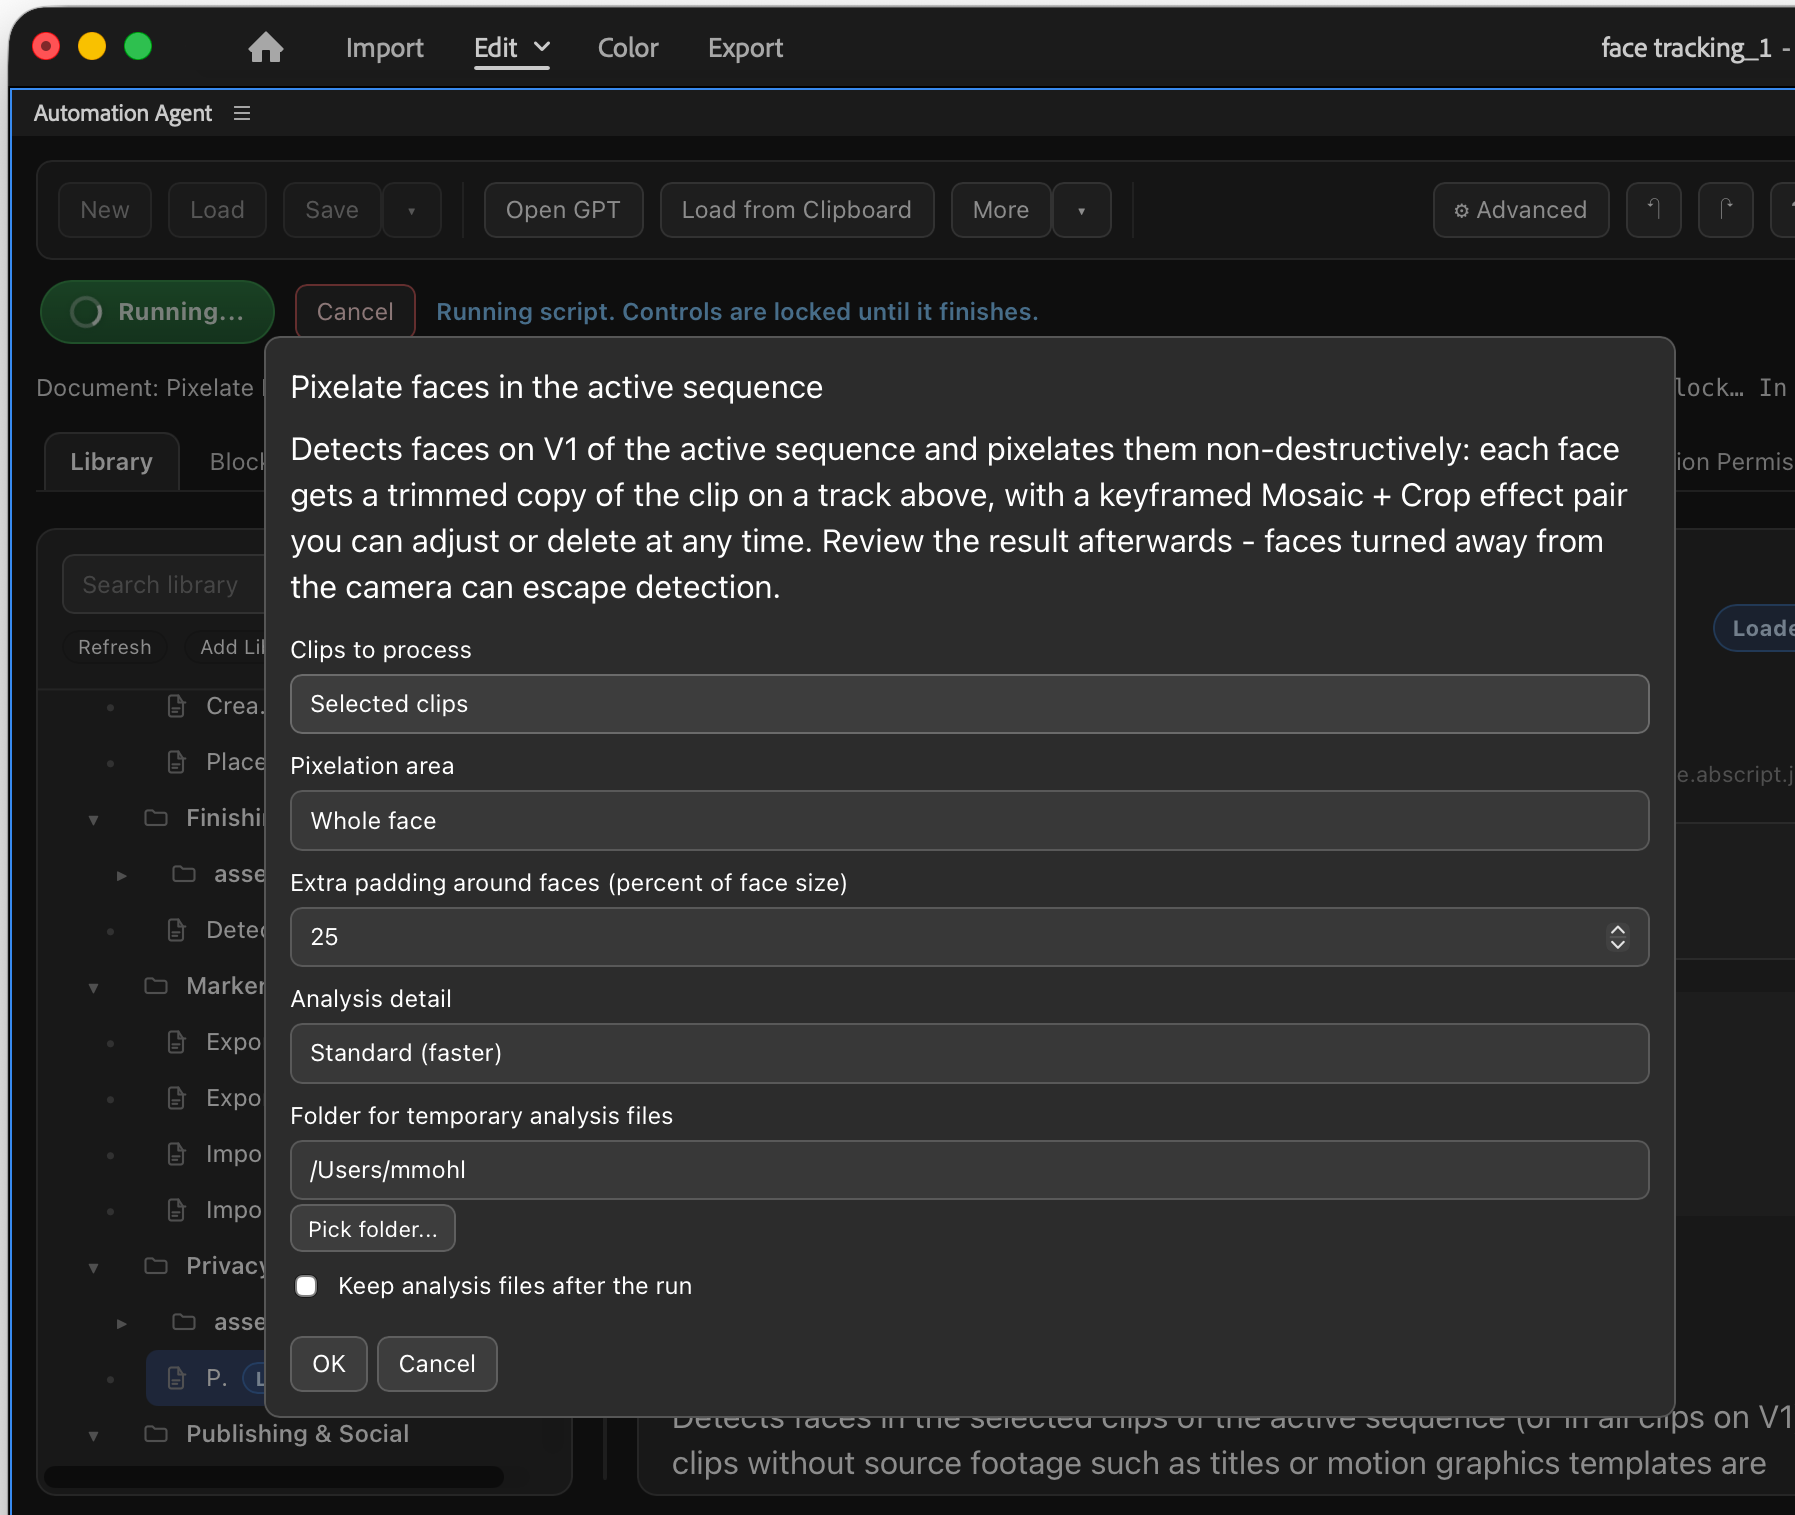
Librarytab and load Pixelate Faces In Active Sequence fromExamples > Privacy. - Choose whether to process the selected clips (default) or all clips on V1, whether to pixelate the whole face or only an eye bar, how much padding the pixelated area gets, the analysis detail (choose fine for small or sideways faces), and where temporary analysis files go.
- Run it. The workflow exports small analysis frames from the sequence, detects and tracks faces, and builds the pixelation in your timeline.
Video Walkthrough
This walkthrough shows the fully local analysis path, the resulting editable Mosaic/Crop clips, and the review steps for false detections and difficult shots.
Expected Result In Premiere
Every accepted face-track fragment becomes a trimmed copy of its clip on a reusable empty video track, carrying a Mosaic effect and a keyframed Crop that follows the face. The workflow uses completely empty tracks wherever they already occur in the sequence, including gaps between occupied tracks, and automatically creates additional video tracks when there are not enough. Track creation uses temporary video Track Item clones and never places source audio. Existing clips from earlier runs or manual edits remain untouched. Non-overlapping fragments share a track; overlapping faces use separate tracks. To preserve the original clip and its effects safely, the workflow prepares each exact fragment on one temporary working track before copying that already-trimmed fragment into its lane. The working clip is removed immediately, although the empty working track may remain. The workflow then verifies every result against its expected source clip, output lane, and timeline range before reporting success. Nothing about your original clips changes. Clips without source footage — titles, motion graphics templates, nested sequences — are skipped and counted in the summary.
Because the result is ordinary clips with ordinary effects, you stay in control:
- drag Crop keyframes if a box drifts
- swap Mosaic for Gaussian Blur if you prefer
- trim, retime, or delete any pixelation like any other clip
- overlapping faces get separate tracks, while fragments that do not overlap reuse the same track
Temporary analysis files are removed after a successful run unless you choose to keep them.
Limitations And Review Points
- Always review the result. Faces turned away from the camera or in strong profile can escape detection for a few moments — add or extend a pixelation copy by hand where needed.
- Clips transformed with Motion (Position, Scale, Anchor Point — static or keyframed) are compensated: the pixelation follows the face inside the transformed picture. Rotation and mixed clip/sequence resolutions without frame-size conforming are not supported.
- Very brief detections are dropped as noise; in extremely crowded shots more than four simultaneous faces are skipped and reported in the summary. Four is both the simultaneous-face limit and the maximum number of occupied pixelation output tracks. One additional empty working track may remain after the run.
- When the first or last reliable detection touches an image edge, the pixelation can extend up to one second to the clip boundary so a face entering or leaving frame stays covered.
- Speed-ramped or reversed clips are not supported in this version.