Project Setup Tools
New Project From Template
As a video editor, you're all too familiar with the hassle of setting up a new project from scratch every time. Creating folders, copying files, naming sequences – it's a time-consuming process. But what if you could automate all of this, getting everything ready with just a few clicks? Enter Automation Blocks for Premiere Pro.
Step 1: Setup Your Templates
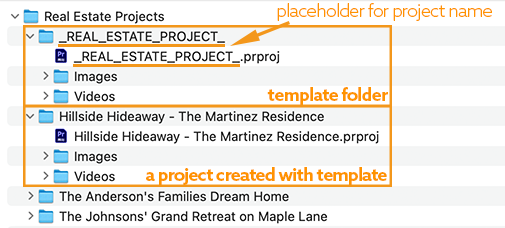
To create new projects, you need to tell Automation Blocks once, what your projects look like. For this you need to create a template folder, which contains all folders and files, which each new projct should contain. In the names of any files and folders, you can use a placeholder, which will be replaced by the actual name of the project. Here is a very basic template folder, with placeholder _REAL_ESTATE_PROJECT.
You can create multiple templates, if you work on different kinds of projects. Here is another example for a template, this time using the placeholder _TEMPLATE_NAME_:
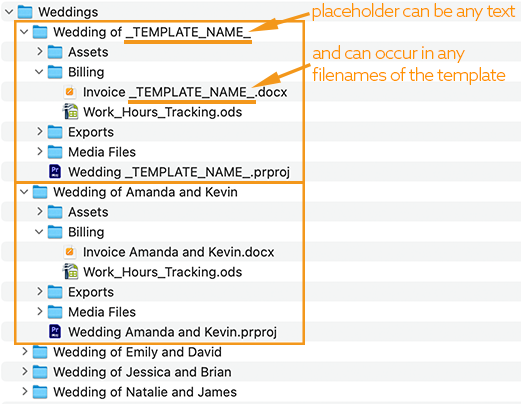
Note that the placeholder can be used in any file or folder names. In this example, we decided that the template should contain a text document for the invoice of the project, for example, and the invoice file contains the placeholder, too.
Our template folder also contain a Premiere Pro project (i.e. a prproj file). Like any other file in the template folder, also the prproj file will be copied for each new project. Hence, this Premiere Pro project should contain all the bins, sequences or also footage items, which you want to have in every new project. Automation Blocks also opens and customizes the Premiere Pro project(s) in the template folder for you. Therefore, also inside the project you can use the placeholder to include the project name into the names of project items:
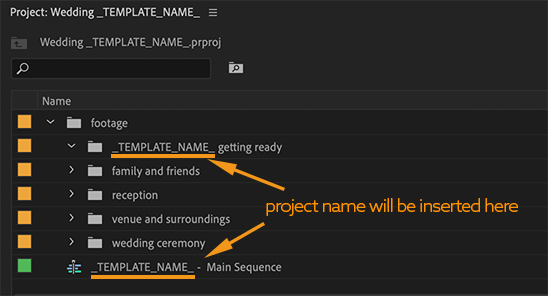
So if you create a project with name "Natalie and James", for example, the bin "TEMPLATE_NAME getting ready" will become "Natalie and James getting ready".
Step 2: Customize the New Project Tool
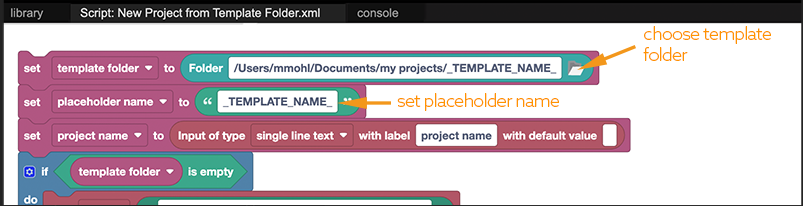
After setting up your template folders (and projects), you need to tell Automation Blocks to actually use those. To do this, open the block code of the tool New Project From Template Folder and modify the block code as follows:
- in the first block choose your template folder
- in the second block enter the placeholder name you used in your template
- save the customized tool in your user library
If you use multiple templates, you can configure one variant of the tool New Project From Template Folder for each of them, such that you have one tool New Wedding Project and one tool New Real Estate Project, for example. Alternatively, if you prefer having all variants in a single tool, you can use the tool New Project From Template Folder Multi. This tool offers a dropdown to choose any of your templates. The customization of the dropdown is a little bit more complex, please see the video tutorial at the beginning of this section for details.
Step 3: Create New Projects
Once you've set everything up, creating new projects is as easy as entering the project name in the inputs panel and running the tool.

Customization: Project Folder Input
This tutorial shows how to customize the Automation Blocks script to include an input for the target folder. Perfect for:
- Creating multiple projects based on the same template in different locations.
- Keeping templates and projects in separate locations for better organization.
You find the modified block script in our Community Library at
Project Management/Create and Import/New Project from Template Folder with Target Folder Input.xml
Here is the direct download link to the file:
Import Footage and Create Sequence
The Automation Blocks tool Import Footage and Create Sequence imports an entire folder of footage, including subfolders, and replicates the folder structure in your project panel and inserts it into a new sequence. Just select your folder, set your project bin, name your sequence, and you're ready to roll.

If you're working with image sequences, don't forget to check the box to include them, since otherwise each image will be imported individually.
To save even more time, you can set default values for the inputs like sequence name and target bins to match your typical requirements. You can customize all default values of the user interface easily in the first block of the tools block code:
