One-Click Slideshow
Overview
If you ever need to create a slideshow from a bunch of photos, this script is for you! Just run the script, choose a folder with images (and optionally also music) and it creates a slideshow from start to finish.
In more detail, the script does the following:
- it imports the entire folder you choose (including subfolders) in your Premiere Pro project
- it creates a new sequence
- it inserts all images it can find in your folder (or subfolders) into that sequence
- it scales the images to fill the frame accuratly and adds a subtle pan and zoom (a.k.a. Ken Burns effect) to bring the images to life. The effect is achieved with position and scale keyframes such that you can easily tweak it later, if you want.
- if there is any music in your folder (or subfolders), it inserts as many of those songs as necessary into the sequence to cover the entire duration of the slideshow. The last song is also faded out at the end of the slideshow using volume keyframes.
Usage
- Run the script one click slideshow with the Automation Blocks Launcher (or with the Automation Blocks Editor)
- In the dialog that pops up, choose a folder that contains the images you want to use for the slideshow. If you want background music, make sure the music file(s) are in that folder, too. Both images and music can also be in subfolders.
- Wait until the script is done - this may take about a minute.
Customization Tips
If you open the block code of the tool, you see a single block where you can customize all basic settings. If you want to see the full block code, you can right-click on the small block below it and choose expand in the context menu:
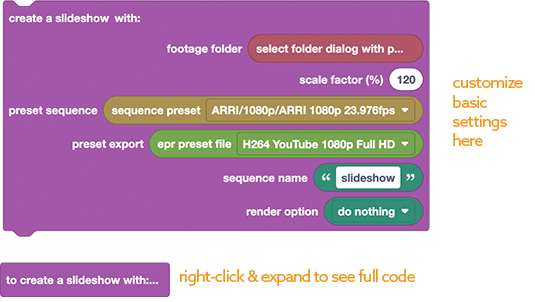
Here is a description for the things you can customize in the main block.
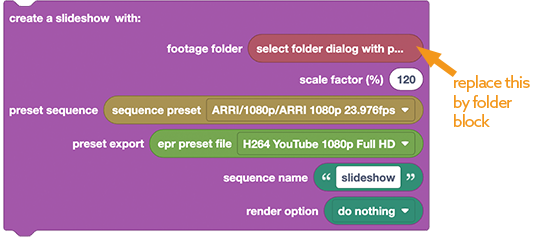
Footage Folder
By default, the tool shows a popup dialog where you can choose the folder with your images. I you want to hard-code a folder directly, you can delete the red "select folder dialog" block and behind it, a Folder block will show up, where you can choose the folder you want to use.
Scale Factor
The scale factor controls the zoom at the beginning of each image. It is set to 120 by default, which means that each image starts with a zoom of 120% and ends with 100% (where 100% means that the image exactly fills the frame). If you set the parameter to 100, the images do not zoom at all, since then both start and end are at 100%.
Preset Sequence
This option controls the details of the sequence, like its resolution and frame rate. The dropdown contains Premiere Pro's default presets, which are installed on most systems. If you want to use your own custom preset, you can simply delete the yellow block with the sequence preset dropdown. Behind it, a File block will show up, where you can choose your custom sequence preset (*.sqpreset) file.
Preset Export
If you choose the option to add the slideshow to the render queue, you can choose here the export preset for that. The dropdown contains the most commonly used export presets. If you want to use a custom preset, just delete the green block with the dropdown and behind it a File block will show up, where you can choose your custom export preset (*.epr) file. Learn here how to create your own epr files.
Sequence Name
Here you can choose the name for the sequence for your slideshow.
Render Option
In this dropdown you have three (pretty self-explanatory) choices:
- do nothing
- add to render queue
- add to render queue and start rendering
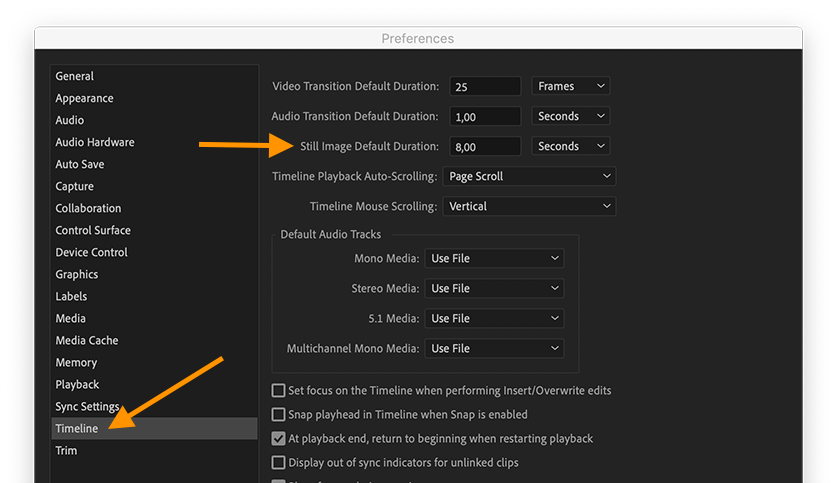
Image Duration
To change how long each image is visible, you don't even need to modify the script. Just go to the Premiere Pro Preferences and adjust the Still Image Default Duration in the Timeline section to your liking.
Bug in Premiere Pro 24.2
Bug in PR2024 - User Canceled Error
In Premiere Pro 2024 versions 24.2 and probably also 24.3 there is a bug which causes the select dialog to fail. If your Pr version still has this bug, the slideshow tool will show a "user cancelled" error whenever you try to run the tool.
Workarounds:
- use a newer Pr version (the current beta or any release newer than Pr 24.3 already contains the fix)
- replace the select folder dialog block by a folder block and enter the folder containing your slideshow images directly in that block.