Keyboard Shortcuts and Remote Triggers
This workflow is for simple, repeatable triggers from outside the panel.
Use it when you want to start a saved Automation Agent for Adobe Premiere script from:
- a keyboard shortcut tool
- Stream Deck
- Touch Portal
- Keyboard Maestro, AutoHotkey, Raycast, Alfred, or similar local trigger tools
What This Is Good For
This is a good fit when you already know which automation you want to run and just want a fast trigger.
Typical examples:
- start a recurring project cleanup script from a shortcut
- run an import helper from Stream Deck
- launch a utility script from Touch Portal
- trigger a script and then answer a follow-up dialog inside Premiere if needed
How To Use It
- If the script is not already in the Library, save it to a User Library.
- Select it in the Library panel.
- In the details view, open
Remote Execution. - Copy the generated local URL.
- Paste that URL into your shortcut or button tool.
When that URL is opened, the saved script runs automatically.
Open it from a local shortcut, button tool, or direct browser navigation. The helper rejects requests that browsers identify as coming from another website through Fetch Metadata or Referrer headers. A browser that sends neither header may still trigger a known URL, so do not publish Remote Execution links on websites or share them with untrusted parties. Existing copied URLs keep working from local trigger tools; they do not need to be regenerated for the shared-helper update.
The URL always points to the saved library entry, not to whatever is currently open in the editor.
Before setting up a shortcut or button, make sure the local Automation Agent helper is running and that the trigger tool runs on the same computer as Premiere.
Set Up Popular Tools
Any tool that can open a local URL or run a small HTTP GET request can trigger Automation Agent scripts.
AutoHotkey on Windows
AutoHotkey is a practical choice when you want normal keyboard shortcuts on Windows. The ready-to-run Automation Agent preset already assigns every official Quick Timeline Action and limits those shortcuts to regular Premiere Pro and Premiere Pro (Beta).
Download the Quick Timeline Actions AutoHotkey preset
The preset requires AutoHotkey v2 and uses the following default assignments:
| Shortcut | Quick Timeline Action |
|---|---|
Ctrl + Alt + Shift + 1 through 5 | Solo V1/A1 through V5/A5 Tracks |
Ctrl + Alt + Shift + Left | Solo Previous V/A Tracks |
Ctrl + Alt + Shift + Right | Solo Next V/A Tracks |
Ctrl + Alt + Shift + 0 | Unsolo All V/A Tracks |
Ctrl + Alt + Shift + S | Solo Tracks Containing Selected Clips |
Ctrl + Alt + Shift + D | Disable Selected Clips |
Ctrl + Alt + Shift + E | Enable Selected Clips |
Ctrl + Alt + Shift + A | Select All Disabled Clips |
Ctrl + Alt + Shift + K | Stack Selected Project Clips |
Stack Selected Project Clips opens a dialog before placing the Project-panel selection at the playhead. Start track and track spacing both default to 1; press Return to accept them. Create all required destination tracks first; missing target tracks stop the tool before any placement. Track spacing is intended for multichannel audio: choose enough space for every channel track Premiere creates. Existing clips, including channels inserted earlier with insufficient spacing, may be overwritten. Undo works per placed source.
For example, with only A1–A4 present, two six-channel sources at start track 4 and spacing 6 target A4 and A10. Create tracks through A10 first, even though the first placement would create channels on A5–A9.
Install and start the preset
- Install AutoHotkey v2.
- Download the preset above and keep the
.ahkfile in a location where you can edit it later. - Double-click the file. AutoHotkey now runs in the Windows notification area.
- Make sure the local Automation Agent helper is running, then focus Premiere and press one of the shortcuts in the table.
All thirteen Quick Timeline Actions are ready immediately; you do not have to copy their links into the preset first. The shortcuts also continue to work after you accept an update to the official actions.
The preset automatically makes its shortcuts available only while Premiere is the active app. This works with both regular Premiere Pro and Premiere Pro (Beta). In other apps, the same key combinations keep their normal behavior.
After editing the preset, double-click it again to apply your changes. AutoHotkey automatically replaces the previous running copy. You can also right-click its notification-area icon to reload, pause, or exit it.
If none of the shortcuts starts an action, first check that the Automation Agent
helper is running. Then copy any Remote Execution link on your computer. If it
begins with http://127.0.0.1:53126 or http://127.0.0.1:53127, open the preset
in a text editor and change the number in this line to match:
AutomationAgentPort := 53125
Start the preset automatically with Windows
- Press
Windows+R. - Enter
shell:startupand pressEnter. - Put a shortcut to the downloaded
.ahkfile into the folder that opens.
Using a Windows shortcut instead of copying the .ahk file itself means that
you only have to edit one file later.
Disable or change a bundled shortcut
Each assignment occupies one line in the preset. To disable one, add a semicolon at the beginning of its line. The semicolon starts an AutoHotkey comment:
; ^!+5::RunAutomationAgentTool("recipe-quick-timeline-activate-comparison-lane-5")
Remove the semicolon to enable it again. To change the shortcut, replace only
the part at the beginning of the line, before ::. Leave everything after
:: unchanged.
AutoHotkey uses compact symbols for modifier keys:
| Symbol | Key or behavior |
|---|---|
^ | Ctrl |
! | Alt |
+ | Shift |
# | Windows key |
< or > | Require the left or right version of the modifier that follows |
~ | Also pass the keystroke through to the active application |
Write letters and numbers directly. Other common keys use short names:
| Write | Key |
|---|---|
k, 7 | Letter K, number 7 on the top number row |
Space, Enter, Tab, Esc | Spacebar, Enter, Tab, Escape |
Left, Right, Up, Down | Arrow keys |
Home, End, PgUp, PgDn | Navigation keys |
Backspace, Delete | Delete keys |
F1 through F24 | Function keys |
Combine a key name with any modifier symbols before ::. For example:
F11::        ; F11
^Space::     ; Ctrl + Spacebar
!Left::      ; Alt + Left Arrow
+Down::      ; Shift + Down Arrow
^!7::        ; Ctrl + Alt + 7
^!k::        ; Ctrl + Alt + K
^!+Enter::   ; Ctrl + Alt + Shift + Enter
#F12::       ; Windows + F12
<^Delete::   ; Left Ctrl + Delete
~^Right::    ; Ctrl + Right Arrow, also passed through to Premiere
If one of these shortcuts overlaps with a Premiere shortcut, only the
Automation Agent action runs. Premiere does not also run its own command. Add
the optional ~ symbol only when you deliberately want both actions to run.
There is no shortcut set that can be guaranteed unused on every computer: Premiere shortcuts can be customized, Windows reserves some combinations, and other utilities may already use shortcuts. The preset therefore starts with uncommon three-modifier combinations, and you can change any assignment that does not suit your setup.
Add any saved Automation Agent script
The preset supports two kinds of shortcut lines:
- The included Quick Timeline Actions use
RunAutomationAgentTool(toolId). You normally do not need to edit those lines unless you want to change their shortcut. - Use
RunAutomationAgentUrl(url)when you want to add any other saved script by pasting the link copied from itsRemote Executionsection.
To add your own saved script:
- Select the script in the Automation Agent Library.
- Open
Remote Executionand click the copy button. - Open the downloaded
.ahkfile in a text editor. - Find the
Add shortcuts for any other saved Automation Agent script herecomment near the bottom. - Add one line in that marked area, choose the shortcut on the left, and paste the copied URL between the quotation marks:
^!+F11::RunAutomationAgentUrl("PASTE_REMOTE_EXECUTION_URL_HERE")
After saving, reload the preset. Shortcuts added in this marked area remain limited to Premiere.
Shortcuts on macOS
The ready-made Apple Shortcuts template is the quickest built-in Mac setup. It
already sends the Remote Execution request and checks whether the active app's
name contains Premiere, so it works with current Premiere Pro releases and
Beta without sending a request while another app is frontmost.
Download the macOS Keyboard Shortcut template
- In the Automation Agent Library, select the saved script, open
Remote Execution, and copy its URL. - Download the template above, then double-click the downloaded
.shortcutfile to install it. Shortcuts asks for the Automation Agent Remote Execution URL as part of the installation; paste the URL you copied. - In the Shortcuts app, give the newly installed shortcut a clear name.
- Open its details and choose
Add Keyboard Shortcut, then press the key combination you want to use. - With Premiere frontmost, use the keyboard shortcut once. macOS may ask for permission to connect to Automation Agent's local server the first time; allow that local connection.
The macOS keyboard assignment itself is global, so choose a combination that
does not conflict with shortcuts you need elsewhere. The template's condition
means it does nothing unless the active application name contains Premiere;
it does not send a request to Automation Agent from another app.
For another Automation Agent tool, download and install a fresh copy of the
template, supply that tool's Remote Execution URL, then name it and assign a
different keyboard shortcut. You can also duplicate an installed shortcut and
replace only its URL; keep the If condition so it remains scoped to Premiere.
Alternative: App Shortcut in System Settings
If you need macOS to reserve the key combination only while Premiere is active,
you can expose a Shortcuts action as a Quick Action in the Services menu and
bind that menu item through System Settings > Keyboard > Keyboard Shortcuts > App Shortcuts. Choose Adobe Premiere Pro and enter the Quick
Action's menu title exactly. This is more involved and more brittle than the
template above, so use it only when the global keyboard reservation is a
problem.
Touch Portal
Touch Portal is a good fit when you want the same kind of trigger button on a phone or tablet.
- Create a button.
- Add an
HTTP Getaction. - Paste the copied Library URL.
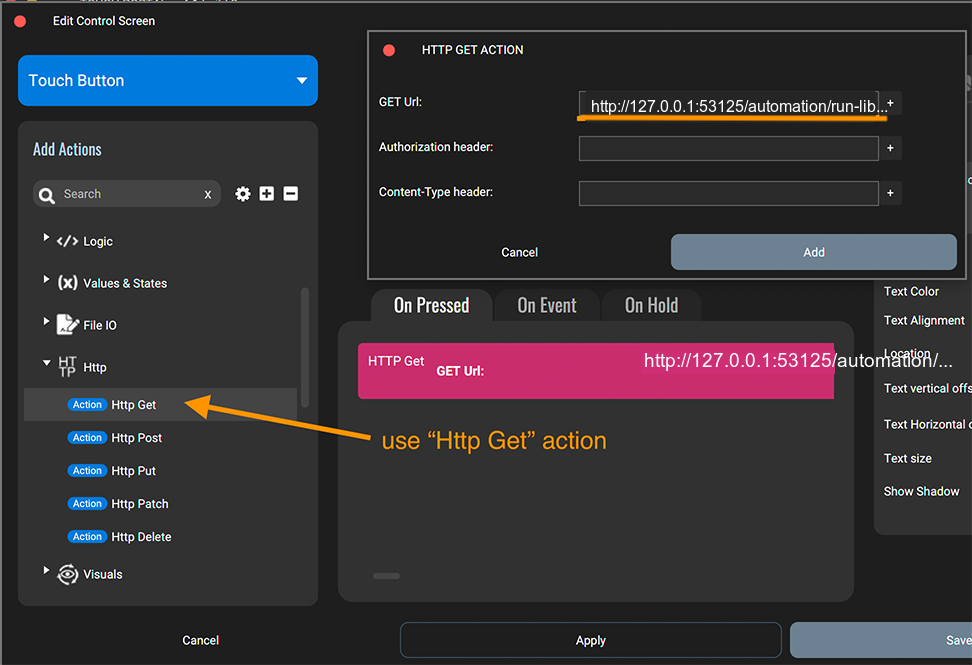
This gives you a simple remote control surface for repetitive editing actions without needing extra hardware.
Stream Deck
Stream Deck works well when you want a dedicated hardware button for one script.
- Create a new button action.
- Use the action that opens a website or URL.
- Paste the copied Library URL.
- If your Stream Deck setup offers a background GET option, enable it so the request runs silently instead of opening a visible browser tab.
This is especially useful for cleanup scripts, import helpers, or recurring utility actions you want on one physical key.
Keyboard Maestro on macOS
Keyboard Maestro is a good Mac option when you want richer automation around a shortcut, such as multiple steps, variables, or additional conditions.
- Create a new macro.
- Add a Hot Key trigger.
- Add a
Get URLaction and paste the copied Library URL. - Optionally put the macro into a Macro Group that is active only in Premiere.
Put the macro in a Macro Group that is active only in Premiere when you want Keyboard Maestro itself to own the app-specific shortcut.
Raycast, Alfred, and similar launcher tools
Launcher tools such as Raycast and Alfred are also a good fit.
In practice, you usually create one of these:
- a quicklink that opens the copied local URL
- a small shell-command action that runs
curl "YOUR_REMOTE_EXECUTION_URL" - a hotkey that triggers one of those actions
That gives you a very lightweight keyboard-driven setup without needing a full macro package.
Icons For Quick Timeline Actions
The official Quick Timeline Actions include a matching button icon pack for Stream Deck, Touch Portal, and other shortcut surfaces.
Download the complete icon pack (ZIP)
The ZIP contains:
- the ready-to-run AutoHotkey v2 preset for all thirteen actions
- compact glyph and labeled variants for all thirteen Quick Timeline Actions
- editable 512 × 512 SVG masters
- 144 × 144 PNG files for Stream Deck
- 256 × 256 PNG files for Touch Portal
- an installable Touch Portal icon pack (
.tpi) - a manifest that maps every file to its stable Automation Agent Example ID
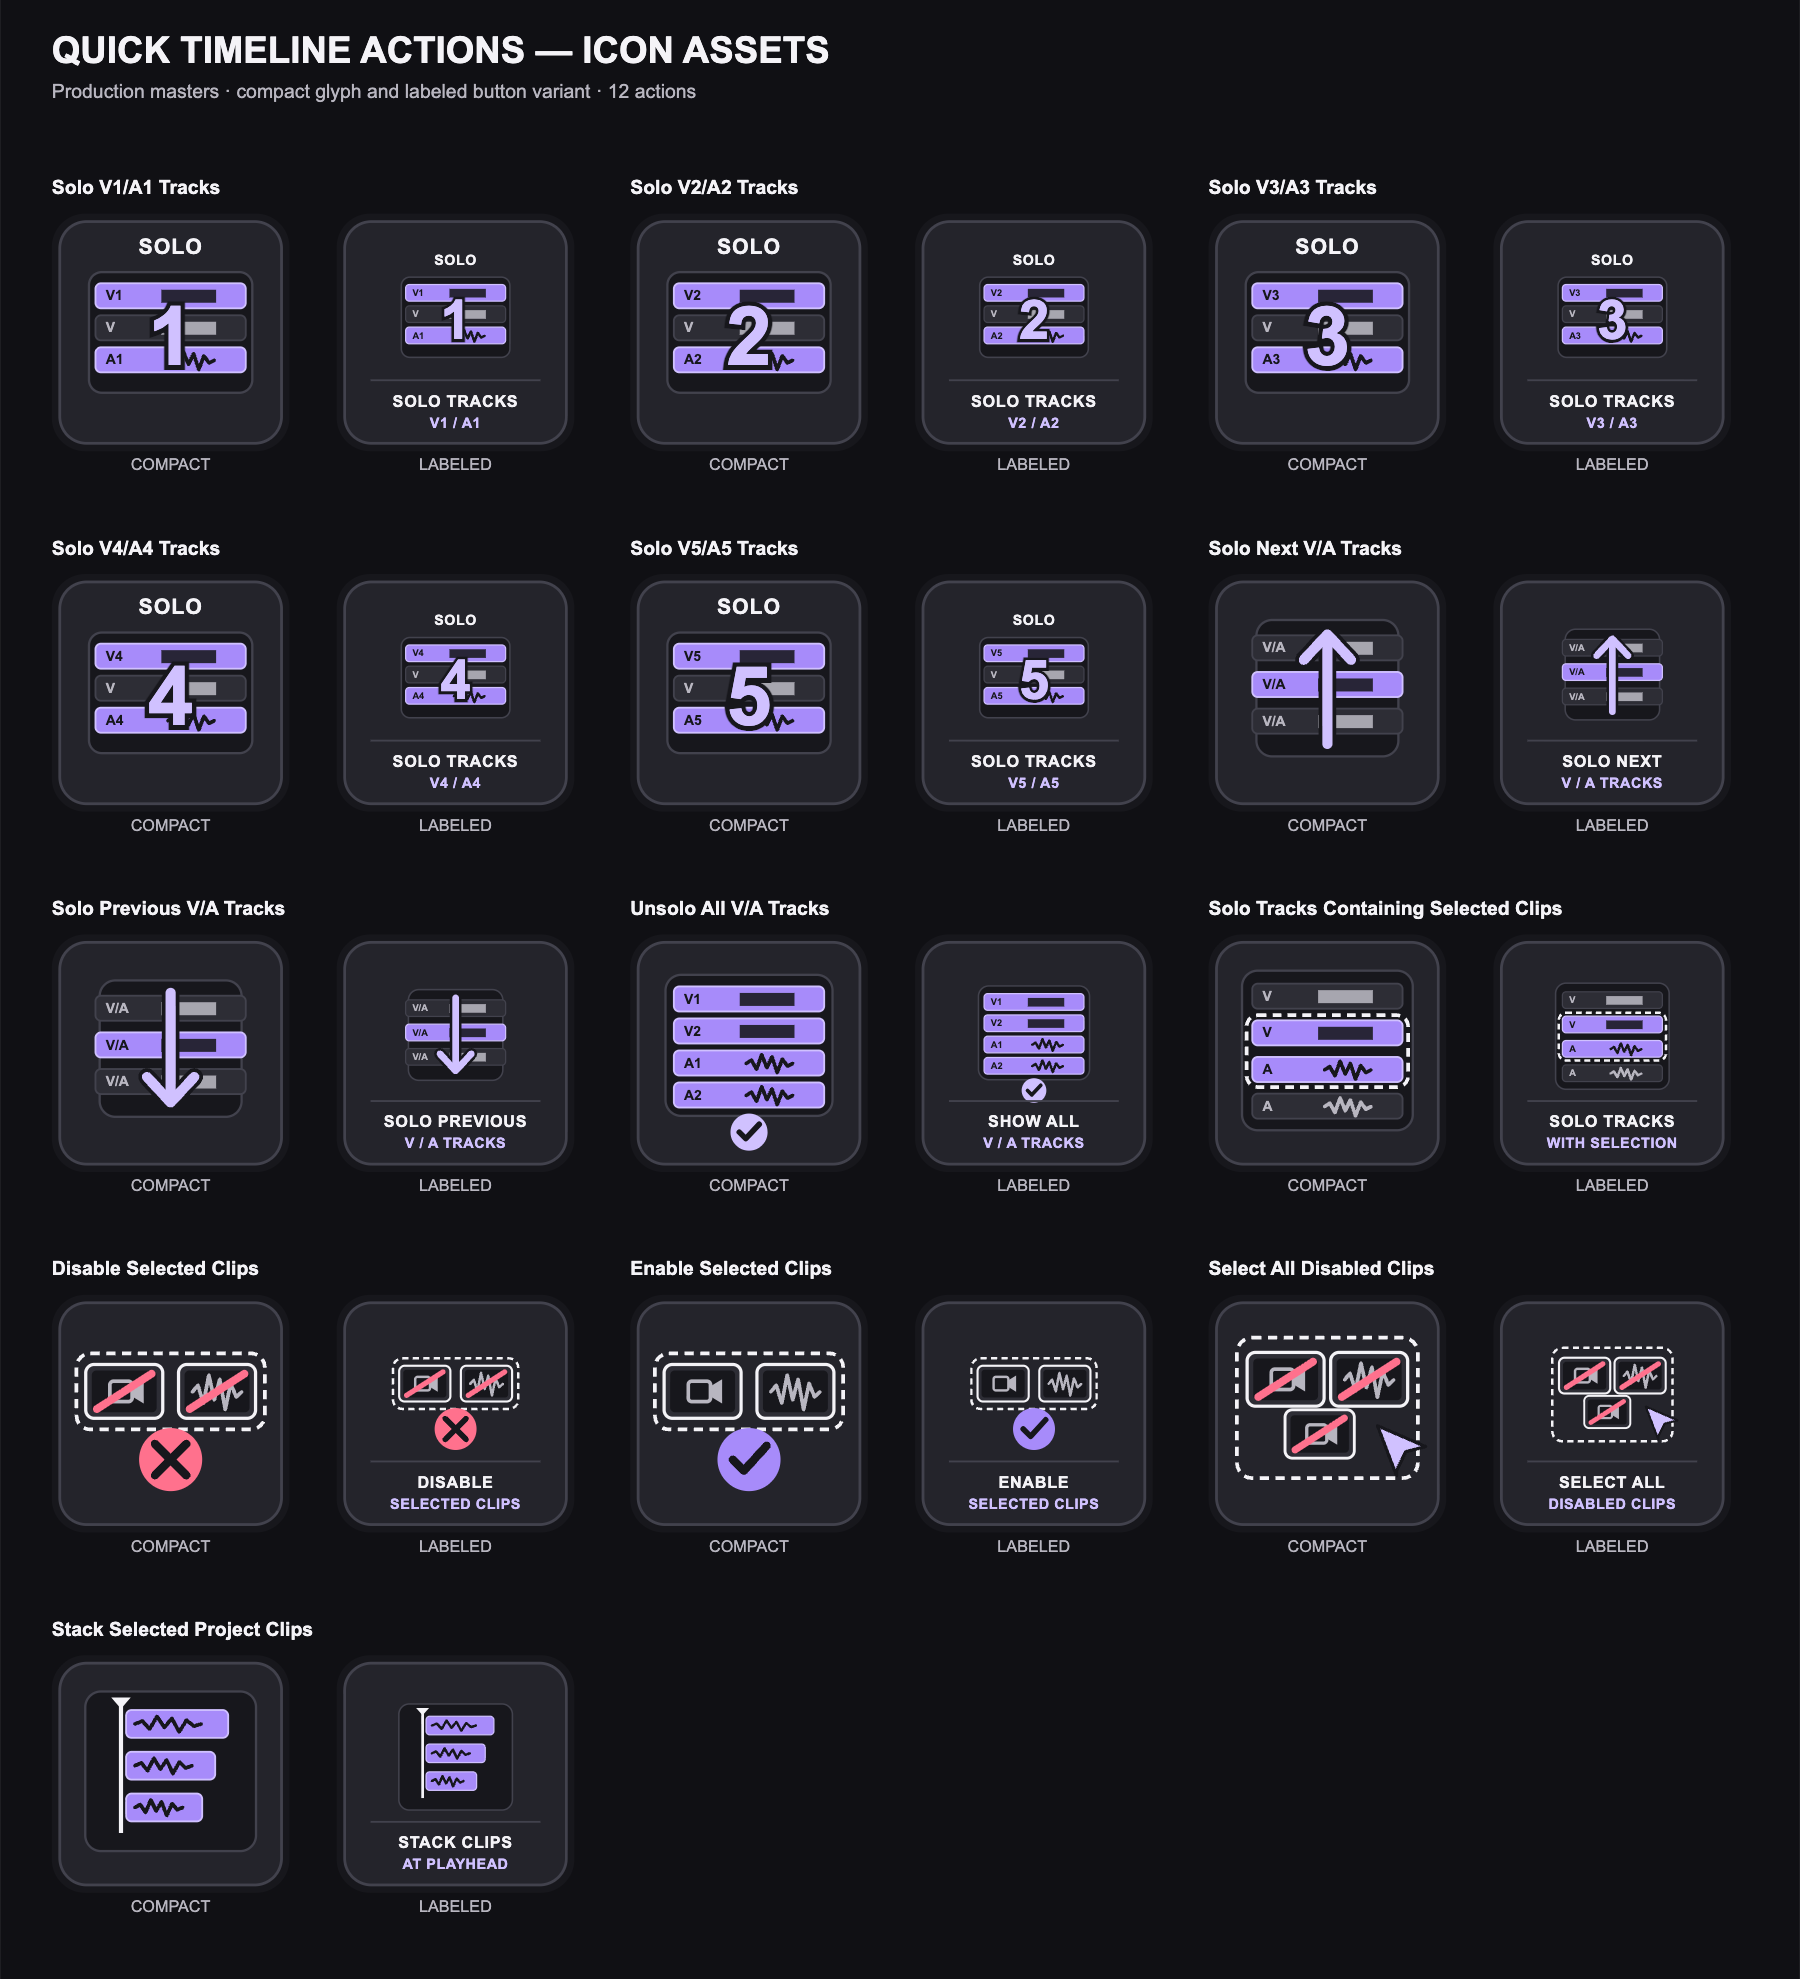
Choose the compact variant for small or densely arranged buttons. Choose the labeled variant when the button is large enough to benefit from a short text description.
These are command icons, not live status indicators. A button assigned to
Solo V2/A2 Tracks, for example, continues to show that command even if Track
visibility or mute state later changes inside Premiere.
Icons For Marker Utilities
The ten Marker Utilities have their own matching icon pack for Stream Deck, Touch Portal, and other shortcut surfaces. The shared Premiere-style marker shape makes these commands easy to distinguish from the Quick Timeline Actions, while Timeline, clip, Project-panel, file, and delete motifs identify the individual operation.
Download the complete Marker Utilities icon pack (ZIP)
The ZIP contains:
- compact glyph and labeled variants for all ten Marker Utilities
- editable 512 × 512 SVG masters
- 144 × 144 PNG files for Stream Deck
- 256 × 256 PNG files for Touch Portal
- an installable Touch Portal icon pack (
.tpi) - a manifest that maps every file to its stable Automation Agent Example ID
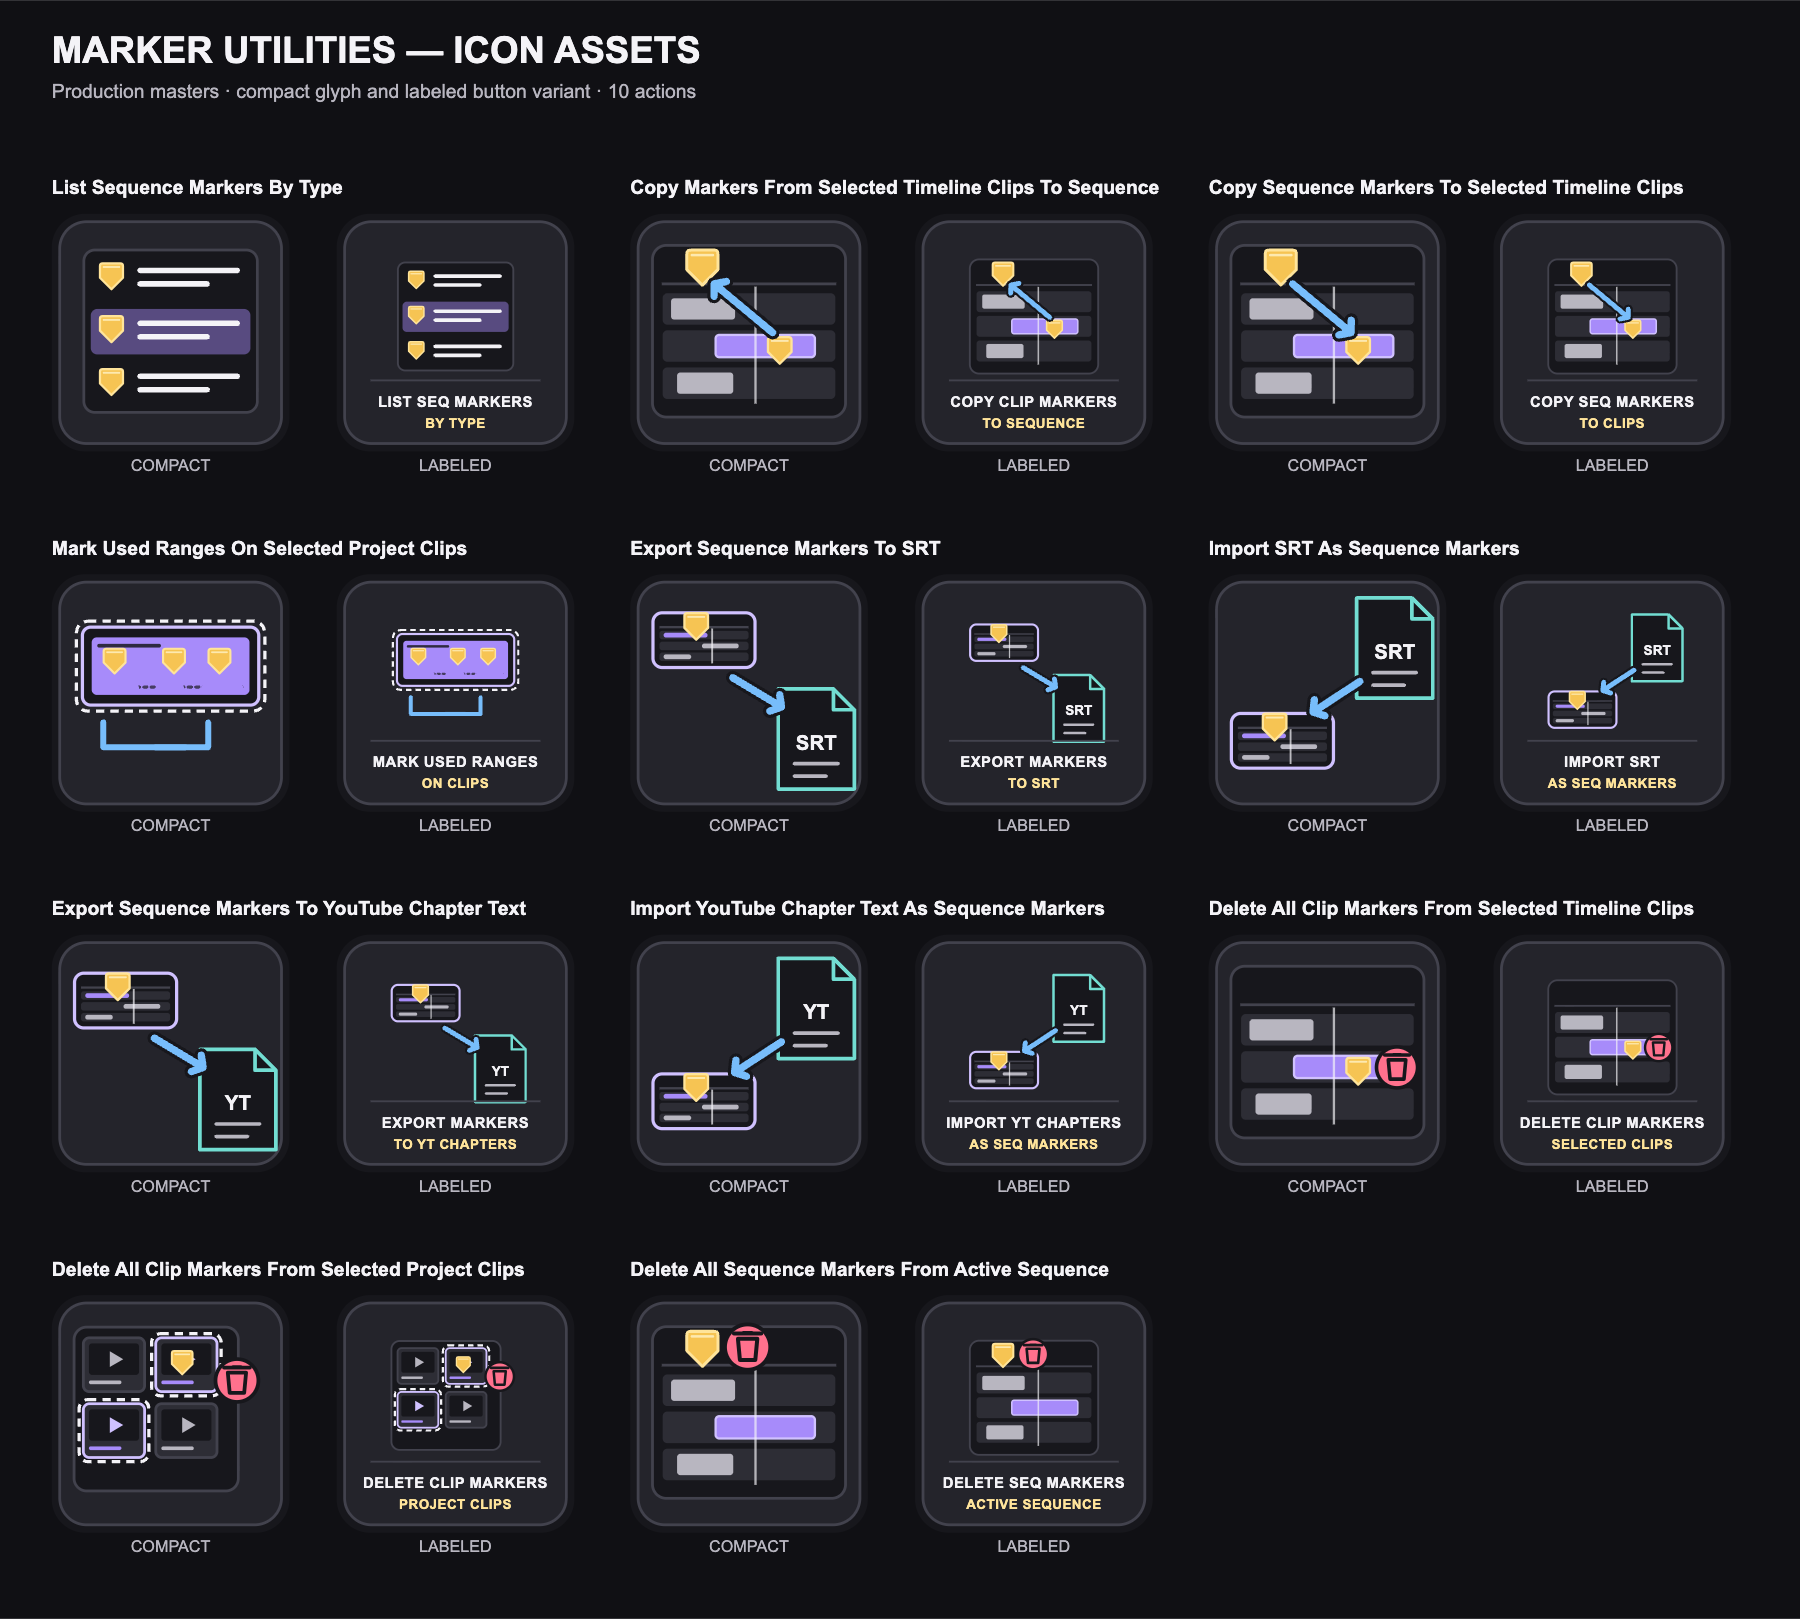
Choose the compact variant for small or densely arranged buttons. Choose the labeled variant when the button is large enough for a short text description. Delete buttons use a rose trash symbol, but the icon itself is not a confirmation step; Automation Agent still applies the workflow's normal prompts and permission checks when the command runs.
Important Behavior
Rapid triggers run one after another
Remote runs are serialized. If you trigger several actions quickly, each request is queued and runs in order; requests are not coalesced or executed in parallel.
For fixed-target actions, such as Solo V1/A1 Tracks followed by
Solo V3/A3 Tracks, the final queued action determines the resulting state.
State-relative actions can deliberately use the queue: every queued
Solo Next V/A Tracks or Solo Previous V/A Tracks run reads the Track state
left by the preceding run, so three rapid presses advance three lanes. Rapid
presses never collapse into a single step.
The saved script is the source of truth
Remote triggering always runs the saved library version of the script.
If the editor currently contains unsaved changes, those are not part of the remote run.
Official Examples follow accepted Library updates
An official Example URL identifies the tool, not its current category or filename. If you accept an official Library update, every shortcut using that URL runs the newly active revision. Moving or renaming the official tool in a later release does not require replacing the URL.
Existing shortcuts copied by an older panel may still contain the previous official Library path. Those URLs continue to work through compatibility aliases, so you do not need to replace them just because the panel now copies stable tool-ID URLs.
If you want an independent version that you can modify or keep unchanged, open the official tool and use Save Current Here to save it in a User Library. That copy has its own User Library URL and does not follow official updates.
See Keep Official Examples Up To Date for update review, rollback, storage, and offline ZIP behavior.
Renaming or moving a User Library script changes its URL
User Library URLs are derived from the current library root and location of the script.
If you rename or move the script inside your library, copy the new URL again in the Library details panel and update it in your trigger tool.
Scripts may still ask for user input
Remote triggering does not mean fully headless execution.
A saved script may still:
- show dialogs
- ask for files or folders
- require additional confirmation or interaction
That is often useful. For example, you can trigger a script from a shortcut and then answer a small follow-up prompt in the normal Premiere workflow.
Remote Triggers vs MCP
Use remote triggers when you want:
- one saved script
- one predictable action
- one local URL that another tool can call
Use MCP when you want:
- an agent to inspect the current project state
- multi-step decision making
- open-ended task execution in the active project
Technical Requirements
Remote triggers are available when the local Automation Agent helper is running.
The generated URL is local to your machine and uses 127.0.0.1, so the trigger tool needs to run on that same machine.